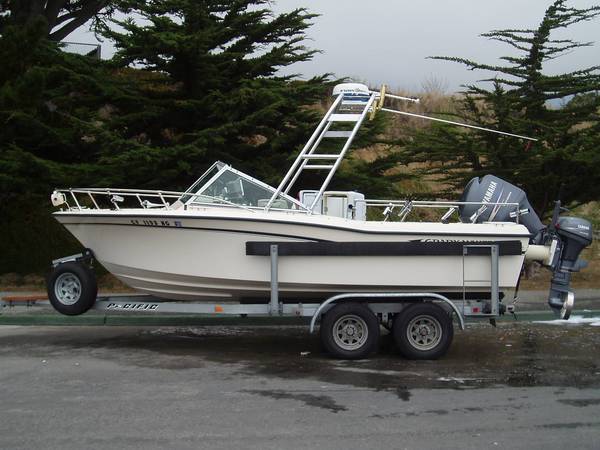
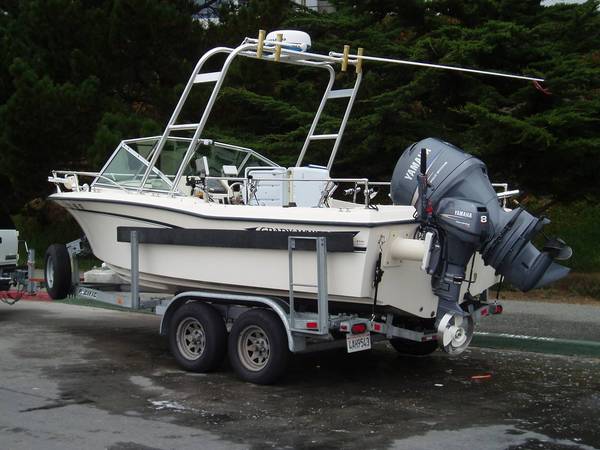
at the local grady tournament, my boat is always the runt of the litter but is still catches fish! it's a 1991 tournament 19 with a 2002 pacific tandem axle trailer, a 2003 yamaha T8 four stroke kicker and fixed bracket, all new 2004 electronics package and a 2005 yamaha 150 four stroke main. yeah, sunk a ton of money into this boat in the last 4 years.
You are using an out of date browser. It may not display this or other websites correctly.
You should upgrade or use an alternative browser.
You should upgrade or use an alternative browser.
first post - 1991 gw tournament 19
- Thread starter alantani
- Start date
GWcpa
Well-Known Member
Bresnahan
Member
Thanks..... Couple questions though. What seating arrangement do you have. Looks like a higher pedestal for your side. Back to back on the other ? Another question. How did you attach the side rod holders on the undersides to the fiberglass ?
nitrox32
Well-Known Member
yup, i still have it. thinking about selling it because the admiral is getting on my case. the problem is that it's a 15 year old hull with $30k worth of stuff added in the last 4 years. i guess i could part it out...... 
Grady84 said:Thanks..... Couple questions though. What seating arrangement do you have. Looks like a higher pedestal for your side. Back to back on the other ? Another question. How did you attach the side rod holders on the undersides to the fiberglass ?
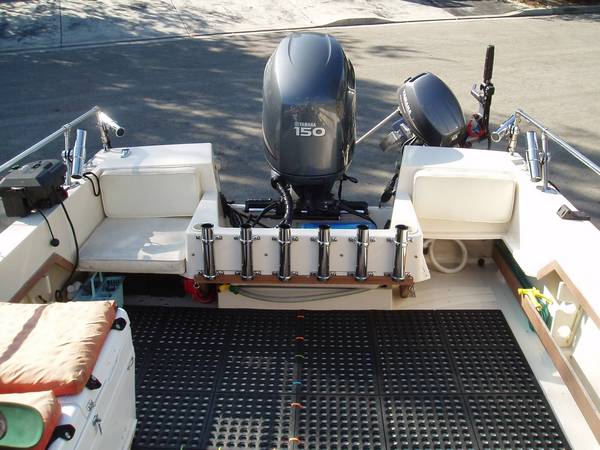
i removed the back-to-back seats and installed a single matching pedestal seat. the rod holders are all through bolted. nothing was done "half way" on this boat.
it's been over a year since i started this original post. since then, i purchased a new grady 258. what a difference! anyway, i thought i'd complete this post with the rest of the photos that i had taken last year. so....
anyone who has ever owned a boat has had to make decisions about rigging. it's all about compromises and limited time, space or money. it seems like i've been upgrading constantly for the last 11 years i've had this boat, and i'm still not done with it. here's an 8 year old shot of my grady off martin's beach....
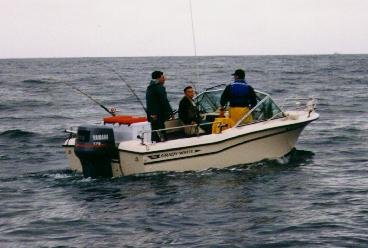
with its modified "V" hull, the GW tournament 19 was intended only for inshore use. it was never intended, or rigged by the factory, for open water. after buying the boat, i installed the rails, a basic fishfinder, basic gps, el cheapo shakespeare radio and antenna first. figuring out my ice chest/fish cleaning station took a while. one thing i was quite proud of was my headlight. with no radar, i thought a headlight would be the next best thing. when i decided to try for albacore, i needed a washdown pump, a livewell pump and a larger bilge pump. three years ago i decided to get a new trailer. two years ago i got the 4 stroke yamaha t-8 kicker. last summer i decided to splurge and get an arch, radar, new fishfinder, gps and auto pilot. on the sea trial for the new electronics, the engine started acting up. i had blown the #1 and #5 cylinders, and had to choose between a new power head ($7k) or a new 4 stroke ($13k). i went for the 4 stroke yamaha 150. now compare the old photo to this....

lots of changes! the only thing that is left from my original purchase is the hull. let me introduce you.... here's the headlight i was talking about.
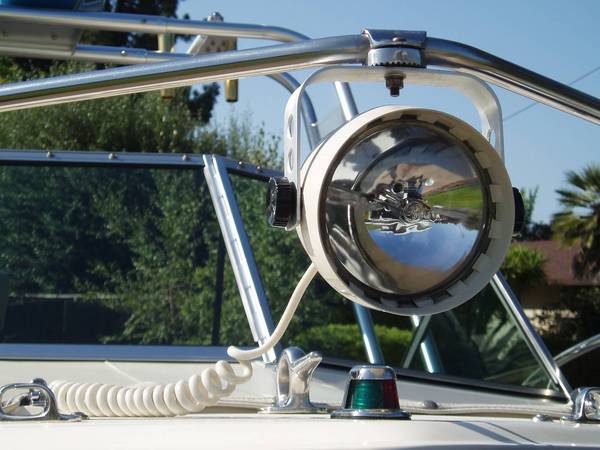
the light is actually a deck mounted night blaster spot light housing. the original 400,000 candle bulb was dumped in favor of a 1,000,000 candle bulb (it actually fits) and the rail clamp is from an old stainless steel antenna mount. the first one had corroded inside, so this second one was torn apart, greased and put back together. to adjust this light, i have to use the boat hook and push or pull to line it up correctly. i had considered a motorized spot light, but opted to keep this one for two reasons. one, it was cheaper. two, it was the only way i could get a million candles. the other deck lights were too wimpy. now for the cockpit rails....
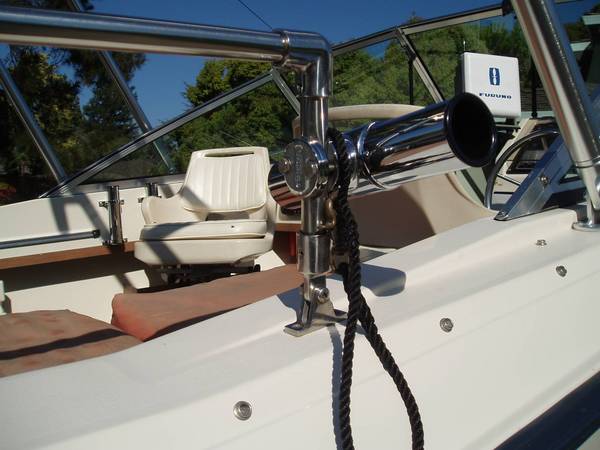
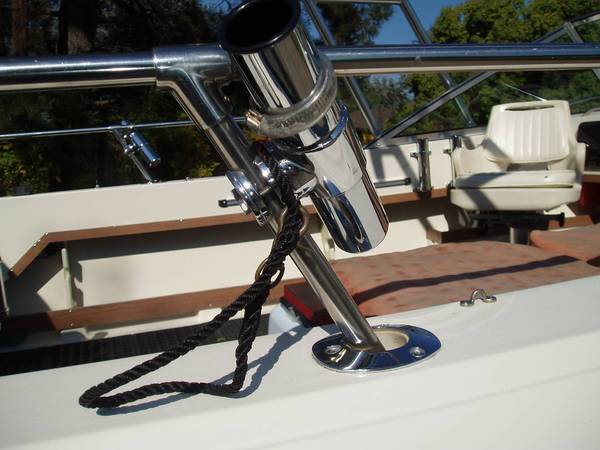
the freeboard is pretty low. i wanted rails to keep people from falling overboard and hold the rod holders, yet removeable in case i took the family waterskiing. well, i took the boat water skiing only one time. the ends of the rail are "pinned" in. the center rests in the flush mount rod holders. to hold the tubing fast, i cut two "slits" at the base and two more "slits" at the top of the flush mount rod holders, then ran a pair of hose clamps through, and cinched down on the clamps until the rail tubing would not wobble. with everything bolted and clamped down in this way, the rail is actually fairly rigid. here's the downrigger....
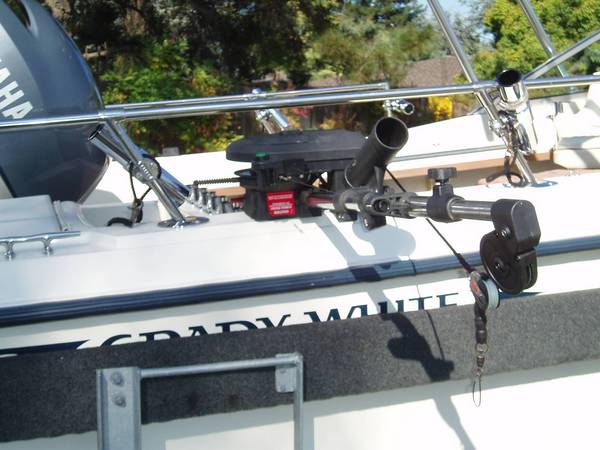
scotty electrics are the only way to go. i've used cannon's before and i hate them. the scotty deck mount has a huge backing plate underneath. the plug is wired directly to the battery and is packed with vaseline. i use a 15# weight and the downrigger "drags" are set for 20#'s, just in case i snag up on another crab pot line. with the rail in the way, i can't directly lift up the downriggers. if i had a bigger boat, i wouldn't have had this problem. now, the engines....
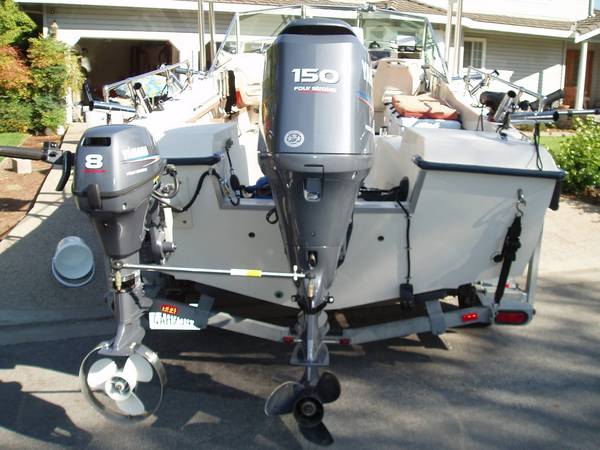
central valley marine did a beautiful job on the installation on both engines. it's hard to believe, but the new 150 4-stroke at idle is actually quieter that the 3 year old T8 kicker. the 150 also trolls so well and is so reliable, i probably don't even need the kicker anymore. that would solve my weight problems. there is so much weight on the transom that the scuppers are now below the waterline, allowing the rear deck to fill with about a quarter inch of water. it is most noticeable when the boat is tied to the dock. but for now i've decided to keep the kicker. i put extra grease on the rubber flap of the scuppers, and that seems to keep the water out while still allowing water on deck to drain out. hey, a little water on deck is no problem, but it looks bad. the prop guard and ez-steer work fine. for a closer look at the kicker....
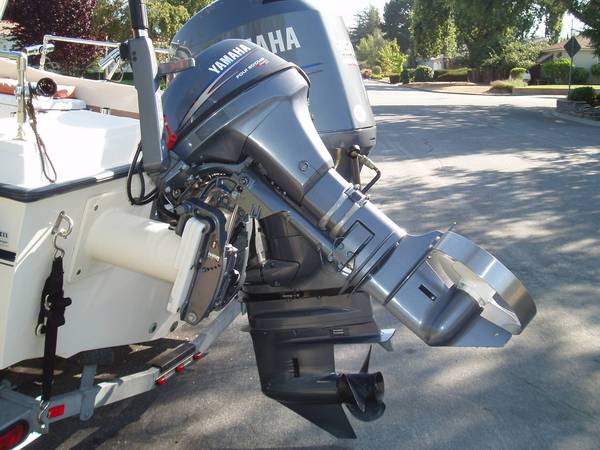
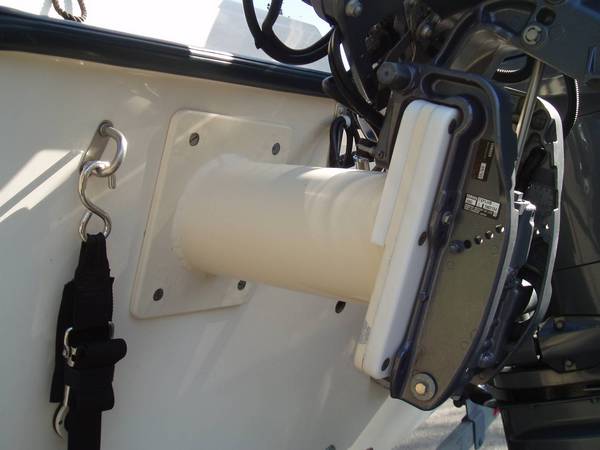
a friend of mine had a spring loaded kicker bracket that broke at sea. i knew i didn't want one of those. i actually decided to go for the kicker when i saw the custom mount from central valley marine. it even came i grady colors. it was painted and the paint is now peeling. i need to have it pulled, sand blasted and powder coated. i also had a friend that lost a downrigger weight in the prop of his kicker, um, ahem, when i was driving. so i knew a prop guard was a good thing to have as well. learn from the mistakes of others! now, this is where i really decided to take the plunge....
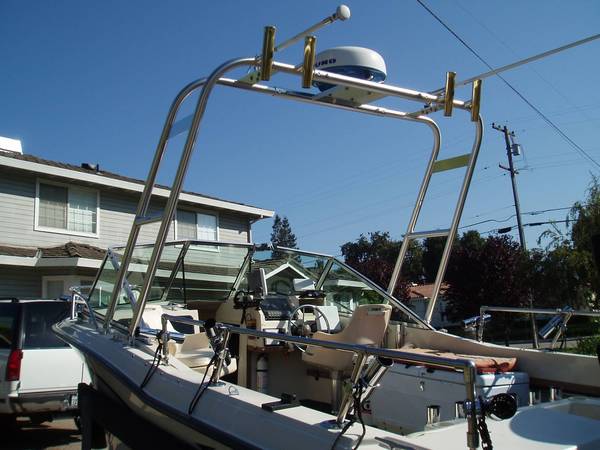
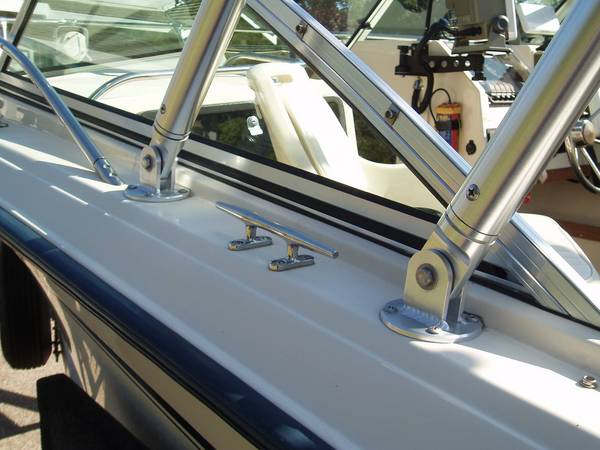
the peter principle is true. a person will rise to the level of his imcompetence. the box with the arch arrived in the middle of summer last year. i stared at it for 3 months before i came to the final decision that i was not going to install this myself. enter galen onizuka and maritime electronics. we talked over my options and came up with a plan. it started with a very clean installation of the arch. now for the electronics....

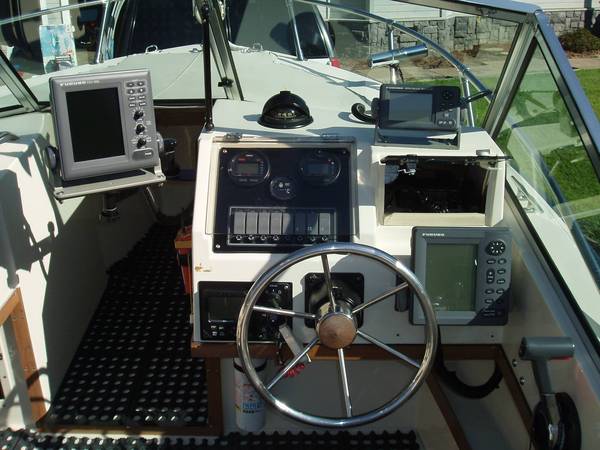
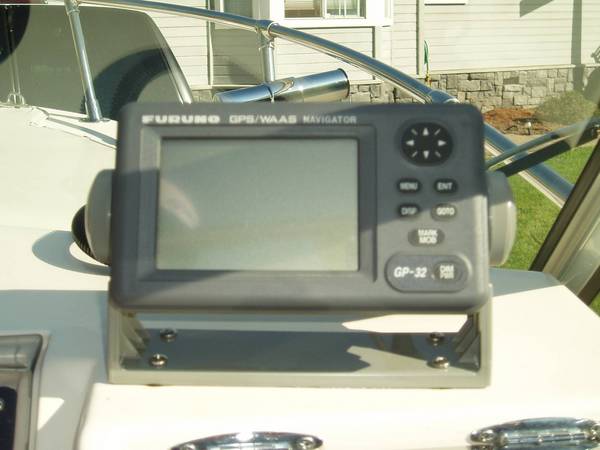
i decided to just go for it. i knew i wanted furuno. and i knew i wanted all free standing units. and i wanted autopilot! i had already lost two toggle switches and two indicator lights on the dash, so i wanted a new dash as well. the more galen and i spoke, the more i was hearing the sound of "cha-ching! cha-ching!" i didn't care, i had gotten to the point where i was either getting a new boat, or i was dumping some serious money into the boat that i already owned (this is before my engine took a dump on me!). i decided against color radar, i decided against a color chartplotter. i got a basic gps...
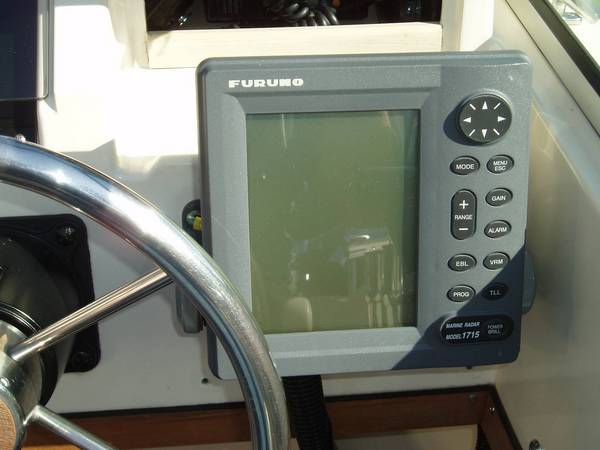
black and white radar (now i wish i had color)....
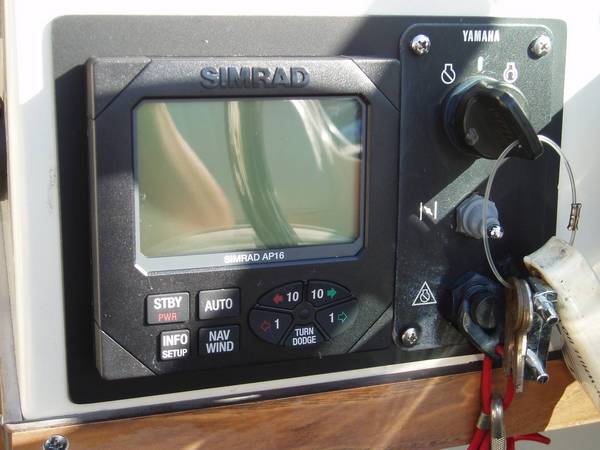
autopilot, way cool!
and a 582L fishfinder on a stick!
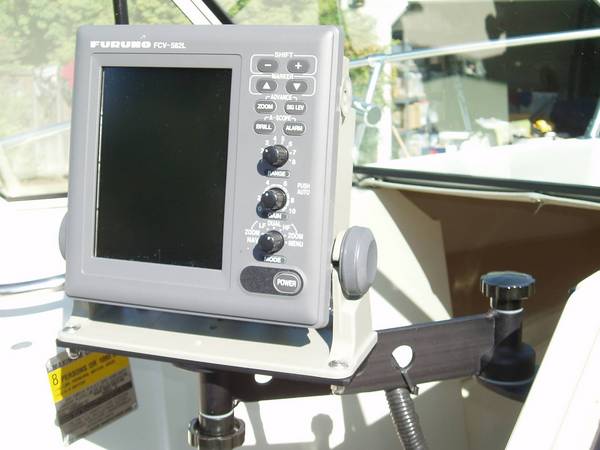
galen said the 582L would bounce like crazy when i was running, and he was right. he wanted to put it on the port console, but i wanted it within arms reach, so he put it on a bracket, and i let it bounce. last, there's the new waterproof fuse panel....

at least now all of the switches work!
i got the restaurant mats at the old bar company in san jose. the place is now called bernie's restaurant supply. i gave them a call and they still carry lots of used items, but no mats. i checked with superior products, located at 730 the alameda in san jose. they have the mats 3x5 mats for $30. i've seen 3x3 sections home depot before, but not recently.

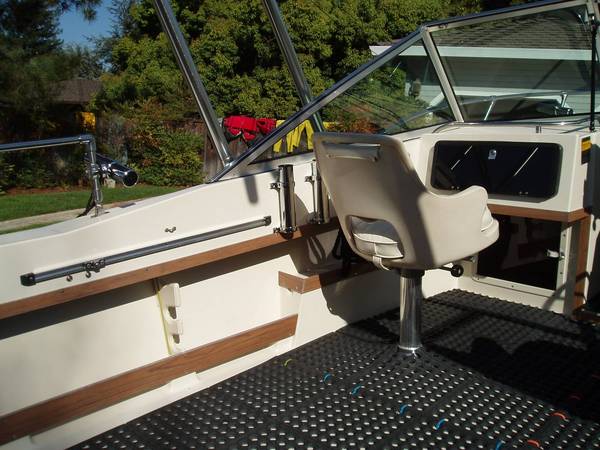
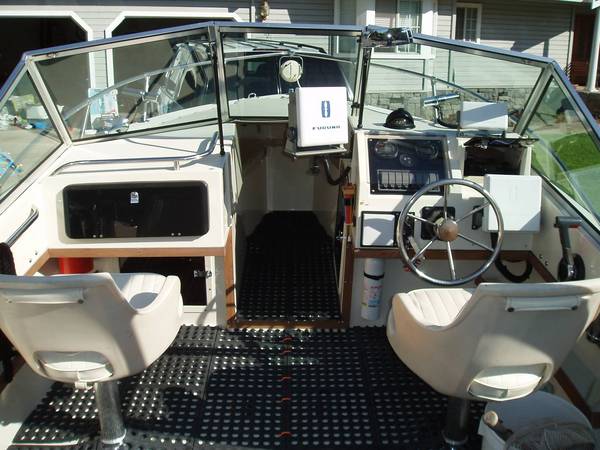
as for the night blaster deck light, yes, it only comes with a 400,000 candle bulb. i bought a 1 million candle hand held night blaster and just switched out the bulbs. i have no idea how many amps the decklight sucks down, but i always run on one battery and leave the other isolated, just in case.
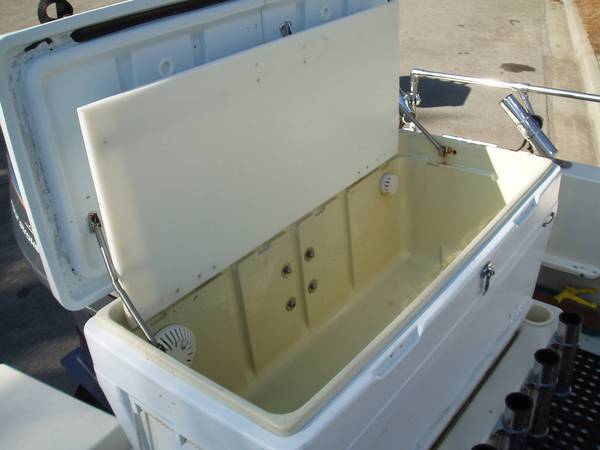
the fish box was another one of those projects that i dove into before ever taking the boat out on the water. it's a double lid 120 quart cooler. i screwed in two long pieces of half inch cutting board material at the base of the cooler so that i could rest it on top of the motor well.....
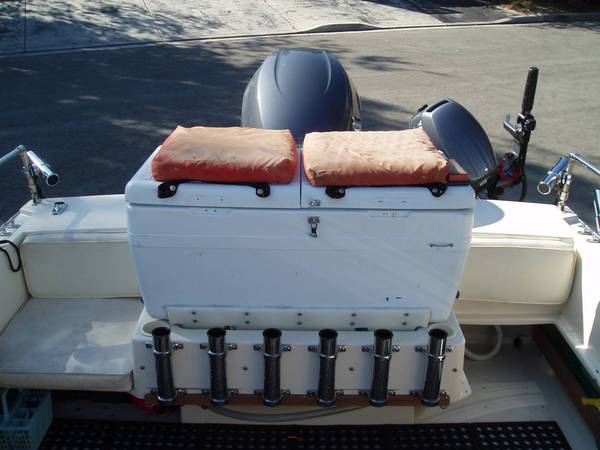
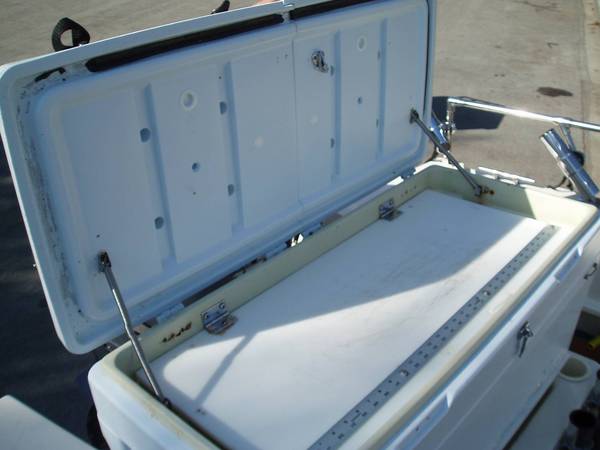
the lids have stainless steel spring hatch holders. open the lid and you see a cutting board with an aluminum yard stick screwed in. the cutting board lifts up and latches out of the way to make it easy to dump fish in. it was originally rigged as a live well with inflow, outflow and two drains, but the water sloshed back and forth too much that it killed the bait.
the trailer is a 3 year old pacific tandem axle trailer with 4 wheel disc brakes. before even loading the boat up, i pulled off the cheap pinewood bunk boards, cut them up and tossed them in the nearest dumpster. i went out to home depot and bought the clearest pieces of pressure treated lumber that i could find. i routed the corners and beveled the forward edges, installed galvanized lag bolts, gave them a double wrap of indoor/outdoor carpet, and bolted them down with galvanized bolts. then it got expensive. i replaced all the non-load bearing bolts with galvanized....
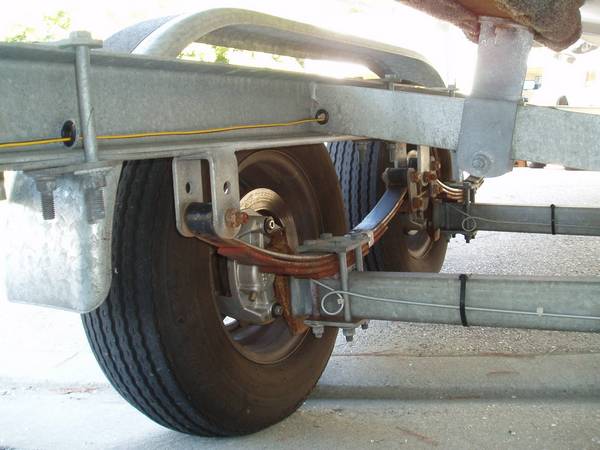
the load bearing grade 8 bolts for the leaf springs were left in and are rusted after 3 years, but the galvanized bolts are all still in pretty good shape. while were under the boat, here's a shot of the forward facing scoop for the live well and washdown pumps....
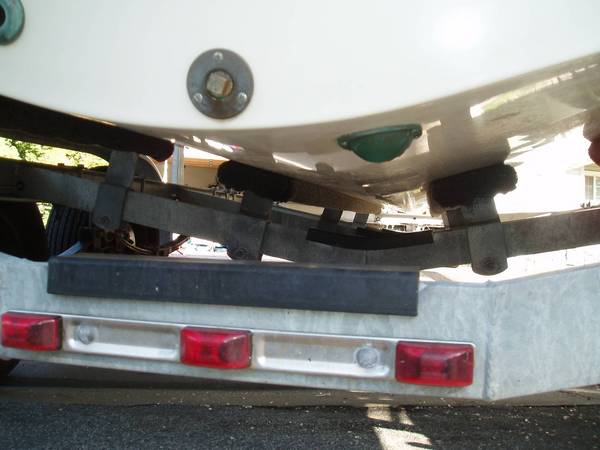
the instruction sheets for the pumps said that the scoop had to be installed at least 12 inches from centerline. the stringers were in the way, so i specifically asked the guy at west marine if i could install the scoop about 6 inches from centerline. he said not to worry about it, so that's what i did. i had a real problem with ventilation while running the old two stroke engine. interestingly, the scoop causes no ventilation problems with the new four stroke.
now, on to the canvas. if anyone wants to see the type of work that my local canvas guy does, grab your reading glasses and scoot up close to the screen. mikey made me a boot for the arch....
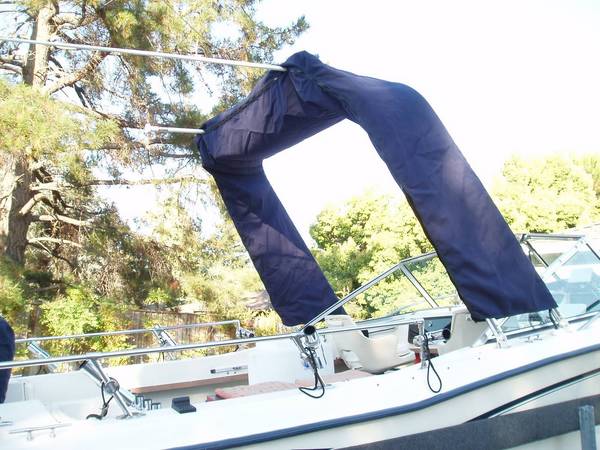
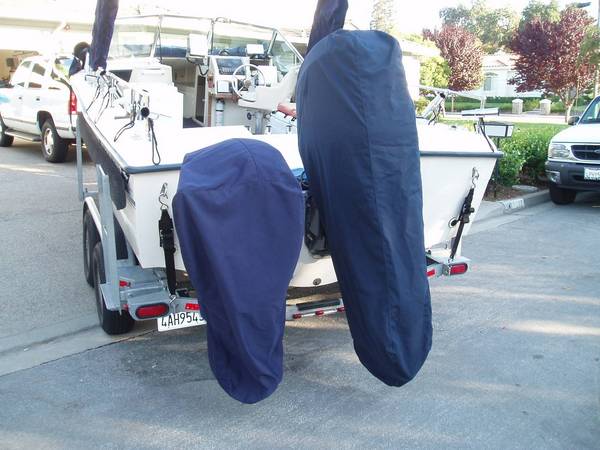
then separate covers for the engines....
and he installed zippers in the old original canvas to accomodate the arch....
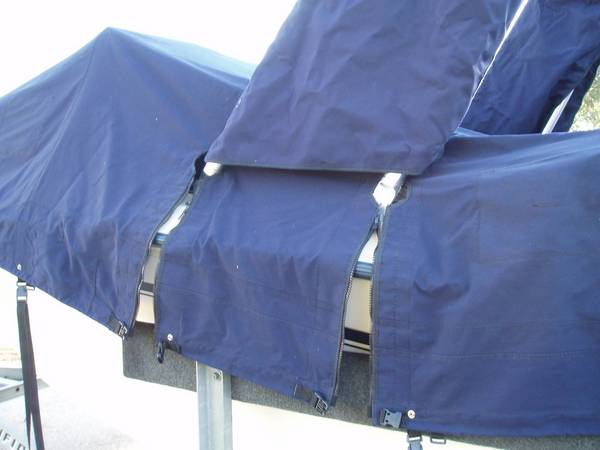
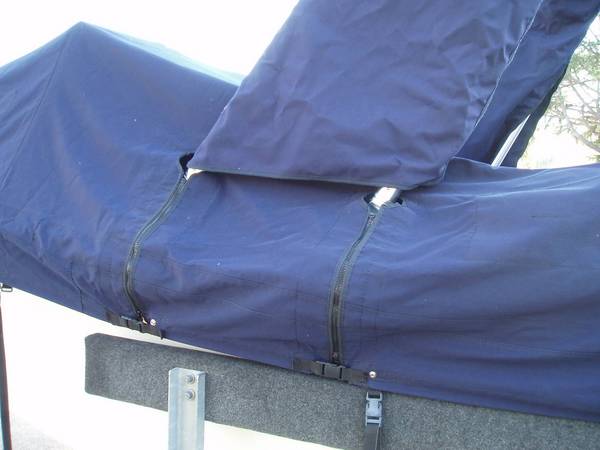
once the canvas is all zipped up....
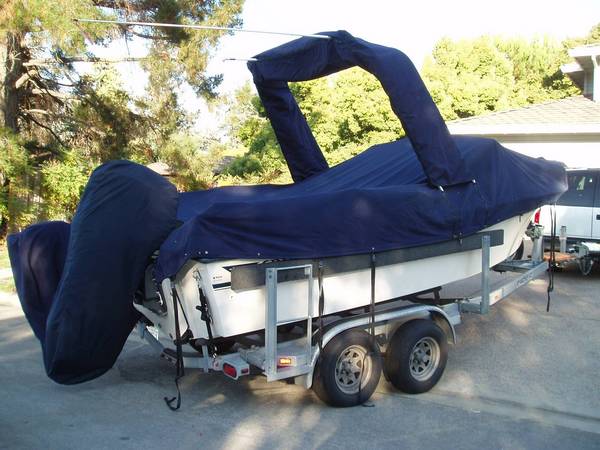
the skirt goes on....

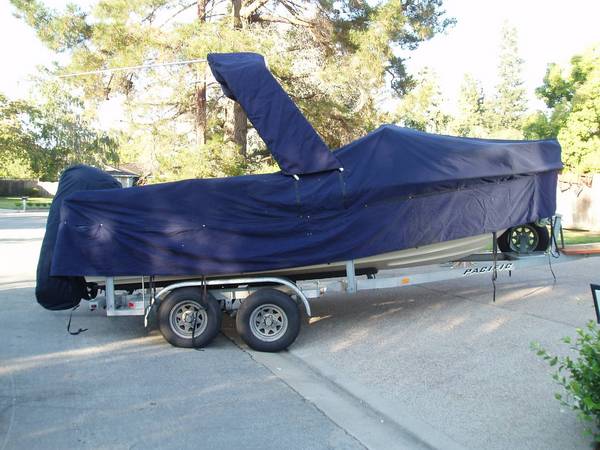
and it's done. it also has a full bimini top, front and sides, and it's for sale!
anyone who has ever owned a boat has had to make decisions about rigging. it's all about compromises and limited time, space or money. it seems like i've been upgrading constantly for the last 11 years i've had this boat, and i'm still not done with it. here's an 8 year old shot of my grady off martin's beach....

with its modified "V" hull, the GW tournament 19 was intended only for inshore use. it was never intended, or rigged by the factory, for open water. after buying the boat, i installed the rails, a basic fishfinder, basic gps, el cheapo shakespeare radio and antenna first. figuring out my ice chest/fish cleaning station took a while. one thing i was quite proud of was my headlight. with no radar, i thought a headlight would be the next best thing. when i decided to try for albacore, i needed a washdown pump, a livewell pump and a larger bilge pump. three years ago i decided to get a new trailer. two years ago i got the 4 stroke yamaha t-8 kicker. last summer i decided to splurge and get an arch, radar, new fishfinder, gps and auto pilot. on the sea trial for the new electronics, the engine started acting up. i had blown the #1 and #5 cylinders, and had to choose between a new power head ($7k) or a new 4 stroke ($13k). i went for the 4 stroke yamaha 150. now compare the old photo to this....
lots of changes! the only thing that is left from my original purchase is the hull. let me introduce you.... here's the headlight i was talking about.
the light is actually a deck mounted night blaster spot light housing. the original 400,000 candle bulb was dumped in favor of a 1,000,000 candle bulb (it actually fits) and the rail clamp is from an old stainless steel antenna mount. the first one had corroded inside, so this second one was torn apart, greased and put back together. to adjust this light, i have to use the boat hook and push or pull to line it up correctly. i had considered a motorized spot light, but opted to keep this one for two reasons. one, it was cheaper. two, it was the only way i could get a million candles. the other deck lights were too wimpy. now for the cockpit rails....
the freeboard is pretty low. i wanted rails to keep people from falling overboard and hold the rod holders, yet removeable in case i took the family waterskiing. well, i took the boat water skiing only one time. the ends of the rail are "pinned" in. the center rests in the flush mount rod holders. to hold the tubing fast, i cut two "slits" at the base and two more "slits" at the top of the flush mount rod holders, then ran a pair of hose clamps through, and cinched down on the clamps until the rail tubing would not wobble. with everything bolted and clamped down in this way, the rail is actually fairly rigid. here's the downrigger....
scotty electrics are the only way to go. i've used cannon's before and i hate them. the scotty deck mount has a huge backing plate underneath. the plug is wired directly to the battery and is packed with vaseline. i use a 15# weight and the downrigger "drags" are set for 20#'s, just in case i snag up on another crab pot line. with the rail in the way, i can't directly lift up the downriggers. if i had a bigger boat, i wouldn't have had this problem. now, the engines....
central valley marine did a beautiful job on the installation on both engines. it's hard to believe, but the new 150 4-stroke at idle is actually quieter that the 3 year old T8 kicker. the 150 also trolls so well and is so reliable, i probably don't even need the kicker anymore. that would solve my weight problems. there is so much weight on the transom that the scuppers are now below the waterline, allowing the rear deck to fill with about a quarter inch of water. it is most noticeable when the boat is tied to the dock. but for now i've decided to keep the kicker. i put extra grease on the rubber flap of the scuppers, and that seems to keep the water out while still allowing water on deck to drain out. hey, a little water on deck is no problem, but it looks bad. the prop guard and ez-steer work fine. for a closer look at the kicker....
a friend of mine had a spring loaded kicker bracket that broke at sea. i knew i didn't want one of those. i actually decided to go for the kicker when i saw the custom mount from central valley marine. it even came i grady colors. it was painted and the paint is now peeling. i need to have it pulled, sand blasted and powder coated. i also had a friend that lost a downrigger weight in the prop of his kicker, um, ahem, when i was driving. so i knew a prop guard was a good thing to have as well. learn from the mistakes of others! now, this is where i really decided to take the plunge....
the peter principle is true. a person will rise to the level of his imcompetence. the box with the arch arrived in the middle of summer last year. i stared at it for 3 months before i came to the final decision that i was not going to install this myself. enter galen onizuka and maritime electronics. we talked over my options and came up with a plan. it started with a very clean installation of the arch. now for the electronics....
i decided to just go for it. i knew i wanted furuno. and i knew i wanted all free standing units. and i wanted autopilot! i had already lost two toggle switches and two indicator lights on the dash, so i wanted a new dash as well. the more galen and i spoke, the more i was hearing the sound of "cha-ching! cha-ching!" i didn't care, i had gotten to the point where i was either getting a new boat, or i was dumping some serious money into the boat that i already owned (this is before my engine took a dump on me!). i decided against color radar, i decided against a color chartplotter. i got a basic gps...
black and white radar (now i wish i had color)....
autopilot, way cool!
and a 582L fishfinder on a stick!
galen said the 582L would bounce like crazy when i was running, and he was right. he wanted to put it on the port console, but i wanted it within arms reach, so he put it on a bracket, and i let it bounce. last, there's the new waterproof fuse panel....
at least now all of the switches work!
i got the restaurant mats at the old bar company in san jose. the place is now called bernie's restaurant supply. i gave them a call and they still carry lots of used items, but no mats. i checked with superior products, located at 730 the alameda in san jose. they have the mats 3x5 mats for $30. i've seen 3x3 sections home depot before, but not recently.
as for the night blaster deck light, yes, it only comes with a 400,000 candle bulb. i bought a 1 million candle hand held night blaster and just switched out the bulbs. i have no idea how many amps the decklight sucks down, but i always run on one battery and leave the other isolated, just in case.
the fish box was another one of those projects that i dove into before ever taking the boat out on the water. it's a double lid 120 quart cooler. i screwed in two long pieces of half inch cutting board material at the base of the cooler so that i could rest it on top of the motor well.....
the lids have stainless steel spring hatch holders. open the lid and you see a cutting board with an aluminum yard stick screwed in. the cutting board lifts up and latches out of the way to make it easy to dump fish in. it was originally rigged as a live well with inflow, outflow and two drains, but the water sloshed back and forth too much that it killed the bait.
the trailer is a 3 year old pacific tandem axle trailer with 4 wheel disc brakes. before even loading the boat up, i pulled off the cheap pinewood bunk boards, cut them up and tossed them in the nearest dumpster. i went out to home depot and bought the clearest pieces of pressure treated lumber that i could find. i routed the corners and beveled the forward edges, installed galvanized lag bolts, gave them a double wrap of indoor/outdoor carpet, and bolted them down with galvanized bolts. then it got expensive. i replaced all the non-load bearing bolts with galvanized....
the load bearing grade 8 bolts for the leaf springs were left in and are rusted after 3 years, but the galvanized bolts are all still in pretty good shape. while were under the boat, here's a shot of the forward facing scoop for the live well and washdown pumps....
the instruction sheets for the pumps said that the scoop had to be installed at least 12 inches from centerline. the stringers were in the way, so i specifically asked the guy at west marine if i could install the scoop about 6 inches from centerline. he said not to worry about it, so that's what i did. i had a real problem with ventilation while running the old two stroke engine. interestingly, the scoop causes no ventilation problems with the new four stroke.
now, on to the canvas. if anyone wants to see the type of work that my local canvas guy does, grab your reading glasses and scoot up close to the screen. mikey made me a boot for the arch....
then separate covers for the engines....
and he installed zippers in the old original canvas to accomodate the arch....
once the canvas is all zipped up....
the skirt goes on....
and it's done. it also has a full bimini top, front and sides, and it's for sale!
yup, still got this old boat. no heart and no motivation to sell it. the batteries in the tournament 19 are under the starboard rear seat.
Thanks, I couldn't see them but now that you say the batteries are there I can see them.
I hear you on not wanting to sell the boat. I am looking to upgrade to something in the 25-28 foot range and I hate the thought of letting my 192 Tournament go even though it would be hard to justify keeping the money tied up in it. I guess your 258 is a tremendous improvement in fishability, comfort and safety and worth setting the Tournament aside.
I hear you on not wanting to sell the boat. I am looking to upgrade to something in the 25-28 foot range and I hate the thought of letting my 192 Tournament go even though it would be hard to justify keeping the money tied up in it. I guess your 258 is a tremendous improvement in fishability, comfort and safety and worth setting the Tournament aside.
frank, the 258 is superior in every way. but honestly, i like the tournament 19 better. it's one tough little boat! alan

