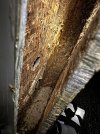
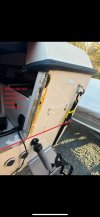
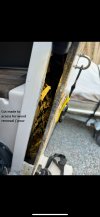
Hey y’all! I wanted to start this thread to see if I could grab attention to those who are pros and those who have done it once or twice… transom repair! A little back story on how I got to this point.. I was in the market for a cuddy last year when i stumbled across a nice 1984 Grady 226 seafarer that looked absolutely amazing in the pictures so I had to take a look at it and take it for a spin on the lake it resided on. 1 owner boat since birth(unfortunately the owner had passed) meticulously maintained, has never seen saltwater and was launched and pulled out every time it saw the water. Dealership serviced every year, etc. of course the first thing to check are the stringers and transom. Stringers were solid from what we could tell by lifting the floor hatches and looking around. Did the old tap test on the transom on the back around the motor area and it sounded like a rock! We also notice someone had custom made a transom plate to go over the lower transom section where the motor attaches which we thought was great due to Grady’s poor design that would let water in over time ( angle aluminum cap ) . The boat was equipped on the starboard side with a old school garlick 2 stroke aluminum kicker bracket… I did notice that it was a little soft in that area where it was attached and they never thru hulled the bracket, they simply added 4 lags and called it good. Fast forward to now, I’m getting prepped to mount a 9.9 merc pro kicker with power tilt and start where the garlick mount was. Clearly the garlick would never hold that motor so we decided to upgrade to a rock solid panther 35, 11” setback motor mount bracket. The idea was to thru hull fit this bracket in the same area the garlick was installed with 5” x 1/2' SS hull bolts backed by a 1/4 aluminum plate to spread the weight on the nut side which would be in the same area the battery’s live and install a transom saver so we can trailer safely. Upon removal of the garlick we noticed that the “soft” spot was that entire side of the transom in the upper end if that makes sense… so we dove into it today by removing the side angle aluminum that covers the transom on the vertical side, cut 2” off the fiberglass cap by about 11” long to take a peak inside to find nothing but rotted wood. Upon further inspection while diving into this maggot filled mess, we discovered that the main lower portion of the transom where the motor attaches (not the vertical sides ) if that makes sense had already been replaced with a transom pour product which was very relieving to find! Upon further inspection, the custom made cap was there for a reason.. it seems to be that they must have kept the skins in tact and removed what they could (wood wise) and poured the transom. That portion is rock solid, no movement what so ever and no stress cracks anywhere to be worried about.
Here are my question(s).
1. I will be able to remove 95% of the wood , but I most likely won’t be able to get down to the fiberglass for a perfect bond, is this something to worry about or is there a product / method I can use to get the most wood out for the best bond without ripping the back skin off / destroying the integrity of the fiberglass on the inside?
2. The new transom pour will meet the old one, anything I could do to help the two bond? Should i not worry too much about that? I am limited on space without removing a portion of the back skin. Note I will be thru hull fitting this new bracket that weights at least 20lbs plus a 4 stroke kicker that weights another 110lbs.
May this take you down memory lane and hope you can also throw me few other knowlesdble things to know / do before I go to the next step. Not sure which transom pour product to use yet either.. they all seem the same to me. In the one picture of the inside you will see where the mulch meets the prior pour... I have never done this before, but im pretty hands on and im not afraid to find a way get it done.. its not like we are doing brain surgery here! HA! I just dont want to go through all of this work and it only last a few seasons... or worse yet.. one trip down the road LOL
Thanks y’all!!
Attachments
Last edited:


