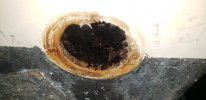
Looks like I'm going to need a new transom

Chessie246G

Well-Known Member
Joined
Oct 31, 2021
Messages
301
Reaction score
104
Points
43
Age
47
Location
Maryland
Model
Explorer
Was pulling all the thru hulls for replacement. Thank god I did, the aft bilge pump thru hull broke off with the slightest touch. The hose tore with little to no effort. Still have 3 more to pull. I'll likely have to break my arm to twist it around to get to some of them......... got frustrated and moved on to the scuppers. port side no issues. starboard side is mess. I knew the minute I took the screws out and they were wet what that meant. The plywood is a soggy mess. No structure left to it at all. Tonight I plan to drill a few holes on the inside of the transom to see the extent of the damage. Someone at Grady white forgot to put any sealer on the scupper at all. Nothing!!! I do not have any hope of saving what is there.
 

Chessie246G

Well-Known Member
Joined
Oct 31, 2021
Messages
301
Reaction score
104
Points
43
Age
47
Location
Maryland
Model
Explorer
Terrible picture as it was dark and about 10pm last night....
 

Attachments

  • 20220227_161138.jpg
    20220227_161138.jpg
    2.3 MB · Views: 61

seasick

Well-Known Member
Joined
Aug 19, 2008
Messages
9,531
Reaction score
1,420
Points
113
Location
NYC
Tap around that area and listen to how it sounds. Then tap outward to also listen to tone changes. If the transom is delaminated, the sound will be hollow sounding. Leather faced hammers are the best but a plastic faced hammer is easier to find. Metal faced hammers don't work as well. You can also use the back of a plastic handled screwdriver to tap. You may get lucky not have extensive rot. You can of course drill small holes to check for water. If you want to do that, drill from inside first to limit the amount of repair you need to do on the outside if the skin is still usable after some limited area fixes. Pull the garboard drain fitting to check that area too.
The breaking off of the bilge pump through hull would affect the ability to pump out the bilge but it wouldn't sink the oat since it is ( or should be) installed above the water line.
 

Chessie246G

Well-Known Member
Joined
Oct 31, 2021
Messages
301
Reaction score
104
Points
43
Age
47
Location
Maryland
Model
Explorer
Tap around that area and listen to how it sounds. Then tap outward to also listen to tone changes. If the transom is delaminated, the sound will be hollow sounding. Leather faced hammers are the best but a plastic faced hammer is easier to find. Metal faced hammers don't work as well. You can also use the back of a plastic handled screwdriver to tap. You may get lucky not have extensive rot. You can of course drill small holes to check for water. If you want to do that, drill from inside first to limit the amount of repair you need to do on the outside if the skin is still usable after some limited area fixes. Pull the garboard drain fitting to check that area too.
The breaking off of the bilge pump through hull would affect the ability to pump out the bilge but it wouldn't sink the oat since it is ( or should be) installed above the water line.
Drilling holes in about 3 hours when I get off work. IT was too late and was too tired/frustrated last night to drill. I tapped extensively. It all sounds solid, even around the scupper. It appears to be 3 layers of plywood. The inner and outer are wet but solid. Its the middle layer thats mushy. It may be possible to fully dry it with 500 holes drilled, repeated soaking with acetone and then bonded with penetrating epoxy.... Im really not getting my hopes up. I need it to be able to handle the rough waters of the Chesapeake Bay and offshore to the canyons. I dont know if I will ever trust it unless its fixed 100% correctly.
 

Chessie246G

Well-Known Member
Joined
Oct 31, 2021
Messages
301
Reaction score
104
Points
43
Age
47
Location
Maryland
Model
Explorer
Is it even possible to patch an area?? I cant seem to think about how to cut and remove the plywood as to stagger the layers since the 3 layers should be bonded to one another. Partial replacement wasnt even on the radar.
 

SkunkBoat

Well-Known Member
Joined
Oct 12, 2017
Messages
4,508
Reaction score
1,614
Points
113
Location
Manasquan Inlet NJ
Website
www.youtube.com
Model
Express 265
I feel for you. I redid a transom on a 20' wellcraft because it had wet corners of the motorwell. After tearing apart it was clear that the transom was not in danger of collapse anytime soon..but then it was too late to stop..
I used Carbon Core (aka ARJAY aka NidaCore) pourable polyester resin core material.
Transom pour

I'd bet every 20 year old boat out there will find wet wood if they remove the motorwell drains. Don't panic. Think it thru..
 
  • Like
Reactions: Punch53

Chessie246G

Well-Known Member
Joined
Oct 31, 2021
Messages
301
Reaction score
104
Points
43
Age
47
Location
Maryland
Model
Explorer
I feel for you. I redid a transom on a 20' wellcraft because it had wet corners of the motorwell. After tearing apart it was clear that the transom was not in danger of collapse anytime soon..but then it was too late to stop..
I used Carbon Core (aka ARJAY aka NidaCore) pourable polyester resin core material.
Transom pour

I'd bet every 20 year old boat out there will find wet wood if they remove the motorwell drains. Don't panic. Think it thru..
too late to not panic. lol!!!! I'll know for sure the extent in a few hours. Going to drill a few holes from the inside after work this evening.
 

Fishtales

Well-Known Member
Joined
Jan 31, 2005
Messages
8,033
Reaction score
1,286
Points
113
Sux dude. Don't let it get you down. Anything can be fixed.
 

Chessie246G

Well-Known Member
Joined
Oct 31, 2021
Messages
301
Reaction score
104
Points
43
Age
47
Location
Maryland
Model
Explorer
OK, I drilled about 30 holes on the inside last night. There is an area about the size of a dinner plate around the scupper that has a void (rotten, drill fell in) it goes about 12 inches towards mid ship, down the keel line. The rest of the area on the starboard side is wet and the wood shavings are dark but not black. I woudl say damp but not soaked. The port side is nice and golden brown normal wood.

Im thinking getting it as dry as possible by injecting acetone into the holes several times. Then sealing everything with penetrating epoxy, followed by filling with thickened epoxy. then layering over a pc of glass on the inside just to add some strength from drilling all the holes. and rebuilding the area around the scupper with thickened epoxy.... Running it for a year then having the whole thing replaced next off season.

What would you do????
 
Last edited:
  • Like
Reactions: dbiscayne

SkunkBoat

Well-Known Member
Joined
Oct 12, 2017
Messages
4,508
Reaction score
1,614
Points
113
Location
Manasquan Inlet NJ
Website
www.youtube.com
Model
Express 265
by scupper you mean down low out to the side not motorwell drain up high next to motor?
How is it at the motor mounts? and across in both directions?
 

Chessie246G

Well-Known Member
Joined
Oct 31, 2021
Messages
301
Reaction score
104
Points
43
Age
47
Location
Maryland
Model
Explorer
by scupper you mean down low out to the side not motorwell drain up high next to motor?
How is it at the motor mounts? and across in both directions?
Yes, low on the outside edge. No motor well on this one. Explorer with a full transom and bracket. The bracket mount bolts on the port side are perfect, tan colored shavings. nice and dry. the starboard side is dark brown and damp, but solid. took pressure to drill thru it.
 

Chessie246G

Well-Known Member
Joined
Oct 31, 2021
Messages
301
Reaction score
104
Points
43
Age
47
Location
Maryland
Model
Explorer
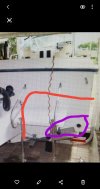
Purple area shavings are black, has a void in the ply drill bit pushed right thru with no effort.... red area is wet with really dark wood shavings, no voids/solid. The rest is tan shavings and dry. Mine does not have a swim platform on starbord side. Only on port side. not my boat pic of same model for reference.
 

Attachments

  • Screenshot_20220301-105619_Gallery.jpg
    Screenshot_20220301-105619_Gallery.jpg
    1.3 MB · Views: 53
Last edited:

SkunkBoat

Well-Known Member
Joined
Oct 12, 2017
Messages
4,508
Reaction score
1,614
Points
113
Location
Manasquan Inlet NJ
Website
www.youtube.com
Model
Express 265
I'd concern myself with the area of the bracket and stringers and decide if I trust that the motor is safe.
I'm guessing there is good wood across from port to stdb from the top couple bolts & up.
Suppose you could pull some bracket bolts and look.

IMO - not terribly concerned with the bottom 3 inches excepting if your trim tabs are compromised.

It comes down to what you are comfortable with. Tough decision.

One good thing about Gradys is that the transom is flat. You can work from the outside and use plywood or coosa
I did a boat with compound angles. Had to work from inside to ensure it kept the shape. Thats why I used pourable transom.

heheh, its not as scary once you've done it once.

If you decide to go, maybe remove some skin in stages and maybe you find its just at the bottom.
Always leave at least 3" of original glass up from the bttom edge. You don't want to have to wrap around the bottom edge...you will be screwed.
 

Chessie246G

Well-Known Member
Joined
Oct 31, 2021
Messages
301
Reaction score
104
Points
43
Age
47
Location
Maryland
Model
Explorer
I'd concern myself with the area of the bracket and stringers and decide if I trust that the motor is safe.
I'm guessing there is good wood across from port to stdb from the top couple bolts & up.
Suppose you could pull some bracket bolts and look.

IMO - not terribly concerned with the bottom 3 inches excepting if your trim tabs are compromised.

It comes down to what you are comfortable with. Tough decision.

One good thing about Gradys is that the transom is flat. You can work from the outside and use plywood or coosa
I did a boat with compound angles. Had to work from inside to ensure it kept the shape. Thats why I used pourable transom.

heheh, its not as scary once you've done it once.

If you decide to go, maybe remove some skin in stages and maybe you find its just at the bottom.
Always leave at least 3" of original glass up from the bttom edge. You don't want to have to wrap around the bottom edge...you will be screwed.

Yes, all the wood around the bracket is solid. (It now has about 20 1/4 inch holes drilled) everything was solid around the bracket. the ply on the SB side was damp and a lightly darker color. no rot....yet.
Replacing the transom doesn't scare me at all. It more the time and having a place to work on it. I store it at my boss"s house (45 min away) during the winter and dry docked (an hour away) during the summer. Where we live there is just simply no room to park it for repairs. (already had 3 written warnings about my bass boat). I figure working weekends, it would take me 3 plus months... tear down, layups, drying/curing time, finish work, reassembly. I figured about 12-15 working days. I have at most 6 boat working days per month with perfect weather... like that happens... LOL!