New Transducer Install

jgrady307

Member
Joined
Dec 31, 2021
Messages
8
Reaction score
0
Points
1
Model
Freedom 307
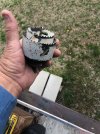
I'm redoing electronics on a Grady 307. First time doing work like this. Was going to replace the old Airmar B60 transducer with a thru hull B175HW. Was thinking the 60 would be easy to get out since the hole needed for the B175 is larger than 60, but I am terrified to cut a hold that large in the boat.

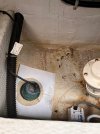
Below are pics of the bilge with a cutout of how large the B175 with the nut on would be. Looks a little tight. I'm assuming that wall to the left is a stringer. Any reason to avoid cutting a hole close to that? Is there anything else I could screw up when cutting a hole in bilge area? Anything structural I could ruin?

Also wondering which angle most use for the transducer on a 307. The B60 on the boat now is a 12 degree, but the hull is more like 20 degrees.

This forum has been great so far. Wondering what your thoughts are and if I should move forward with this myself or bring in the professionals?
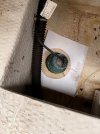
Bilge1.jpgBilge2.jpg
 

wspitler

GreatGrady Captain
Joined
May 16, 2011
Messages
1,365
Reaction score
318
Points
83
Location
Inglis, FL
Model
Express 330
Your new hole doesn't have to be concentric with the existing hole. I fact, it might be easier to drill it if you remove the current transducer, plug the existing hole with a wooden plug, glued in place, and then drill a new larger hole with a 3 3/4" hole saw so as to get new clean edges , but shifted toward the keel. I believe most people use the 12 degree tilt which accommodates 8-15 degrees of deadrise. Depending on where along the hull you have the transducer, it shouldn't be too hard to find out what the deadrise actually is with a level.
 

glacierbaze

Well-Known Member
Joined
Jul 6, 2012
Messages
2,488
Reaction score
644
Points
113
Age
75
Location
Chapel Hill and Pine Knoll Shores, NC
Model
Seafarer
Often there are pads glassed into the hull, for transducers, seacocks, etc. You would probably want to stay on it, and have a consistent thickness, if there is one where the current transducer is.
 

Hookup1

GreatGrady Captain
Joined
Oct 16, 2007
Messages
3,035
Reaction score
855
Points
113
Age
70
Location
Cape May, NJ
Model
Islander
To drill larger holes over existing one I use two hole saws on the same arbor. The inside socket will be your guide and the outer one will make a new hole.

Hole Saw.jpg

Looks like the B175 is available in 20 degree and 12 degree tilt.

Shoot a picture of the hull over.
 
Last edited:

BobH1

Well-Known Member
Joined
Nov 23, 2021
Messages
66
Reaction score
14
Points
8
Location
Greenbackville Va/Lake Wales Fl
Model
Islander
Whenever I would install a thru hull transducer, I would have a 1/4" to 3/8"ply wood backing plate between the inside of the hull and the nut of the transducer.
I would paint the backing plate with bilgekoat. Seal the backing plate to the inside of the hull with your choice of caulk.
 

jgrady307

Member
Joined
Dec 31, 2021
Messages
8
Reaction score
0
Points
1
Model
Freedom 307
To drill larger holes over existing one I use two hole saws on the same arbor. The inside socket will be your guide and the outer one will make a new hole.

View attachment 25261

Looks like the B175 is available in 20 degree and 12 degree tilt.

Shoot a picture of the hull over.
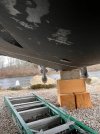
That is a good idea. The angle find says the hull is 20 degrees where the current transducer is located. Couldn't find it for this pic though. hull.jpg
 

jgrady307

Member
Joined
Dec 31, 2021
Messages
8
Reaction score
0
Points
1
Model
Freedom 307
Whenever I would install a thru hull transducer, I would have a 1/4" to 3/8"ply wood backing plate between the inside of the hull and the nut of the transducer.
I would paint the backing plate with bilgekoat. Seal the backing plate to the inside of the hull with your choice of caulk.
Does the plywood just add strength to the hull where you are making the cut?
 

Hookup1

GreatGrady Captain
Joined
Oct 16, 2007
Messages
3,035
Reaction score
855
Points
113
Age
70
Location
Cape May, NJ
Model
Islander
That is the perfect hull for this type of transducer.

For a more accurate deadrise angle at your mounting point do it yourself. Two 24" pieces of wood 1x2 and a bolt and wing nut. With wood on both sides of the hull tighten up under the boat and bench measure with cheap plastic protractor.

For example: 212 degrees - 180 = 32 degrees / 2 = 16 degrees.
 

SkunkBoat

Well-Known Member
Joined
Oct 12, 2017
Messages
4,508
Reaction score
1,614
Points
113
Location
Manasquan Inlet NJ
Website
www.youtube.com
Model
Express 265
307 is 19.5 at the transom. So you are closer to 20 than 12.
I would not add plywood. it'll get wet and rot and then it all loosens up...someday years down the road... Fairing a flat area with fiberglass would accomplsh that better.
I think the B175 will come with a gasket in lieu of having a perfectly flat surface.
Several guys here have just installed B175s hopefully they will chime in.

Looks like your hull has transducer flat spots moulded in. Maybe you can fit your B175 there and get a 0 degree?
 

Hookup1

GreatGrady Captain
Joined
Oct 16, 2007
Messages
3,035
Reaction score
855
Points
113
Age
70
Location
Cape May, NJ
Model
Islander
I would stay with the existing hole (enlarged), no backing (same as you currently have), 20 degree transducer (after measuring). Use 5200 but sparingly when mounting the transducer and be sure you orient the transducer correctly for the angle.
 

Doc Stressor

Well-Known Member
Joined
Nov 13, 2009
Messages
1,186
Reaction score
295
Points
83
Location
Homosassa, FL
Model
Seafarer
"I would stay with the existing hole (enlarged), no backing (same as you currently have), 20 degree transducer (after measuring). Use 5200 but sparingly when mounting the transducer and be sure you orient the transducer correctly for the angle."

I agree, but I would not use 5200. There is no need for an adhesive when you have a compression washer and nut holding the transducer in place. BoatLife Life Seal or 4200 are better in case you ever need to remove the unit. We used silicon back in the day. All you need is something to form a nice gasket seal.

I use the hole saw from the outside of the hull after masking the area with tape. That leaves a smoother edge on the gel coat which can crack if you cut from the inside.
 
  • Like
Reactions: wspitler

SkunkBoat

Well-Known Member
Joined
Oct 12, 2017
Messages
4,508
Reaction score
1,614
Points
113
Location
Manasquan Inlet NJ
Website
www.youtube.com
Model
Express 265
The outside of the hull is smooth. The inside of the hull is rarely flat and smooth. Often its bumpy. (Another way to look at it is that the hull thickness is not even) Cranking the nut tight against the rough surface can make a poor mechanical connection and even cause the thru-hull to tilt. The bigger the hole the worse it can be. Often they give you a rubber washer to compensate for that.
For that reason, I tend to go with 5200 for underwater thru hulls. I feel better because the cured 5200 is going to hold that thing in place even if the nut fell off!
5200 is not for everything but it is for underwater things you can't afford to get loose.

Making a flat surface with fiberglass is another way to go.

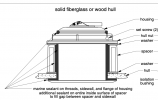
Looking at the instructions for a B175 with the giant spacer, I would probably NOT cover all of the threads with 5200 though. I would use 5200 at the hull connection and fill the threads with 4200 or 4000 or just really good silicone.

Screen Shot 2022-04-01 at 6.48.39 PM.png
 

Fishtales

Well-Known Member
Joined
Jan 31, 2005
Messages
8,029
Reaction score
1,286
Points
113
4200 if you ever have to get it off, 5200 if forever. I'd stay away from silicone in this application.
 

Halfhitch

GreatGrady Captain
Joined
Nov 11, 2017
Messages
1,412
Reaction score
457
Points
83
Location
Venice, Florida
Big mistake to use 3M 5200 in that application. I had to remove two simple backing plates from my boat that the previous owner needlessly bedded with 5200. It would be a shame to damage the gelcoat on the bottom of your boat should it need to be removed. Transducers do fail.
QHjJgeyl.jpg

QRSOFtZl.jpg
 
Last edited:

Hookup1

GreatGrady Captain
Joined
Oct 16, 2007
Messages
3,035
Reaction score
855
Points
113
Age
70
Location
Cape May, NJ
Model
Islander
Let's not scare jGrady307 by making this too complicated. The backing plate is unnecessary and another thing to caulk or leak. A a good 1/4" bead of 5200 on both sides of the hull and crank the transducer nut down. Make sure its oriented properly for the hull angle.
 

Halfhitch

GreatGrady Captain
Joined
Nov 11, 2017
Messages
1,412
Reaction score
457
Points
83
Location
Venice, Florida
Let's not scare jGrady307 by making this too complicated. The backing plate is unnecessary and another thing to caulk or leak. A a good 1/4" bead of 5200 on both sides of the hull and crank the transducer nut down. Make sure its oriented properly for the hull angle.

I humbly dissagree.
 

Chessie246G

Well-Known Member
Joined
Oct 31, 2021
Messages
301
Reaction score
104
Points
43
Age
47
Location
Maryland
Model
Explorer
I'd rather have to possibly repair some gellcoat than my boat sink. 5200 is without a doubt what I would use on a hole that size below the waterline.
 
  • Like
Reactions: SkunkBoat