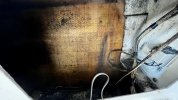
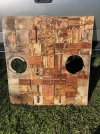
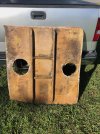
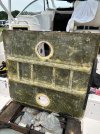
2001 Sailfish. We recently took a look at our fuel tanks under the deck plates and noticed a lot of mold. Cleaned up the tanks but not sure how to clean the fiberglass. Does anyone have recommendations on cleaning the fiberglass mold and also repairing the water damage? There is also mold near the deck plates. I've read that bleach should work but wondering if that will damage the fiberglass. We are also concerned about the water damage which cause the fiberglass to separate in the bottom left corner, see zoomed in picture, wondering if there are recommendations for an epoxy or other resin? The top of the deck panel is in good condition. Our plan after cleaning and fixing the fiberglass is to put in new screw out deck plates, sealed with bed-it tape under the trim and use GE SCS1700 Sanitary Sealant to seal the deck panel back to the deck. Any other recommendations are appreciated. Cheers.
You are using an out of date browser. It may not display this or other websites correctly.
You should upgrade or use an alternative browser.
You should upgrade or use an alternative browser.
Sailfish deck panel rot/mold
- Thread starter kerilynno
- Start date
Bleach wont hurt the underside but can discolor the gel coated top side. Its hard to judge from only photos but the panel doesn't look too bad. The corner with the water damage should be repaired and the entire underside probably could use a coat of gel coat or perhaps a bilge paint. It is very important that the balsa wood that makes up the coring is sealed from moisture intrusion You may want to talk to a fiberglass shop for advice on the most cost effective fix.
DennisG01
GreatGrady Captain
- Joined
- Sep 1, 2013
- Messages
- 7,818
- Reaction score
- 1,543
- Points
- 113
- Location
- Allentown, PA & Friendship, ME
- Model
- Offshore
Bleach will not hurt anything you are dealing with. Personally, I've never expereienced it hurting or discoloring the gel, either. I actually use bleach quite often.
The BIG question is whether or not the core is compromised... and how much. You'll have to do some destructive detective work to figure that out. But if there has been water intrusion, be ready to re-core the entire hatch - don't worry, it's quite easy - and there are threads on here already about that that you can search for... or the net, in general.
The BIG question is whether or not the core is compromised... and how much. You'll have to do some destructive detective work to figure that out. But if there has been water intrusion, be ready to re-core the entire hatch - don't worry, it's quite easy - and there are threads on here already about that that you can search for... or the net, in general.
Hookup1
GreatGrady Captain
- Joined
- Oct 16, 2007
- Messages
- 3,577
- Reaction score
- 1,011
- Points
- 113
- Age
- 71
- Location
- Cape May, NJ
- Model
- Islander
Those dark spots in the core are "wet". Not terrible yet. Can't be patched but as Dennis said it's not difficult to replace the entire core. Lots of discussion here on GG on core material, resin choice, tips and technique.
When you stood that hatch up on the edge over the towel - Did you get any coffee colored leakage from the hatch? The edge seal gets compromised and will leak out.
When you stood that hatch up on the edge over the towel - Did you get any coffee colored leakage from the hatch? The edge seal gets compromised and will leak out.
SkunkBoat
GreatGrady Captain
- Joined
- Oct 12, 2017
- Messages
- 4,859
- Reaction score
- 1,740
- Points
- 113
- Location
- Manasquan Inlet NJ
- Website
- www.youtube.com
- Model
- Express 265
Doesnt look to bad actually. Does it flex? Is the glass separated from the core anywhere? If you stand it on its side overnight, does it drip water? If not, I'd probably clean it and button it back up.
Its not balsa its plywood squares.
Look at this thread. https://www.greatgrady.com/threads/deck-hatch-re-core-265.32638/
Its not balsa its plywood squares.
Look at this thread. https://www.greatgrady.com/threads/deck-hatch-re-core-265.32638/
Last edited:
Hookup1
GreatGrady Captain
- Joined
- Oct 16, 2007
- Messages
- 3,577
- Reaction score
- 1,011
- Points
- 113
- Age
- 71
- Location
- Cape May, NJ
- Model
- Islander
When those plywood squares get wet they will loosen the plywood glue up and leak a brown "maple syrup" colored goo onto your fuel tanks. The water gets in thru the screw holes along the edges. Typically the fiberglass underneath will separate from the edges of the topside of the hatch. You can see the dark wood along the edges. It's not "shot" yet. If it's not flexing you can put off replacing the core but it will need to be done at some point.
I believe that those are not plywood but rather end grain balsa wood. Balsa wood Balsa when sealed on the end grain historically is a good coring material when sealed. However when the end grain is exposed, it will suck up water like a sponge and start to rot . As the wood rots it leave behind a the brown goo you mentioned
Many of the older (and not that old) Grady hulls are cored above the water line with end grain balsa
Many of the older (and not that old) Grady hulls are cored above the water line with end grain balsa
Hookup1
GreatGrady Captain
- Joined
- Oct 16, 2007
- Messages
- 3,577
- Reaction score
- 1,011
- Points
- 113
- Age
- 71
- Location
- Cape May, NJ
- Model
- Islander
Could be. I really don't remember what I took out of the core of the hatch. Pretty sure my anchor locker hatch was plywood though.I believe that those are not plywood but rather end grain balsa wood.
DennisG01
GreatGrady Captain
- Joined
- Sep 1, 2013
- Messages
- 7,818
- Reaction score
- 1,543
- Points
- 113
- Location
- Allentown, PA & Friendship, ME
- Model
- Offshore
In this particular case,
Looking (only) at his pics, it looks like the typical plywood seen on a lot of these boats.I believe that those are not plywood but rather end grain balsa wood. Balsa wood Balsa when sealed on the end grain historically is a good coring material when sealed. However when the end grain is exposed, it will suck up water like a sponge and start to rot . As the wood rots it leave behind a the brown goo you mentioned
Many of the older (and not that old) Grady hulls are cored above the water line with end grain balsa
SkunkBoat
GreatGrady Captain
- Joined
- Oct 12, 2017
- Messages
- 4,859
- Reaction score
- 1,740
- Points
- 113
- Location
- Manasquan Inlet NJ
- Website
- www.youtube.com
- Model
- Express 265
Thanks all for your replies. As for the type of wood, we think it looks like plywood squares. It is sturdy as heck everywhere, around the edges, by the deck plates, and seems bone dry. It sat up on its side (like in the picture) for about 5 hours while I was cleaning the tanks and nothing dripped out. The separating corner is also dry, the only separation of the fiberglass is on the underside. Once we get the new deck plates in I will check to see if the fiberglass is also separating from the wood there and decide to re do the coring or not. My though if it was only the edges with damage, to possibly inject something like GIT rot between the fiberglass/wood, then do an entire epoxy layer to reseal the fiberglass.
on another note, does anyone know the max mb picture you can upload? I keep getting errors saying my photos are too large and when I compress them the quality goes to potato.
on another note, does anyone know the max mb picture you can upload? I keep getting errors saying my photos are too large and when I compress them the quality goes to potato.
Attachments
SkunkBoat
GreatGrady Captain
- Joined
- Oct 12, 2017
- Messages
- 4,859
- Reaction score
- 1,740
- Points
- 113
- Location
- Manasquan Inlet NJ
- Website
- www.youtube.com
- Model
- Express 265
The problem is that when Grady White made them, they ran the wood all the way to the edge, so the screws go through the wood.
IMO. You could get away with grinding the glass clean 4 “ around edges and lay in some new glass and high density filler
around the screw holes, I would use a holesaw bit to widen the hole from the backside and use high density filler so that the screws would now be going just through epoxy filler. You don’t wanna mess up the front face the deck face the gelcoat.
Hookup1
GreatGrady Captain
- Joined
- Oct 16, 2007
- Messages
- 3,577
- Reaction score
- 1,011
- Points
- 113
- Age
- 71
- Location
- Cape May, NJ
- Model
- Islander
The work to patch it will be more than re-coring assuming it's wet. You can't get the water out and it will continue to deteriorate. I would either ignore it for now and do it right down the road or do it right now.Thanks all for your replies. As for the type of wood, we think it looks like plywood squares. It is sturdy as heck everywhere, around the edges, by the deck plates, and seems bone dry. It sat up on its side (like in the picture) for about 5 hours while I was cleaning the tanks and nothing dripped out. The separating corner is also dry, the only separation of the fiberglass is on the underside. Once we get the new deck plates in I will check to see if the fiberglass is also separating from the wood there and decide to re do the coring or not. My though if it was only the edges with damage, to possibly inject something like GIT rot between the fiberglass/wood, then do an entire epoxy layer to reseal the fiberglass.
on another note, does anyone know the max mb picture you can upload? I keep getting errors saying my photos are too large and when I compress them the quality goes to potato.
If you look at your original photo all those dark squares are wet. Notice how they are linked to an edge or a pie plate. These hatches were not vacuum bagged and the resin didn't get all the edges of the squares. The water finds its way and more gets in.
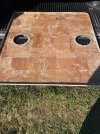
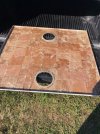
I cut around the fiberglass bottom sheet and peeled the bottom completely off. I could have re-used it but didn't. The squares which were definitely plywood after seeing SkunkBoat's end grain balsa. The plywood was delaminating. Not that difficult to take it all out. Important point that SkunkBoat brought up is the screw holes. If you put plywood back in over-drill the plywood holes and fill them from the underside. Then re-drill for the screws from the top. New screws too!
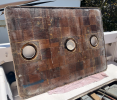
Here are the cleaned out hatch and vacuum bagging test. Finished part. Done right done once!

Last edited:


