Underwater Lights - sealing holes

grady33

GreatGrady Captain
Joined
Jun 30, 2008
Messages
727
Reaction score
80
Points
28
Location
Ocean Pines, MD
Model
Express 330
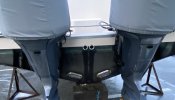
My starboard underwater light (ugh) failed after 2(Ocean LED X16 Spectrum) and I may need to install new lights (looking at Lumitec SeaBlazeX2’s). If I do, I might move them higher up the stern on my ‘06 330. So my question is about sealing the existing and new holes. What I did before is to drill hole and seal with West System Six10 Thickened Epoxy Adhesive and once dry, drill smaller hole down center and use 4200 sealant. Is that the best product to use? I want to be sure to avoid any possible water intrusion since I know there is some wood in my transom.
Is there another product or technique I should use instead?

Will the epoxy be good enough to seal the hole up?

Thanks,
 

Attachments

  • 85F6DE80-4CEE-4FC2-9C9D-BB3B845E5396.jpeg
    85F6DE80-4CEE-4FC2-9C9D-BB3B845E5396.jpeg
    401.2 KB · Views: 39
Let me know if anyone else has done this or has a better way of sealing holes.
 
You’re working with good products. Six10 is my epoxy of choice - it dries a bit yellow though. Will dry very hard.
 
Thanks. Does it absorb into the wood any?
Six10 is a thickened epoxy. Like peanut butter kind of consistency so, in essence you need to ‘push’ the epoxy in completely to the void. while it has good bonding qualities, it’s not penetrating epoxy. You may want to use GitRot or CPES penetrating epoxy first then a layer of Six10 as a harder cover/shell. Curious what others have done
 
As long as the holes are no bigger than 1/4 inch, your approach will be fine. Since the old holes will be bottom painted, the color is not important. Even MarineTex will work.
Your approach to the new holes is good but you may want a thinner/ more watery epoxy mix to coat the sides of the hole. let the epoxy set a bit and then use a thicker epoxy to fill the hole. When cured, drill as you planned to do and seal the wire in place with Again, the smaller the hole the better, no more than 1/4 inch, To seal the wires, I would suggest a product like
 
How big is the hole that you need to fill? This will dictate the proper fix. Can you get your hands on the interior side of the hole?
Hole side is maybe 1/4 of an inch - just enough to feed wire through.
 
As long as the holes are no bigger than 1/4 inch, your approach will be fine. Since the old holes will be bottom painted, the color is not important. Even MarineTex will work.
Your approach to the new holes is good but you may want a thinner/ more watery epoxy mix to coat the sides of the hole. let the epoxy set a bit and then use a thicker epoxy to fill the hole. When cured, drill as you planned to do and seal the wire in place with Again, the smaller the hole the better, no more than 1/4 inch, To seal the wires, I would suggest a product like
Thanks. What is the repair technique for hole bigger than 1/4 like a 1/2?
 
I usually mix up my own but FGCI is local for me. 3/1 standard epoxy, fumed silica and milled fibers to a peanut butter constancy. They have the large syringes that work well. If there is a wood core try to wet it a bit before adding the mixed structural putty.
 
Hole side is maybe 1/4 of an inch - just enough to feed wire through.
Oh, if that's all it is, just fill it with unthickened epoxy. If you can get a drill to the backside, put a large drill bit in and chamfer the hole - do the same to the outside. This will create an hour glass shape to "lock" it in and also give more surface (and a clean surface since it was just drilled... also, run a drill bit through the hole to clean it up) for the epoxy to grab. You can put a piece of tape over the backside to prevent the epoxy from running out. On the front, do the same, but leave a little space at the top of the tape to aquirt the epoxy in - use a syringe. Let it dry overnight, pull the tape, quickly smooth the outside and slap some bottom paint on it. Done.
 
Oh, if that's all it is, just fill it with unthickened epoxy. If you can get a drill to the backside, put a large drill bit in and chamfer the hole - do the same to the outside. This will create an hour glass shape to "lock" it in and also give more surface (and a clean surface since it was just drilled... also, run a drill bit through the hole to clean it up) for the epoxy to grab. You can put a piece of tape over the backside to prevent the epoxy from running out. On the front, do the same, but leave a little space at the top of the tape to aquirt the epoxy in - use a syringe. Let it dry overnight, pull the tape, quickly smooth the outside and slap some bottom paint on it. Done.
Thank you! All the horror stories of wet transoms in Grady’s is unnerving!