AC Install in 282. It Works!

DennisG01

GreatGrady Captain
Joined
Sep 1, 2013
Messages
7,189
Reaction score
1,341
Points
113
Location
Allentown, PA & Friendship, ME
Model
Offshore
Lookin' good, blondie! :)

This plexiglass has a unique property. Somehow it filters out grey and restores blonde. Because, believe me, its harder and harder to find anything but grey up there. I know because my daughter very kindly tells me each time she comes home from college.
I'm only 49 and only have a couple grey strays at this point. But since I have blonde hair as well, I'm going to keep this "plexiglass trick" in the back of my head... as I get older, I'll just walk around with a sheet of plexiglass held in front of me all the time ;) Not really, truth is I don't care - but I liked your response!
 

wahoo33417

GreatGrady Captain
Joined
Feb 28, 2005
Messages
1,233
Reaction score
240
Points
63
Location
West Palm Beach, FL
Model
Sailfish
It works!

Went down to boat yesterday to make some of the temporary pieces more permanent. I.e., cut more holes in the boat. But they had a slip open with power. So in she went. And to my pleasant surprise, all seemed to work.

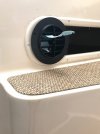
When I first opened the seacock, water rushed through the lines pretty quickly. I was glad I used fairly clear lines. Only a couple of very small air bubbles came in and they zipped right through my strainer, pump and bleed-off valve. I only have two outlet vents and there was good air flow at each. It was a cool morning, but the air felt cold.

Air Flow.jpg


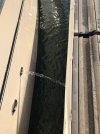
Then I went outside to check on water flow. It looked to me like the 500 GPM pump was flowing great.

Water Flow.jpg


Truth be told, I ran into one hiccup - of my own making, of course. At first, the unit came on, but with no fan. So I called Mermaid (who have been great throughout this install). Tom instructed me to removed the face plate of the thermostat (which came off too easily, big hint), and use needle nose pliers to touch red and black. Fan came on. "You don't have your thermostat face plate pins lined up with the receivers on the back of the thermostat", said Tom.

Well, that's because the instructions called for drilling a hole behind the face plate for the wires to come into the face plate. I didn't want to have a hole there, so I brought the wires in through the side of the face plate. After bringing the wires in from the back of the thermostat and making sure the face plate snapped in place solidly, everything seemed to work as it should.

The unit was noisier than I had hoped, but I also had no cover over it at all. I wanted to be able to see all the water line connections. I do regret not placing some thick rubber padding beneath the unit. It would be a bear to do that now. I will wait until I use the plexiglass as a template to make an air intake cutout in the original PVC panel and get it in place and then see how much that cuts the sound down. If still noisy, then I'll consider the rubber pad.

Also, Mermaid says there should be two or three 4" outlet vents. I'm going to start with 2. After running the air through 9' of 4" ducting, I'm not sure I see the advantage of adding more vents. Perhaps if I could spread them around the cabin, that would help, but I can't. At least not without running exposed venting through the head. That wouldn't look too professional.

In any case, I'm glad it works. I've got some more work to do, like make the thermostat right and install the vent in the photo.. Then I won't know until about August just how well it works!

Rob
 

teaklejr

Well-Known Member
Joined
Jun 25, 2006
Messages
179
Reaction score
45
Points
28
It works!

Went down to boat yesterday to make some of the temporary pieces more permanent. I.e., cut more holes in the boat. But they had a slip open with power. So in she went. And to my pleasant surprise, all seemed to work.

When I first opened the seacock, water rushed through the lines pretty quickly. I was glad I used fairly clear lines. Only a couple of very small air bubbles came in and they zipped right through my strainer, pump and bleed-off valve. I only have two outlet vents and there was good air flow at each. It was a cool morning, but the air felt cold.

View attachment 24167


Then I went outside to check on water flow. It looked to me like the 500 GPM pump was flowing great.

View attachment 24168


Truth be told, I ran into one hiccup - of my own making, of course. At first, the unit came on, but with no fan. So I called Mermaid (who have been great throughout this install). Tom instructed me to removed the face plate of the thermostat (which came off too easily, big hint), and use needle nose pliers to touch red and black. Fan came on. "You don't have your thermostat face plate pins lined up with the receivers on the back of the thermostat", said Tom.

Well, that's because the instructions called for drilling a hole behind the face plate for the wires to come into the face plate. I didn't want to have a hole there, so I brought the wires in through the side of the face plate. After bringing the wires in from the back of the thermostat and making sure the face plate snapped in place solidly, everything seemed to work as it should.

The unit was noisier than I had hoped, but I also had no cover over it at all. I wanted to be able to see all the water line connections. I do regret not placing some thick rubber padding beneath the unit. It would be a bear to do that now. I will wait until I use the plexiglass as a template to make an air intake cutout in the original PVC panel and get it in place and then see how much that cuts the sound down. If still noisy, then I'll consider the rubber pad.

Also, Mermaid says there should be two or three 4" outlet vents. I'm going to start with 2. After running the air through 9' of 4" ducting, I'm not sure I see the advantage of adding more vents. Perhaps if I could spread them around the cabin, that would help, but I can't. At least not without running exposed venting through the head. That wouldn't look too professional.

In any case, I'm glad it works. I've got some more work to do, like make the thermostat right and install the vent in the photo.. Then I won't know until about August just how well it works!

Rob
One reason it might sound loud is if you don't have enough vents or larger enough vents the air will back up inside the unit and create noise. Also if you don't get enough supply air out it will freeze up the unit. I am in the process of replacing our ac unit and have to up all the duct work and add a extra vent so unit does not freeze up.
 

wahoo33417

GreatGrady Captain
Joined
Feb 28, 2005
Messages
1,233
Reaction score
240
Points
63
Location
West Palm Beach, FL
Model
Sailfish
One reason it might sound loud is if you don't have enough vents or larger enough vents the air will back up inside the unit and create noise. Also if you don't get enough supply air out it will freeze up the unit. I am in the process of replacing our ac unit and have to up all the duct work and add a extra vent so unit does not freeze up.
Thanks, Tealejr. Freezing up the unit isn’t something that was on my radar. It will be now.

In my story above, I left out the part about disconnecting the main duct line from the unit itself when no air was coming out of the vents. I was afraid of some huge tear or other blockage from when I routed ducting through small stretch 'blind'. So when I first started unit up, there was no ducting connected at all.

Sound didn’t change appreciably when I connected up main duct line.

The supply air exit from the unit is only 4”. Then there is 8'-9’ of 4” ducting before a ‘Y' splitter, whereas Mermaid recommends no more than 5’ before that Y. Couldn’t be helped. (At least not without running exposed ducting across aft Bert and head.) Both supply vents are within 2’ of that Y.

I’m hoping this set up will do. I’d like to keep enough flow coming from these vents at the steps that there is cool cool air circulation at the main berth.

If I have to I’ll look for a thick rubber pad to put under it. I put it in. I can take it out and do it again!

It does come with a rubber pad that fits just under the base of the unit. It does not protrude out at all, so it does not dampen the contact between the unit and the mounting surface. This pad is there to dampen vibration.

Also, I mounted the unit on 3/4” starboard. I think mounting on a treated wood surface might transmit less sound. Always trade-offs.

In any case, I’ll report back on sound when I get a chance to make the air intake cutout on the original pvc panel and get it mounted.
 
Last edited:

usmm1234

Well-Known Member
Joined
Jul 21, 2019
Messages
456
Reaction score
148
Points
43
Location
Myrtle Beach SC
Model
Express 330
Easy fix for mounting your shelf. Cut a large round hole in the middle. Then you can reach thru the hole and hold the lock nuts with your wrench. We do that all the time, if we are not glassing the shelf in. The hole will not effect the self strength much.
 

wahoo33417

GreatGrady Captain
Joined
Feb 28, 2005
Messages
1,233
Reaction score
240
Points
63
Location
West Palm Beach, FL
Model
Sailfish
An access hole is a good idea if I have the space. Thinking it through, I think I could access 3 of the four blind side nuts while tightening the nuts again. But the hole would have to be off to the right, between the support brackets, and likely about 4" in diameter to give me enough wiggle room to get a wrench on the nuts. Still worth thinking through...


AC Mid View.jpg
 

GVGaston

Member
Joined
Feb 4, 2022
Messages
6
Reaction score
0
Points
1
Age
54
Model
Sailfish
This is awesome....thank you so much for replying. I was really stressed with thinking I should have bought a boat with an AC. It was a big driver but didnt want to loose the option. Thanks again and I will continue following!!!
 

GVGaston

Member
Joined
Feb 4, 2022
Messages
6
Reaction score
0
Points
1
Age
54
Model
Sailfish
How does Grady run the supply ducts. I would like to run it too the stairs but not run through the aft berth if I can help it. Wondering if it is possible to go around the port side. Has anyone tried? My other option is to just supply the aft berth with a fan to transfer air from the aft berth through the stairs.
 

wahoo33417

GreatGrady Captain
Joined
Feb 28, 2005
Messages
1,233
Reaction score
240
Points
63
Location
West Palm Beach, FL
Model
Sailfish
GV: My duct work went around the port side of the aft berth to get to the steps. But you may be asking about continuing further forward than that.

You may be able to continue the duct work behind the fridge. Then you may be able to locate a small, maybe three inch, vent beneath the counter top, facing aft, near the AC outlet. Maybe.

I did not explore this option as we had previously pulled out the fridge and replaced it with a custom storage box. The custom storage box takes up all available space in its general area.

So I did not explore this route very long, once I realized that our custom box was an obstacle.

Rob
 

GVGaston

Member
Joined
Feb 4, 2022
Messages
6
Reaction score
0
Points
1
Age
54
Model
Sailfish
GV: My duct work went around the port side of the aft berth to get to the steps. But you may be asking about continuing further forward than that.

You may be able to continue the duct work behind the fridge. Then you may be able to locate a small, maybe three inch, vent beneath the counter top, facing aft, near the AC outlet. Maybe.

I did not explore this option as we had previously pulled out the fridge and replaced it with a custom storage box. The custom storage box takes up all available space in its general area.

So I did not explore this route very long, once I realized that our custom box was an obstacle.

Rob
Thanks! that helps! For the water discharge, did you consider using any of the existing thru hulls such as the sink or bilge?
 
Last edited: