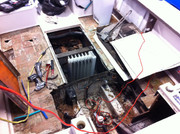
Alarm on Yamaha F150

You should have a round deck plate over the sending unit. No need to pull up "floor boards".

Sending unit is probably on the top front of the tank, so you want to lower your trailer in front, rather than jack it up, and let the water settle there. I would want to know what, and how much is in there, before I started pumping anything.
 
Thanks, Seasick - I think I have to pull the sending unit to really get a good look at what is in the tank at this point. I was very low on fuel to start with, or at least as far as the sending unit was telling me at the gauge.
I'll start with pumping what's in there - I'll ask again here too, is a fuel transfer pump the same as an electric automotive pump?

ohh, also how do you prime the VST? Do I need to just quick crank to get the fuel through the line to the VST? Or the primer bulb will get the fuel past the filters to the VST?

Running the engine on muffs during this period I hope is acceptable as I already have the boat out of the eater and on trailer.

First things first. Use the primer bulb and keep squeezing until it gets firm. I takes a lot of squeezing to refill the VST tank. In the process you will be refilling the on the motor gas filter and the 'in the bilge' water separating filter. That big filter if empty will add a lot of extra squeezes. It take a bit of time. You can speed things up by prefilling the water separator filter with gas first. That may be a little messy but will same your hand:)

Second priority, running on muffs. Make sure you have decent water pressure and a decent diameter hose. Hoses like the crinkly ones that contract when turned off may not pass enough volume to cool the motor.
Do not rev the motor too high and keep an ear out for overheat alarm.
Finally, in general auto fuel pumps are sealed and explosion proof. Many folks use them as transfer pumps. You just need to make sure you have long wires so that any sparks while connecting to the battery are far away from any gas fumes.

Make a mark on the sender flange and the tank for realignment later. The five screws are not evenly spaced; you have to make sure all holes lined up. Do not overtighten when reinstalling. If the gasket comes off without tearing it can usually be reused.
 
You should have a round deck plate over the sending unit. No need to pull up "floor boards".

Sending unit is probably on the top front of the tank, so you want to lower your trailer in front, rather than jack it up, and let the water settle there. I would want to know what, and how much is in there, before I started pumping anything.
I wanted to pull up the floor board so I can get a good look at the tank and the fuel lines for any indication on how the water got in the tank. Oddly too, the access plate will get me to the unit but two the of the screws were really hard to get at - the sending unit isn't centered underneath the access plate sot he unit is a little bit under the floor board. I remember doing this about 4 years ago, I replaced the unit.

On the sending unit, it's actually to the back of the tank, far aft of the boat.

Unfortunately, I can't get anything done this weekend between the rain that I still have and my sons championship hockey games are this weekend.
 
First things first. Use the primer bulb and keep squeezing until it gets firm. I takes a lot of squeezing to refill the VST tank. In the process you will be refilling the on the motor gas filter and the 'in the bilge' water separating filter. That big filter if empty will add a lot of extra squeezes. It take a bit of time. You can speed things up by prefilling the water separator filter with gas first. That may be a little messy but will same your hand:)

Second priority, running on muffs. Make sure you have decent water pressure and a decent diameter hose. Hoses like the crinkly ones that contract when turned off may not pass enough volume to cool the motor.
Do not rev the motor too high and keep an ear out for overheat alarm.
Finally, in general auto fuel pumps are sealed and explosion proof. Many folks use them as transfer pumps. You just need to make sure you have long wires so that any sparks while connecting to the battery are far away from any gas fumes.

Make a mark on the sender flange and the tank for realignment later. The five screws are not evenly spaced; you have to make sure all holes lined up. Do not overtighten when reinstalling. If the gasket comes off without tearing it can usually be reused.
ahhh, okay, so the primer will get the fuel to the VST. Great! Thanks for this info, very helpful! Yeah I hate those crinkle hoses, I don't use them. The Yamaha has that inline connection right to the engine that I like to use instead of the muffs. I feel like the water flows through the engine better.
 
  • Like
Reactions: wspitler
ahhh, okay, so the primer will get the fuel to the VST. Great! Thanks for this info, very helpful! Yeah I hate those crinkle hoses, I don't use them. The Yamaha has that inline connection right to the engine that I like to use instead of the muffs. I feel like the water flows through the engine better.
Caution. Water does not flow better through the flush port! Use muffs.
Also take a look at the o-rings on your fuel fill fittings. That is the number 1 cause of water in the tank if it rains heavily where the boat is located. Remember that the water in the tank may have accumulated over a long long time. It only becomes a major issue when the level in the tank is higher than the pickup which can be an inch more or less from the bottom of the tank.

In general, I don't recommend removing the deck panel unless you are going to pull the tank out since most leaks develop on the bottom. If you do decide to pull the panel, at a minimum you should plan on replacing fuel lines. That can be a challenging job.
Do yourself a favor and check the filler o-rings first and pump out the bottom contents of the tank if it has a lot of water.
 
I do think Tony is correct to pull the floorboard and check the tank for probable leak points. In his first post, he said the tank was nearly empty and then after the "near sinking" it was registering full on the gauge.

Tony, in the meantime, if you wanted to run the engine, connect a portable tank directly to the engine. Leave the drain screw open in the VST tank and when you pump the primer bulb, collect what comes out of the VST until you're positive it's just fuel. This will at least let you run the engine to, hopefully, show that no damage has been done (I suspect everything will be fine) to the engine. That, I'm sure, will be a huge relief. Then you can focus on the tank which, in comparison, is a less "stressful" issue.

Yes, do not run the engine when it's on the flush port (Yamaha is clear on this - and mentions it in manuals). Very little water drops down to the impeller so doing that shortens the life of the impeller. You may want to replace the impeller as a preventative measure, knowing it's been run on the flush port. The muffs supply the same amount of water - if you're noticing that a lot of water is escaping the muffs then either muffs aren't sealing well or the impeller is weak and not pushing the water up to the powerhead fast enough.
 
Last edited:
  • Like
Reactions: PointedRose
OK.. got to take a look yesterday - without removing the floor panel, I took off the sending unit - which is working, I had hoped it was just not working properly. Gas Tank is full of water. So now I am going to get that water out of there. Dennis, great idea, I will have to run down to West Marine and get a portable tank.

I checked the O-Ring on the fuel filler, the gasket seems to be in pretty good shape. But I did notice that the gas cap was not fitted tightly, I was able to remove the cap with my hand. Normally I need to use the gas cap key to twist - losses and tighten. I don't know how much water could have got through that the fuel filler to fill up my gas tank.
I don't know how else to know how all that water got in there. I am wondering if should do a pressure test on the tank? At this point I am going to have to pull up the floor panel to do a visual inspection. I can tell already though that the tank is wet on top of it and lots of slimy muck sitting on it. The top of the sending unit was covered in slime and muck.
I am curious though Seasick - why would you recommend changing the fuel lines if I remove the floor panel? I've had the floor panel up before to re-do the fiberglass behind it. Should I have changed the hoses back then?

Muffs vs flush port - interesting, I don't use the flush port often, maybe twice a year, unless I happen to drop in saltwater but I haven't been able to get into salt for a while - not at least since last changing the impeller. Speaking of which, Dennis, that's what I am supposed to be doing now, changing the impeller as part of regular maintenance. But this came up.
So, whenever I do use the flush port, I always have a nice stream coming out from the head and also water coming out from the lower unit too. I always felt the engine was getting proper water to keep it cool. I never throttled the engine or raced the RPM while under a flush port which is what I had an understanding from Yamaha. I'll go back to muffs but curiously, what is the best time to use the flush port? What's its purpose?
 
Last edited:
I recommended doing the fuel lines since you had the deck open. The lines themselves can leak but after you said the tank was 'full' of water you should inspect the tank for leaks. Mi sometimes foggy brain makes me think that if the tank were leaking on the bottom and taking water into tank when the bilge filled up it should also drain when the bilge is not filled. If the tank was sitting for a while and the water was up to the top, it may be correct that there is a leak near the top. That you may be able to see with the hatch removed. Now, since the tank is full of water, try adding more water until the vent overflows and see if thr tank or sender leaks anywhere. Cap off the line to the water separator first:)
 
I recommended doing the fuel lines since you had the deck open. The lines themselves can leak but after you said the tank was 'full' of water you should inspect the tank for leaks. Mi sometimes foggy brain makes me think that if the tank were leaking on the bottom and taking water into tank when the bilge filled up it should also drain when the bilge is not filled. If the tank was sitting for a while and the water was up to the top, it may be correct that there is a leak near the top. That you may be able to see with the hatch removed. Now, since the tank is full of water, try adding more water until the vent overflows and see if thr tank or sender leaks anywhere. Cap off the line to the water separator first:)
Ohh, oops.. I already started siphoning the gas (water) out of the tank, I am down to just under a half now. Filling it up with more water, it would take me 2 weeks to get it out of there and disposed of. I want to make sure there is no water in that tank when the freezing temps come along. I am going to run out of my window to shrink wrap the boat too and keep the snow out.
Is there an alternative?
 
What are you going to do after siphoning?
If you will store for the winter, that's OK. If you were planning on added fresh fuel and seeing what happens, that's OK too. Don't add too much, say 5 gallons tops since in the spring you may have a tank full of watered down gas to get rid of.
 
What are you going to do after siphoning?
If you will store for the winter, that's OK. If you were planning on added fresh fuel and seeing what happens, that's OK too. Don't add too much, say 5 gallons tops since in the spring you may have a tank full of watered down gas to get rid of.
I was going to leave it dry for now - and with the suggestion from Dennis, get a portable tank and use that to a) Make sure the motor is still in good shape and It didn't get damaged and then from there, fog the engine and drop the lower unit oil (and the impeller was my plan too!) From there, either wrap it up or start troubleshooting how the water got into the tank.. if I am able to wrapt it that quickly, my troubleshooting will have to wait until spring.

Is pressure testing the tank an option at all?
 
Use the flush port WITHOUT running the engine. Yamaha specifically says not to run the engine while on the flush port. I do know that some water drops down the water tube to the impeller - but how much, and if it is enough to keep it properly lubricated - who knows. There are other factors, I'm sure, at play here such as sufficient water flow (GPM) from the hose.

Wet and mucky tank top is normal due to condensation - exacerbated by water in the bilge.

Yes, you could pressure test the tank. A few PSI is all you need. But pulling the floorboard to check the tank is recommended to do every so often, anyways (and CERTAINLY sometime in the last 3 decades), you should be doing that, regardless.
 
Most of the crap on the top of the tanks are plywood glue from a deterioration deck hatch. Tanks leak from the bottom where you can't see them. The top of the tanks can pin hole and give you some idea of the condition of the tank. Or the sending unit doesn't seal.

If you are going to go so far as to pull the tanks (especially the forward one) I would replace them. I tested mine in place by pumping them out and using a automotive smoke machine. This also applies some pressure to the tank (minimal to avoid blowing out a bad spot on the tank). All done thru fuel fill. Mine tested good.

I will probably do the tanks in a few years.

https://www.amazon.com/AutoLine-Pro...9Y2xpY2tSZWRpcmVjdCZkb05vdExvZ0NsaWNrPXRydWU=

https://www.amazon.com/gp/product/B07QXQH3ZN/ref=ppx_yo_dt_b_asin_title_o05_s00?ie=UTF8&psc=1
 
  • Like
Reactions: TonyD
Use the flush port WITHOUT running the engine. Yamaha specifically says not to run the engine while on the flush port. I do know that some water drops down the water tube to the impeller - but how much, and if it is enough to keep it properly lubricated - who knows. There are other factors, I'm sure, at play here such as sufficient water flow (GPM) from the hose.

Wet and mucky tank top is normal due to condensation - exacerbated by water in the bilge.

Yes, you could pressure test the tank. A few PSI is all you need. But pulling the floorboard to check the tank is recommended to do every so often, anyways (and CERTAINLY sometime in the last 3 decades), you should be doing that, regardless.
Ouch.. I didn't know that. I was under the impression that it was suggested that just idle the motor under the flush mount. Well, now I know - luckily I don't do it often and I also change the impeller.

As for the floor panel, I can tell ya that it's been pulled within the last decade. :-) You were the one who walked me through glassing that panel a number of years ago when it had rotted out.

As for the my situation right now and speaking with my wife, I think I am going to give Somers Point Marina a call tomorrow and see if I can bring the boat down to them. They originally replaced the gas tank about 17 years ago and then I had them re-power the boat with the Yamaha 7 years ago. I am jus running out of time to try and get this done and beat the cold weather coming in.
 
  • Like
Reactions: johnt2032
As for the floor panel, I can tell ya that it's been pulled within the last decade. :) You were the one who walked me through glassing that panel a number of years ago when it had rotted out.
Uh-oh. You followed MY advice? That could be trouble... ;)

If you wanted more time, build a square-ended frame over the transom and have it shrink wrapped nice and high. Put a zipper door on the backside and you can work on it all Winter at your leisure. I did this when I replaced and re-built (different than stock) the entire cockpit floor and I even hung a 4' shop light and had a little heater in there. It was actually kind of nice to have a place to "get away" when I needed to.
 
Sounds tempting! Honestly, I'd love to be able to do this myself and have that kind of a set up (Although messing with a buddy heater and a gas tank under shrink wrap scares me! lol

I am thinking piece of mind though BUT I'd also like to see what kind of costs I would be running into first. I might just end up sitting in my driveway through the winter anyways. And hey, no way, your advice was solid - that floor panel is holding up like it should.
 
This may have been covered here already but I had almost 40 gallons of bad gas to dispose of a while back and I was able to make a call to my local sanitation/recycling center and they gave me an appointment to bring it in to them for disposal. They were very good about it....I think they make it easy so you don't do the wrong thing. Good luck with all this.

BTW.....I just siphoned it into 5 gal cans.