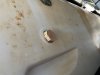
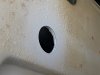
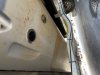
Just installed a new thru hull transducer. 20 degree tilt. Very difficult to fit right between stringer and hull pocket on a 1999 islander. Less is more with sealant. I had to cut the spacer to get the threads exposed per instructions. Hopefully water will be clean and clear at this location. I reused a hole from a prior smaller transducer. See wood plug I used to guide the arbor. I enlarged the hole. It’s a tough job and there is very little room for error.

You are using an out of date browser. It may not display this or other websites correctly.
You should upgrade or use an alternative browser.
You should upgrade or use an alternative browser.
B175m 1 kw install
- Thread starter efx
- Start date

Keitha
Well-Known Member
- Joined
- Sep 11, 2020
- Messages
- 92
- Reaction score
- 46
- Points
- 18
- Location
- Orange County, CA
- Model
- Gulfstream
Any pics from the inside of the hull?
I tend to disagree with the Less is more on the sealant. When I installed my B175HW, I wanted to ensure sealant was completely around the flange and pushed up through the hole between the transducer and the core. I didn't mind a bet of extra clean-up to ensure a well sealed install.
I tend to disagree with the Less is more on the sealant. When I installed my B175HW, I wanted to ensure sealant was completely around the flange and pushed up through the hole between the transducer and the core. I didn't mind a bet of extra clean-up to ensure a well sealed install.
From the installation instructions:
Bedding
CAUTION: Be sure the surfaces to be bedded are clean and dry.
1. Apply a 4mm (1/8") thick layer of marine sealant to the flange, sidewall, and threads of the housing (Figure 5). The sealant must extend 12mm (1/2") higher than the combined thickness of the hull, spacer, and hull nut. This will ensure there is marine sealant in the threads to seal the hull and to hold the hull nut securely in place.
2. Apply a 4 mm (1/8") thick layer of marine sealant to the entire inside surface of the spacer. This will fill the gap between the spacer and the sidewall of the transducer preventing vibration.
Please keep us posted on the performance; I’ll be installing one this weekend on my 208.
It’s working perfectly. Best transducer I’ve ever had. It’s hooked up to a garmin 7606xsv. Clear as day from trolling to cruise. I am very happy. I’ve been learning how to control gain and use chirp. The first cost and install was tough but I’m set for now. Also, no leaks. The hole saw was new and very precise at 3 3/4” od. I placed a thick bead on the transducer flange, pushed the transducer against the hull, then placed the cut plastic spacer over the threaded body and filled the void with sealant. The nut was last and I sealed that bottom face against the spacer and then tightened down the anti vibration Allen screws. The two rubber washers plus sealant make up for the irregular surface of the inside hull. It’s working well.
Last edited:
Pat Hurley
Well-Known Member


Installed mine this past weekend. It was a pain tightening down with the rubber gaskets; the tiny flats on the transducer body didn’t help matters. I was ready to give in a buy the Airmar wrenches but a last bit of contortion (208 has horrible bilge access) and I was able to get it snug. Will hopefully test it this weekend if the weather cooperates.

The painters tape trick from the BOE Marine video on YouTube helped a lot to keep the install neat.

The painters tape trick from the BOE Marine video on YouTube helped a lot to keep the install neat.
Hockeysurf7
Member
- Joined
- Jul 7, 2020
- Messages
- 11
- Reaction score
- 1
- Points
- 3
- Age
- 31
- Model
- Chase
How has the transducer been working? I've been looking for a spot to mount a B175 on my 263 chase. The only spot seems to be between the stringer and the zero-degree spot. I am nervous about drilling the hole and not having room for the nut.