Best way to repair this?

grady33

GreatGrady Captain
Joined
Jun 30, 2008
Messages
727
Reaction score
80
Points
28
Location
Ocean Pines, MD
Model
Express 330
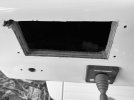
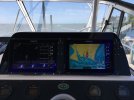
Replacing my Furuno Navpilot with Garmin Reactor. Since the control unit is smaller, I’m looking for the best way to repair the holes. Thought about seeing if any of the local shops/gelcoat guys had a cutout I could pop in there and then re-gell.
 

Attachments

  • 003B2B7D-4B67-4502-B395-D9C8387326FC.jpeg
    003B2B7D-4B67-4502-B395-D9C8387326FC.jpeg
    1.3 MB · Views: 67
I filled my electronics panel back in on my 330 with plywood. Cut out for new electronics then made a black plexi cover to put on then installed the electronics over it. It really wasn’t a bad job and looks good to me. I had to do the same thing with the shifters going from Yamaha to Mercury . Mercury was smaller so I filled the hole made a black plexi base to cover the patch the mounted the new shifters on top.
 
Replacing my Furuno Navpilot with Garmin Reactor. Since the control unit is smaller, I’m looking for the best way to repair the holes. Thought about seeing if any of the local shops/gelcoat guys had a cutout I could pop in there and then re-gell.
It's not that simple to just "pop something in there and re-gel". There's much more to it. To do it right, the plywood that you fit in there has to be properly glassed in. This requires sanding the existing area down/back at least a coupe inches (ideally, it would be more, but this isn't a major structural area) so the layers of glass that are layed in will allow the final layer of gelcoat to be flush with the entire area. You also need to put a layer of glass on the back side, too. Anything short of this and the final gelcoat will look like crap and likely crack.

However, you could just put a cover pate of starboard (whatever color you want) over the entire area - about an inch larger than the hole. Then install the new electronics into the starbaord. That would be PLENTY strong enough as is with no need for any filler.
 
You don't need to fix the wood & gelcoat.
cover with black starboard. drill hole for GHC20 in starboard. 1/2" is plenty to hold it...even 1/4" would be fine.
I would cover that whole area with one piece, re-mount that "SidePower" thing thru it. Mount the GHC20 to one side and leave empty space for something in the future
 
  • Like
Reactions: amf282
Could use teak or some other material as others suggested and just make a trim frame to fit your new setup. Use existing holes and use short screws from the inside out to the teak trim frame.
 
The boys with big sleds have the glass guy come out, close up all the old holes and start over. It looks really clean. But it comes with a price. Lots of alternatives if cost vs look is an acceptable tradeoff for you.

I did mine with Seafood Starboard. Flush mount. I'm big on the "look" thing and this worked for me.

4210a.jpg
 
Last edited:
  • Like
Reactions: 5-Salt and grady33
The boys with big sleds have the glass guy come out, close up all the old holes and start over. It looks really clean. But it comes with a price. Lots of alternatives if cost vs look is an acceptable tradeoff for you.

I did mine with Seafood Starboard. Flush mount. I'm big on the "look" thing and this worked for me.

View attachment 21047
Yeah - I’m big on the repair thing too. Wish they saved these cutouts to make the glassing job a little easier.

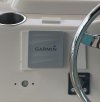
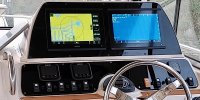
I went ahead and add a piece of SB although I didn’t have a table saw and not 100% straight.
 

Attachments

  • CE43B46F-3D53-474D-9CCC-204D51D17C35.jpeg
    CE43B46F-3D53-474D-9CCC-204D51D17C35.jpeg
    202.8 KB · Views: 48
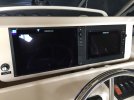
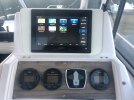
I did an acrylic face as well. Matches the hard top box doors and cabin hatch.
 

Attachments

  • 58049324326__45291738-AEE8-4138-9F0B-54BDDA6266A3.JPG
    58049324326__45291738-AEE8-4138-9F0B-54BDDA6266A3.JPG
    2 MB · Views: 36
  • Like
Reactions: 5-Salt
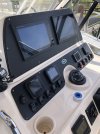
I‘ve just about completed the acrylic dash replacement. New switch covers are on the way. Replacing the lower dash where the gauges and switches are located was an afterthought, but I’m glad I did it. Still need to black out the screws on that panel.
 

Attachments

  • 6120F9B8-69FE-49EB-BC7D-8771A40EFB4C.jpeg
    6120F9B8-69FE-49EB-BC7D-8771A40EFB4C.jpeg
    88.3 KB · Views: 29
  • Like
Reactions: PointedRose
I‘ve just about completed the acrylic dash replacement. New switch covers are on the way. Replacing the lower dash where the gauges and switches are located was an afterthought, but I’m glad I did it. Still need to black out the screws on that panel.
@Harrysea I also have a Marlin what size screens were you able to get in there? I have a 12" and 7" furuno over black starboard Doesn't look likeI could squeeze two 12" displays in there.
Thanks
 
There’s plenty of room. I replaced my old Garmin 5212 MFDs with new Garmin 1243xsv units. The new units fit more easily than the old ones and have 12.1 inch touchscreens.
 
Yeah - I’m big on the repair thing too. Wish they saved these cutouts to make the glassing job a little easier.

I went ahead and add a piece of SB although I didn’t have a table saw and not 100% straight.
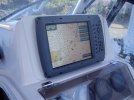
I upgraded to 8612xsv since then but went with he same mounting.

IMG_2069.jpeg
 
The boys with big sleds have the glass guy come out, close up all the old holes and start over. It looks really clean. But it comes with a price. Lots of alternatives if cost vs look is an acceptable tradeoff for you.

I did mine with Seafood Starboard. Flush mount. I'm big on the "look" thing and this worked for me.

View attachment 21047
That Seafood Starboard really hits the spot! ;)