DIY SOS: Fuel Filler & Vent Hose Replacement on 2006 Sailfish 282 – HELP NEEDED!

Deepsix

Member
Joined
Nov 19, 2005
Messages
8
Reaction score
1
Points
3
Location
St. Petersburg, FL
Model
Sailfish
Hey Great Grady Crew,
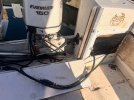
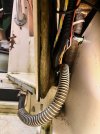
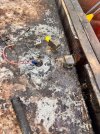
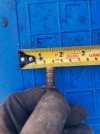
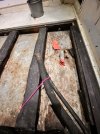
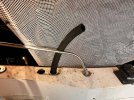
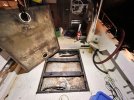
I’m in a bind and need your collective wisdom! My marina flat-out refused to replace the fuel filler and vent hoses on my 2006 Sailfish 282, claiming it’s a “major job” and they’re too swamped to touch it. Fine—I’m rolling up my sleeves and doing it myself!!! But I’m flying blind here and could really use your help.
Has ANYONE tackled this on a Sailfish 282 (especially around the 2002-2010 range)? I’ve scoured the forum and found threads on other models, but nothing specific to the 282 near my vintage. I’m also hearing the 300 Marlin has a similar setup—Marlin owners, please chime in if you’ve conquered this beast!
What I’m begging for:
  • Step-by-step tips or a game plan—where do I even start?
  • Sneaky pitfalls or “wish I’d known” moments to avoid disaster.
  • Tool or technique hacks to make this less of a nightmare.
  • PHOTOS or sketches—visuals would be a lifesaver!
This is my first big DIY on the boat, and I’m determined to get it right. Your advice could save my sanity (and my fuel system). Let’s get this thread buzzing—any and all experiences welcome! Thanks a million, Grady fam!
Tight lines,
Bill
St. Petersburg, FL
 
Take a look at this thread. Skip down to post #39. This is a 268 Islander - basically a narrow beam Sailfish. In order to get access to the fuel fill's and hose I cut out a 12"x12" opening on the flat part of the gunnel. It's an easy repair if you make the cuts in the flat area. Glue Popsicle sticks inside the corners and glue the cut piece back in. Should match perfectly. Finish the gelcoat repair.

29 Fuel 1.jpeg

You should be able to snake the hoses down to the fuel tanks and make the tank connection last.

 
Last edited:
Hi Deepsix,
I don’t have a Sailfish 282 but I do have a sweet ‘84 Sailfish 255 and I just replaced all my fuel lines (tank fill, vent hoses, 2x tank to outboard fuel supply and all filters in between) on my own and it certainly wasn’t fun but it also wasn’t that hard. I recommend doing it all. My whole fuel system and motors run waaaaaay better now.

See my attached pics.

I also learned that my tank and filler cap were not grounded and that you don’t really need Anti Syphon valves on your tank pickups!

First, google how to shut down your electrical/shore/battery system. Gas fumes and electrical sparks are very real and very serious hazard. Some people will fully drain all fuel out of their system but that’s a big hassle. I was careful and used common sense and good ventilation and I felt safe leaving fuel in the tank.

Determine your hose sizes, lengths and specs. Pro Tip; follow each hose you’re replacing, from start to finish with a piece of string. You can then lay out each string in a straight, open area and measure this string with a tape.
There’s very specific hose you must use in different locations/ applications. Fuel tank fill and engine fuel feed lines are USCG A1 Gr3 (or something like that) and you can use a bit cheaper, A2 or Gr. 2 hose for vent and maybe non-exposed lines. Look it up. My local hose shop didn’t even carry the lower grade hose.

You should replace any fittings/couplers/caps that are inline with obsolete hoses. It might be easier to take some pieces of the different old hoses and the old fittings right to you hose shop and they should hook you up. (They’ll want to know the Inside Diameter and Outside Diameter of the gear you’re replacing anyway).

Buy a big tube of marine grease.

Now, to remove and replace I determined which end of the hose I would be pulling from (tank end of vent hose) and started at the other end of the hose. I disconnected the hose from the gunnel through hull vent cap thingy and cleaned the hose end well. Then I fastened an end of my new hose to the existing hose. (Get inventive with attaching the new and old hose pieces together. They must be very securely connected. I threaded tie wire between the pieces and then covered that Frankenstein connection with tuck tape. ). Because, the next step is to pull on the other end of the old hose and snake the entire piece out while dragging the new piece in place behind it. I greased every part of new and old hose that I could access to help it slither through my hull. It’s also handy to have a buddy feeding/pushing one end while you pull the other. Disconnect the old and new hose and fasten the new hose to the tank or vent cap just like the old one was. Try to always install a minimum of two hose clamps anywhere that a hose meets a fitting.

The access to the hose and fittings in my gunnels was pretty bad but I managed scrape by without cutting any holes in my boat. But that has not always been the case. In the past when I have cut access ports elsewhere on the boat, I covered the hole with a deck plate. You can get them from 4” dia to 10” dia and they’re easy to install and they look decent. I’m to lazy to attempt large, fibre glass and gel coat fill/repairs.

I don’t know how to label or sequence my photos so they’re a bit of a mess. If you’ve got any questions I’ll try to help.
I recommend taking lots of pictures before you dismantle things. This habit has saved me countless times when I’ve hacked something apart and had to look at photos to figure out how to rebuild it.

Good Luck
 

Attachments

  • IMG_4437.jpeg
    IMG_4437.jpeg
    112.6 KB · Views: 23
  • IMG_4788.jpeg
    IMG_4788.jpeg
    119 KB · Views: 23
  • IMG_4442.jpeg
    IMG_4442.jpeg
    196.2 KB · Views: 23
  • IMG_4441.jpeg
    IMG_4441.jpeg
    83.1 KB · Views: 24
  • IMG_4481.jpeg
    IMG_4481.jpeg
    97.9 KB · Views: 24
  • IMG_4446.jpeg
    IMG_4446.jpeg
    130.9 KB · Views: 24
  • IMG_4491.jpeg
    IMG_4491.jpeg
    134.7 KB · Views: 27
  • IMG_4816.jpeg
    IMG_4816.jpeg
    183.3 KB · Views: 24
  • IMG_4817.jpeg
    IMG_4817.jpeg
    205.5 KB · Views: 24
  • IMG_4790.jpeg
    IMG_4790.jpeg
    124.2 KB · Views: 23
  • Like
Reactions: Chutch
Hi Deepsix,
I don’t have a Sailfish 282 but I do have a sweet ‘84 Sailfish 255 and I just replaced all my fuel lines (tank fill, vent hoses, 2x tank to outboard fuel supply and all filters in between) on my own and it certainly wasn’t fun but it also wasn’t that hard. I recommend doing it all. My whole fuel system and motors run waaaaaay better now.

See my attached pics.

I also learned that my tank and filler cap were not grounded and that you don’t really need Anti Syphon valves on your tank pickups!

First, google how to shut down your electrical/shore/battery system. Gas fumes and electrical sparks are very real and very serious hazard. Some people will fully drain all fuel out of their system but that’s a big hassle. I was careful and used common sense and good ventilation and I felt safe leaving fuel in the tank.

Determine your hose sizes, lengths and specs. Pro Tip; follow each hose you’re replacing, from start to finish with a piece of string. You can then lay out each string in a straight, open area and measure this string with a tape.
There’s very specific hose you must use in different locations/ applications. Fuel tank fill and engine fuel feed lines are USCG A1 Gr3 (or something like that) and you can use a bit cheaper, A2 or Gr. 2 hose for vent and maybe non-exposed lines. Look it up. My local hose shop didn’t even carry the lower grade hose.

You should replace any fittings/couplers/caps that are inline with obsolete hoses. It might be easier to take some pieces of the different old hoses and the old fittings right to you hose shop and they should hook you up. (They’ll want to know the Inside Diameter and Outside Diameter of the gear you’re replacing anyway).

Buy a big tube of marine grease.

Now, to remove and replace I determined which end of the hose I would be pulling from (tank end of vent hose) and started at the other end of the hose. I disconnected the hose from the gunnel through hull vent cap thingy and cleaned the hose end well. Then I fastened an end of my new hose to the existing hose. (Get inventive with attaching the new and old hose pieces together. They must be very securely connected. I threaded tie wire between the pieces and then covered that Frankenstein connection with tuck tape. ). Because, the next step is to pull on the other end of the old hose and snake the entire piece out while dragging the new piece in place behind it. I greased every part of new and old hose that I could access to help it slither through my hull. It’s also handy to have a buddy feeding/pushing one end while you pull the other. Disconnect the old and new hose and fasten the new hose to the tank or vent cap just like the old one was. Try to always install a minimum of two hose clamps anywhere that a hose meets a fitting.

The access to the hose and fittings in my gunnels was pretty bad but I managed scrape by without cutting any holes in my boat. But that has not always been the case. In the past when I have cut access ports elsewhere on the boat, I covered the hole with a deck plate. You can get them from 4” dia to 10” dia and they’re easy to install and they look decent. I’m to lazy to attempt large, fibre glass and gel coat fill/repairs.

I don’t know how to label or sequence my photos so they’re a bit of a mess. If you’ve got any questions I’ll try to help.
I recommend taking lots of pictures before you dismantle things. This habit has saved me countless times when I’ve hacked something apart and had to look at photos to figure out how to rebuild it.

Good Luck
Great advice Marcus, especially on the electric/battery!!! Thanks for your pictures! I am taking pictures was well. The Grady White customer service has been really helpful as well. I will post their info for others as well.
 
Great advice Marcus, especially on the electric/battery!!! Thanks for your pictures! I am taking pictures was well. The Grady White customer service has been really helpful as well. I will post their info for others as well.
 
um, yes.. you do need anti syphon valves on your fuel tank.