Gulfstream deck panel repair

RussGW270

GreatGrady Captain
Joined
Mar 5, 2019
Messages
1,761
Reaction score
253
Points
83
Age
57
Model
Islander
Thanks Dennis.. helpful as always!:)

Not looking to "do" anything atm, I have plenty to do right now.. lol.. but always want to learn more. I need/want to make room on my dash for a 2nd screen and the cost they want is crazy.. really crazy.. to cleanly redo the dash... so, was thinking of ways to do something myself.. heh

R
 

blindmullet

Well-Known Member
Joined
Oct 19, 2015
Messages
449
Reaction score
106
Points
43
Location
Florida
Model
Explorer
If only Grady would have done that, I would not have had to replace my entire floor. The water spread quite nicely from piece to piece to piece...

Funny, though, I had always heard that the reason that Grady did that was because, on a production scale, it made it quicker to build the boats as they could just quickly toss those squares in, rather than wrestling with large sheets.

When I replaced the floor, I contemplated the squares - but I just couldn't justify a good enough reason to spend all of that extra time and effort (and extra peanut butter).

The large sheets will deform the glass too. The glass would take on the shape of the wood with the right pressure. When you do a transom you can sometime see this when you start the fairing process on the glass skin.
 

DennisG01

GreatGrady Captain
Joined
Sep 1, 2013
Messages
7,189
Reaction score
1,341
Points
113
Location
Allentown, PA & Friendship, ME
Model
Offshore
The large sheets will deform the glass too. The glass would take on the shape of the wood with the right pressure. When you do a transom you can sometime see this when you start the fairing process on the glass skin.
I suppose. It hasn't been my experience, though. But at the same time, it's not like I do this for a profession. The entire floor is straight and level - both hatches are flat as could be - and the transom I did on a smaller boat looks flat to me. Couple other hatches and such on other boats - all as flat as could be.

Actually, when redoing a floor, I would think a large sheet would be preferred because the squares WOULD take on the shape of the onion skin (bottom skin) too easily. Whereas the large sheet would span any imperfections.
 
Last edited:

blindmullet

Well-Known Member
Joined
Oct 19, 2015
Messages
449
Reaction score
106
Points
43
Location
Florida
Model
Explorer
A deck should have a bit of camber. I haven't put a straight edge on the Grady but I would assume there is some. The transom on my Grady was some what straight. When I added the new bracket there was a little more filling on each end.

When I did the Mako I built the camber into the stringer grid. I don't think it mattered if I did or didn't to be honest.
 

DennisG01

GreatGrady Captain
Joined
Sep 1, 2013
Messages
7,189
Reaction score
1,341
Points
113
Location
Allentown, PA & Friendship, ME
Model
Offshore
Just thinking outloud here a bit. We (you and I and every other DIY'r out there) are also rebuilding things backwards as compared to how Grady (and any manufacturer, really) does it. Once we tear things apart, we're building the core THEN adding the topskin (deck). Grady builds the deck first (upside down in the mold) and THEN adds the core.
 

SkunkBoat

Well-Known Member
Joined
Oct 12, 2017
Messages
4,508
Reaction score
1,614
Points
113
Location
Manasquan Inlet NJ
Website
www.youtube.com
Model
Express 265
As you say, they build upside down. They do the squares because they will get full adhesion of each square as apposed to trying to put down a sheet. And the sheet may pop up in a corner or in the middle because, as you say, it has its own shape. They are not covering a sheet of plywood, they are coring a glass mould.
 

ScottyCee

Well-Known Member
Joined
Feb 11, 2020
Messages
456
Reaction score
86
Points
28
Location
Samish Island, WA
Model
Sailfish
So, I will doing the big 272 cockpit one with two ports in it in a week or two - and possibly the little one behind it - can't tell yet. I'm thinking of doing the one for the live well first for practice - has two holes in the top that is clearly how the rot started (visible in pic).

After reading all the posts, I'm still not clear whether it would be better to do it in pieces ("squares" here, a solid sheet, or a solid sheet with scores in it to allow some flex. From how it sounds, there must be other structural members - stringers - or something to support the load, or pieces would not be an option.

(Having never done it!) Here's how I imagine approaching the job:

* Apply straightedge to deck assess curvature. Is it supposed to be flat?
* Cut caulking and remove screws
* Pry up panel and take into shop.
(* Assess everything in the hull that I expose. Say prayers first.)
* Cut out underside of panel to gain access to rot. I'm assuming that the bottom looks like the bottom of the live well one - i.e. Gelcoat.
* Remove rotten wood and grind "mold" until pristine
* Cut in replacement ply
* Use thickened (slightly) resin to bed ply.
* Cure - using weights or whatever to preserve shape - this one is the scariest and where I would think I could mess it up.
* apply glass mesh and resin to finish underside of hatch.
* reinstall.

Does this sound at all like it was when (any of) you did it?
 

Attachments

  • aft cockpit.jpg
    aft cockpit.jpg
    63.6 KB · Views: 10

DennisG01

GreatGrady Captain
Joined
Sep 1, 2013
Messages
7,189
Reaction score
1,341
Points
113
Location
Allentown, PA & Friendship, ME
Model
Offshore
Squares or full sheet of ply... Both ways can be equally successful. Go with whatever method you're more comfortable with.

Along the lines of what's been mentioned above when using full sheets, you do run the possibility of NOT getting full adhesion -- air pockets between the plywood and the hatch. If you used something that has a bit of flexibility to it, it's not a problem. But if you go with a full piece of plywood, I would suggest cutting a bunch of 1" holes in it. That would allow it to be a bit flexible when you lay it down, along with giving areas for air to escape. The holes won't affect the strength and you can leave them as they are, or come back and fill them in with more epoxy. Remember, this is the underside of a hatch - aesthetics isn't a huge deal here.

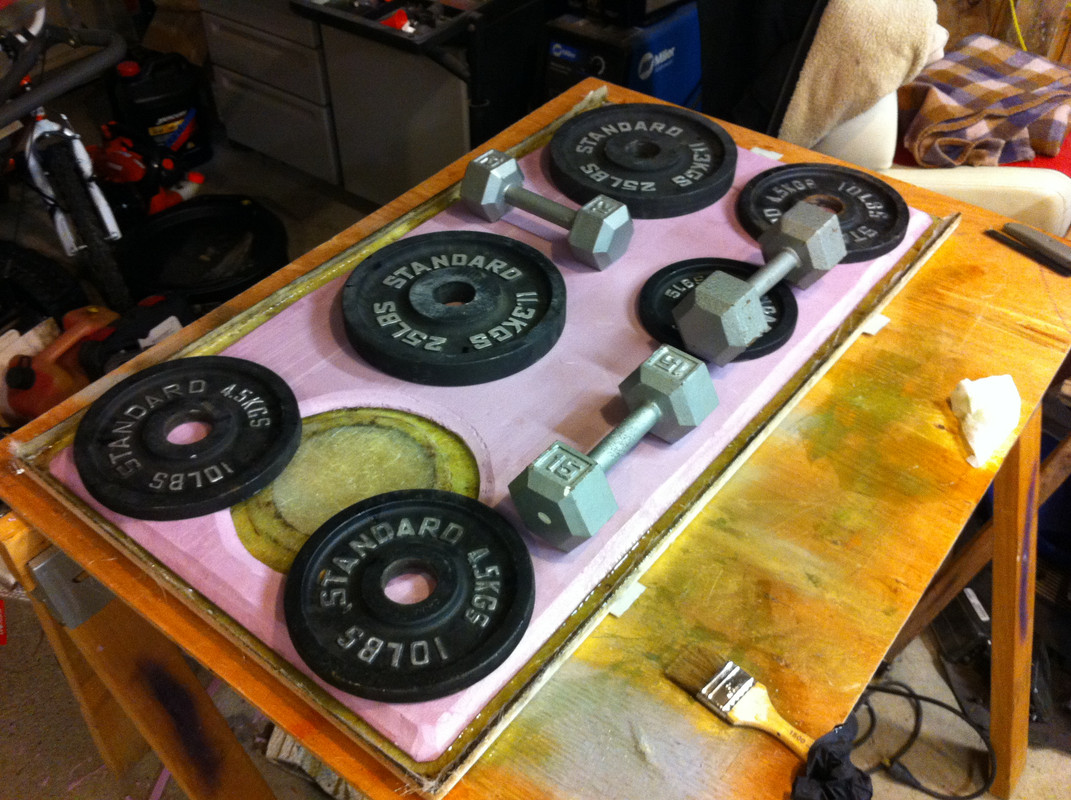
A VERY important thing is what you lay the hatch on when re-coring it. It MUST be completely flat and level. Otherwise, you will end up with a twist in the hatch and it will never lay flat in the boat.

This is from when I used that foamboard insulation, but I spent time making sure the support table was completely flat. You asked about using weights - that's the main reason I posted this pic for you. If you have a flat floor, you could always do it on the floor, too.

IMG-4070.jpg
 
  • Like
Reactions: ScottyCee

SkunkBoat

Well-Known Member
Joined
Oct 12, 2017
Messages
4,508
Reaction score
1,614
Points
113
Location
Manasquan Inlet NJ
Website
www.youtube.com
Model
Express 265
My advice, start with the smaller hatch. Get some experience planning and timing out your mixes and amounts and all the things you need to have at the ready.

That hardest part of the job is not having a container of epoxy harden on you before you get it down...or running out of mix before you fully soaked the glass....

Remember, It doesn't have to be pretty. no one will see it.

Dennis' picture is great. Notice the tapered edges and that they don't go all the way to the glass edge. Use strips of glass and/or filler there. Your screws will then not go thru the core material.

Epoxy over pink foam is a way to go but if you use foam you CANNOT use polyester resin. It will melt the foam.

As for plywood squares...split the difference and use a couple pieces instead of one big sheet.
Also, there is no law that says you can't add a few long strips as stiffeners that weren't there before. So long as they won't hit anything when the hatch is in place.
(kind of like a capital "H")
 

ScottyCee

Well-Known Member
Joined
Feb 11, 2020
Messages
456
Reaction score
86
Points
28
Location
Samish Island, WA
Model
Sailfish
Thank you. Very Interesting - It feels thin from the top when I step on it, but it seems clear now that the strength is largely in the hatch shell itself....
 

Colliw11

Member
Joined
Oct 6, 2019
Messages
23
Reaction score
1
Points
3
Age
37
Model
Chase
I just "finished" the glass job on my panel and not i have all of the excess around the edge. What is the best way to cut this off and smooth it out so that it sits flush? ?
 

DennisG01

GreatGrady Captain
Joined
Sep 1, 2013
Messages
7,189
Reaction score
1,341
Points
113
Location
Allentown, PA & Friendship, ME
Model
Offshore
I just "finished" the glass job on my panel and not i have all of the excess around the edge. What is the best way to cut this off and smooth it out so that it sits flush? ?
Cut-off wheel, grinder, handsaw, file. Take your pick. Why is there so much extra? Did you do something different? Maybe post a pic. I'm a little confused because this would be the easiest part of the job so I'm wondering why the question - meaning, there must be more to it than just what's in your post.
 

ROBERTH

GreatGrady Captain
Joined
Jun 10, 2006
Messages
1,311
Reaction score
125
Points
63
Location
Raleigh, NC
Model
Sailfish
Steve, just as reference, this was my approach for my Swim Platform and I did the same for my Large floor panel.
 

Colliw11

Member
Joined
Oct 6, 2019
Messages
23
Reaction score
1
Points
3
Age
37
Model
Chase
Thanks Dennis... There isn't alof of extra, but probably a 1/4-1/2" above the panel that needs to be trimmed back to make it flush. I'll take some pics when I'm back in front of it tonight.
 

DennisG01

GreatGrady Captain
Joined
Sep 1, 2013
Messages
7,189
Reaction score
1,341
Points
113
Location
Allentown, PA & Friendship, ME
Model
Offshore
Thanks Dennis... There isn't alof of extra, but probably a 1/4-1/2" above the panel that needs to be trimmed back to make it flush. I'll take some pics when I'm back in front of it tonight.
Don't worry about the pic - now that you mentioned the measurement, I understand. Slice it off most of the way any way you want - even a sharp razor blade. Then hit it with a sanding sponge or paper to smooth the edge. The amount of time to do it... it's less than a "1 beer" job.