GW Transom Repair 1999 Adventure 208

langski93

Well-Known Member
Joined
Sep 23, 2006
Messages
86
Reaction score
11
Points
8
Location
New Hampshire, USA
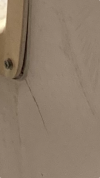
I have not used the boat in a couple of years. This fall I spotted cracks in corners of transom cutout. See photos.
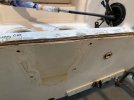
I decided to fix immediately to stop further damage. The top edge of the transom was caked with old dried adhesive or sealer that fell away easily. The edge was damp all the way across where the bang plate had been, and its surface dried overnight.

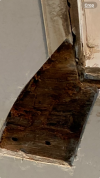
The port side crack was larger and I removed a chunk of fiberglass over the crack. Water had seeped down diagonally toward the drill holes where the swim platform was attached. See dark plywood in cut out fiberglass. Wet, but not dripping or soaked. I banged on the exposed plywood and it is very solid, though damp/wet. There is also de-lamination of the fiberglass layer from the ply in the immediate 6" (+ -) from this corner with a depth of 4-5" down from the top edge. I cannot detect any movement the rest of the way across until I get to the opposite starboard corner. When I the fiberglass it moves slightly.

I have removed several pieces of equipment (more to come) and have not yet seen any moisture down low. All fasteners were originally bedded in a severe amount of sealant. Today, I am going to cut out the scuppers that are in good locations to see if there is moisture below the area of the transom cut out.

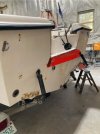
Red highlighted area. Propose cutting out rectangular piece, grinding back, insert coosa plate, then grind down forward face of transom in the splash well, fold over layers of glass from outside to inside of splash well.

Top of transom edge is stepped. Why not flush? Why did they just fill it with caulk and call it a day with bang plate? I know cost, but it makes it difficult to smoothly glass over. I appreciate any ideas for attacking this part, as I don't want to change the final shape or dimensions of the finished transom.


I wrote the post this morning and didn't send. Has anyone removed the outer face of the transom to access water damage? So far I don't see evidence of the transom being waterlogged and if exposed it would dry. It's ideal humidity levels right now and I could reglass and add back the external skin. If I find its more damaged than I expect, well then the skin is off and its one step closer to replacement. I have no plan to do any replacement from the inside. I would have to tear down too much of the deck, jump seats/ battery box, oil and trim pump box, transom splash well and the the whole aft section of the gunnel cap, just to get access to the inner skin of the transom. thanks


Port corner starboard corner
View recent photos.jpeg 3.pngView recent photos.jpeg 2.png

IMG_3102 (1).jpeg

Port side where fiberglass separated, plywood peeled by FG still adhered
View recent photos.pngIMG_3109.jpeg
 

Fishtales

Well-Known Member
Joined
Jan 31, 2005
Messages
8,033
Reaction score
1,286
Points
113
Sorry to say but that looks like a total rebuild. I'd let a marine glass guy look at it. I'd say $10K to fix.
 

langski93

Well-Known Member
Joined
Sep 23, 2006
Messages
86
Reaction score
11
Points
8
Location
New Hampshire, USA
Sorry to say but that looks like a total rebuild. I'd let a marine glass guy look at it. I'd say $10K to fix.
Thanks. I certainly can't say you're wrong. I think my last paragraph is going to be the direction I take. On one hand if its a total fight to the death to get that skin off, I'll be questioning the necessity of going so far. On the other hand, I'll have a final answer and either confirm the need for total replacement and take next steps or I''ll let it dry out and reinstall the skin.

I got a ballpark figure to do the work of "$7000 and quite possibly higher" so your quote is accurate. The boat is not worth that amount of investment. I'll be posting more pics.
 

steveditt

Well-Known Member
Joined
Nov 11, 2012
Messages
152
Reaction score
24
Points
18
Look at the pictures from my rebuild ,same cracks , water also entered from where the top and bottom of the boat are sandwiched together , when he cut the outer layer of gel coat the entire back came off in one piece from delamination which looking inside the bilge you could see separation also . He let it sit in the heated shop over a month hoping the wood would dry then a drilling a few holes it was rotten .he separated the top and bottom of the boat and fiber glassed over the edge of the new wood and where the engine is mounted . last week out in some rough water with my grandson i was glad i had it done .Again look at my posted pictures, good luck mine was a 98
 
  • Like
Reactions: langski93

seasick

Well-Known Member
Joined
Aug 19, 2008
Messages
9,531
Reaction score
1,420
Points
113
Location
NYC
Dryig out will not restore strength. If the coring is solid and just wet, you might be able to make some band aid repairs. The strength of a transom is directly related to the fact that the coring is laminated between the inner and outer shell or skin as you call it.
Try doing the tapping test. Using a small hammer with ideally a leather peen or a hammer with a plastic peen, firmly tap various areas of the skins. A hollow sound or obvious deflection is a sure sign the coring is delaminated at best or rotten as is often the case. Tao some spots on the hull sides to get an idea of what a solid hull sounds like. It is possible that your rot is local to the motor mount area. More picture might help us see how bad the swelling is.
If the rot is limited to an are under the cap and not super deep, a solution that some have tried is pourable filler, a two part solution that sets up hard. I am not a fan of those products but for limited areas that are 'easy' to clean up the inner sides od the skins, they might buy you some time.
There are plenty of videos online of transom repairs . There are videos also of the pourable products
 

Fishtales

Well-Known Member
Joined
Jan 31, 2005
Messages
8,033
Reaction score
1,286
Points
113
Thanks. I certainly can't say you're wrong. I think my last paragraph is going to be the direction I take. On one hand if its a total fight to the death to get that skin off, I'll be questioning the necessity of going so far. On the other hand, I'll have a final answer and either confirm the need for total replacement and take next steps or I''ll let it dry out and reinstall the skin.

I got a ballpark figure to do the work of "$7000 and quite possibly higher" so your quote is accurate. The boat is not worth that amount of investment. I'll be posting more pics.
Would you try it yourself? Maybe get someone who has worked with fiberglass to assist. It really isn't that hard. I'm sure you would get a lot of input here.
 

langski93

Well-Known Member
Joined
Sep 23, 2006
Messages
86
Reaction score
11
Points
8
Location
New Hampshire, USA
Would you try it yourself? Maybe get someone who has worked with fiberglass to assist. It really isn't that hard. I'm sure you would get a lot of input here.
Hi Fishtail; yes I plan to do all the work. 2 years ago I did an internal transom replacement on a 66 Bertram Moppie using coosa, glass and epoxy. I was really satisfied with the result. My inquiry here is to figure out if the transom work needs to be done given that the damage "appears' to be limited. On the Moppie, it was completely obvious that the transom needed to be replaced. Here the consensus is leaning toward the Grady also needing replacement. I still very much look forward to advice and guidance here, Its an excellent forum, Have a great weekend,
 

Hookup1

GreatGrady Captain
Joined
Oct 16, 2007
Messages
3,035
Reaction score
855
Points
113
Age
70
Location
Cape May, NJ
Model
Islander
"They are all sinking. Only difference is how fast." GW wet transoms are a common problem.Just because they are wet doesn't mean they are falling apart. I'm watching mine. Maybe next summer.
 

Fishtales

Well-Known Member
Joined
Jan 31, 2005
Messages
8,033
Reaction score
1,286
Points
113
I think I'd bit the bullet. Looks like you got a decent piece of material cut out. Cut out the aft, rebuild the wood to ensure strength and bond and glass the aft. Totally doable and not too costly especially if the option is part with the boat. Why the heck not. Do it all, do it right and never have to do it again.
 

Fishtales

Well-Known Member
Joined
Jan 31, 2005
Messages
8,033
Reaction score
1,286
Points
113
Hi Tom,
Removing the motors and cutting off the exterior transom skin is the way to go. Then remove all the wet wood (I'd do it all). You may have some stringer repair as well. Then decide if you want to use marine plywood (don't use any other wood except marine plywood) or a composite material like coosa board. Get the best screws you can to rebuild the transom with the material you select. I wouldn't use pressure treated plywood as I don't thing the resin and glass adhere as good as marine plywood or a good composite board. Woven glass would be my choice for the first mat followed by fiberglass mat and maybe another layer of woven followed by layers of mat. Maybe ask here what folks recommend for a layup schedule.
My friend did his transom on a boat and ended up paining on the gelcoat with a brush. I thought he was crazy but it came out nice and smooth. I've only done deck panel back sides and some kit cars long ago so I've only got minor experience with glass. Once thing I can say is it isn't as hard as it looks and you can always touch up or re-do. It's only time and material cost.

For an older boat, I wouldn't hesitate to take a shot at it. It likely saves the boat and you get experience.
 

JeffN

Well-Known Member
Joined
Jan 16, 2007
Messages
605
Reaction score
10
Points
18
Location
Nantucket, Ma.
I think I'd bit the bullet. Looks like you got a decent piece of material cut out. Cut out the aft, rebuild the wood to ensure strength and bond and glass the aft. Totally doable and not too costly especially if the option is part with the boat. Why the heck not. Do it all, do it right and never have to do it again.
Buy once cry once then enjoy your boat. If you like it enough to keep.
 

langski93

Well-Known Member
Joined
Sep 23, 2006
Messages
86
Reaction score
11
Points
8
Location
New Hampshire, USA
The real work has started. You’ll notice I just went a couple of inches above the splash well opening (above waterline) as the core is bone dry in those areas with no sign of delaminating. The plan as of today is to grind those areas into a miter and layup new glass high up into those areas. The same method around the perimeter of the transom and overlay into the splash well. Cheers
 
  • Like
Reactions: Duke1903

Hookup1

GreatGrady Captain
Joined
Oct 16, 2007
Messages
3,035
Reaction score
855
Points
113
Age
70
Location
Cape May, NJ
Model
Islander
The real work has started. You’ll notice I just went a couple of inches above the splash well opening (above waterline) as the core is bone dry in those areas with no sign of delaminating. The plan as of today is to grind those areas into a miter and layup new glass high up into those areas. The same method around the perimeter of the transom and overlay into the splash well. Cheers
Since you are doing the replacement from the outside of the boat make sure the stringer to transom bonds have not been compromised on the inside. The stringer bonds keep the transom from twisting out.
 
  • Like
Reactions: langski93

langski93

Well-Known Member
Joined
Sep 23, 2006
Messages
86
Reaction score
11
Points
8
Location
New Hampshire, USA
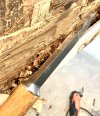
In order to leave a deep trough 4.25 “ for the new core at the bottom of the transom I had to figure out how to reach the lowest point on the inside and hog out the wet and stubborn ply. In polite company the chisel is called a mortising chisel or an English mortising chisel. It’s more commonly know as a “pig sticker”. My grinder wouldn’t reach, and my Feinmultimaster would not reach. The chain saw was ok, but couldn’t get close with any control land the 3/4” drill was ok, but left too much behind and as with all power tools they can speed up the process but also just can get away from you. The 1/2” pig sticker was just what the Dr ordered. Cheers

IMG_3166.jpegIMG_3167.jpeg