New motor Arriving: Is my Engine Mount Good?

brightnight

Active Member
Joined
Feb 16, 2021
Messages
25
Reaction score
1
Points
3
Age
91
Model
Seafarer
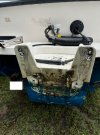
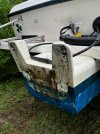
Took my 2006 mercuary optimax engine off my 1994 Grady White seafarer 228G this weekend and the paint on the motor mount looks delaminated. I'm bringing my boat to the dealer to have a new engine installed in a week. What can I do to confirm that my engine mount is not rotted and if it is, what are my options? Tapped on the mount with a hammer and didn't notice any difference in sound. Last year a mechanic looked at it and said it had some of the cracking around the top of bolt holes but that it was superficial and I had nothing to worry about. However, nobody has seen it with the engine off. Even if it's fine, is there anything that should be done before the new engine goes on for another 5-10 years?

Video of my Engine Mount:
https://youtube.com/shorts/FuiJGxTKiwY?feature=share
IMG_8797.jpg

Engine_Mount.JPG
 
Last edited:

seasick

Well-Known Member
Joined
Aug 19, 2008
Messages
9,531
Reaction score
1,420
Points
113
Location
NYC
Have you checked the bracket for water? That inspection plate on the top is how you would get a look at the inside.
You might be able to test if the bracket has water in in it by tapping on the side from top to bottom with a small hammer and listening for an obvious change in the tone that could indicate water. You also need to clean up the black stained areas to check for corrosion that could allow water to seep in.
It is possible that the bracket is fine and just need cleanup, a bit of sanding and the proper primer and paint
 
  • Like
Reactions: brightnight

brightnight

Active Member
Joined
Feb 16, 2021
Messages
25
Reaction score
1
Points
3
Age
91
Model
Seafarer
Thanks, I haven't checked into the inspection cap but I will next weekend (my boat is 2 hours from me). I wanted to open it but was expecting after I removed the screws that it would be glued on with silicone or some type of marine sealant. There are two bolts from the engine mount that I assume are still inside that I will need to remove too.
 

Halfhitch

GreatGrady Captain
Joined
Nov 11, 2017
Messages
1,412
Reaction score
457
Points
83
Location
Venice, Florida
I owned a 2004 of the same model until recently that was a 2004. It had the same engine bracket. The underside of that inspection cover on top that seasick mentioned has a groove in it with an O-ring so there is no need for caulk of any kind there. Additionally, the screws don't need to be cinched down really hard to be water tight. You may find some screws stripped from being over-tightened since the threads are in aluminum. Easily repaired if you find that.

On the bottom of the bracket near where it bolts to the transom there is a good-sized black nylon screw-in plug to drain it. Check that closely because people have a tendency to over tighten it and strip the nylon threads on the plug. It is threaded in to thin plate so there is only a couple of threads, but again there is an O-ring on the flanged plug and it is under compression when submerged so there is no need for a great amount of torque when installing. Removing that plug drains most of the water but there will be a small amount trapped right up against the transom that your shop-vac will take care of.

Since your mechanic mentioned some cracking near the top mounting bolts, I believe he would have been talking about the top bolts holding the bracket onto the transom since the top bolts for the engine where it mounts to the bracket is solid aluminum. Check closely where the bracket mates with the transom. The cracks will start showing about 1 inch down from the top on each side. I have been there.
 
Last edited:
  • Like
Reactions: brightnight

brightnight

Active Member
Joined
Feb 16, 2021
Messages
25
Reaction score
1
Points
3
Age
91
Model
Seafarer
I owned a 2004 of the same model until recently that was a 2004. It had the same engine bracket. The underside of that inspection cover on top that seasick mentioned has a groove in it with an O-ring so there is no need for caulk of any kind there. Additionally, the screws don't need to be cinched down really hard to be water tight. You may find some screws stripped from being over-tightened since the threads are in aluminum. Easily repaired if you find that.

On the bottom of the bracket near where it bolts to the transom there is a good-sized black nylon screw-in plug to drain it. Check that closely because people have a tendency to over tighten it and strip the nylon threads on the plug. It is threaded in to thin plate so there is only a couple of threads, but again there is an O-ring on the flanged plug and it is under compression when submerged so there is no need for a great amount of torque when installing. Removing that plug drains most of the water but there will be a small amount trapped right up against the transom that your shop-vac will take care of.

Since your mechanic mentioned some cracking near the top mounting bolts, I believe he would have been talking about the top bolts holding the bracket onto the transom since the top bolts for the engine where it mounts to the bracket is solid aluminum. Check closely where the bracket mates with the transom. The cracks will start showing about 1 inch down from the top on each side. I have been there.
I wont be able to get to my boat until this weekend and it's going to the shop Monday. Is there a Part number for that 0-ring so I can just buy one to replace it when I open the inspection cover? I called Grady White but they didn't have the original or know what to suggest.
 

Halfhitch

GreatGrady Captain
Joined
Nov 11, 2017
Messages
1,412
Reaction score
457
Points
83
Location
Venice, Florida
Just tell the shop to get one. I did have a guy that owns a grady with a bracket tell me that his didn't have a groove. It a may have been one that had been replaced or maybe some years didn't have the groove. I can't say. I know mine was a 2004 and it had the groove. If I remember correctly the screws holding the cover had small nylon washers under the heads.
 
  • Like
Reactions: brightnight

brightnight

Active Member
Joined
Feb 16, 2021
Messages
25
Reaction score
1
Points
3
Age
91
Model
Seafarer
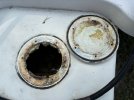
Pulled the hatch off and sucked about 1 gallon of water out from inside. If water gets in, how is it supposed to drain? Anyone know the screw size/length that holds the hatch on? Somehow lost one and now the boat is at the yard for a new engine so can't run out to check. Also not sure what a normal hatch looks like inside so unclear to me if the expanding foam was put on by Grady or the last owner and what purpose it serves.

Took some pics too:

IMG_8889.jpg

Looking down the hatch:
IMG_8885.jpg

IMG_8887.jpg

IMG_8886.jpg
 
Last edited:

Thor's Outlaw

Active Member
Joined
Jun 9, 2022
Messages
29
Reaction score
6
Points
3
Location
Long Island NY
Model
Seafarer
I have the same bracket and mine does not have any foam in it. There is also a drain bung underneath. Sorry I cant help with the screws.
 
  • Like
Reactions: brightnight

igblack87

Well-Known Member
Joined
Oct 21, 2012
Messages
291
Reaction score
46
Points
28
Model
Fisherman 222
doesn't look bad from the pictures, would be worth having the marina its at put some fresh caulking around the pie plate and screws, maybe a new o-ring gasket as well. potential cheap assurance while its in the shop.
 
  • Like
Reactions: brightnight

Ky Grady

GreatGrady Captain
Staff member
Joined
Mar 1, 2006
Messages
3,027
Reaction score
1,351
Points
113
Location
Berea, KY/Cross, SC
Model
Seafarer
PO that had boat before I bought it, put a pilates ball inside then inflated it. I take it out ever so often and clean out the inside. Still using the ball.