Rewiring 1984 Tournament 170

MikeyThumbs

Active Member
Joined
Apr 2, 2023
Messages
27
Reaction score
4
Points
3
Age
41
Model
CHOOSE
Hi.. as the title states, I’m in the process of re-wiring my 84 Tournament 170. Under the console was a huge rats nest of wires with splices everywhere, wire nuts, regular THHN wire tied into things, etc.. a lot of wires when touched would just crumble

im going to basically start from scratch (with exception to the control cable from the motor)

I drew up a sketch of the main power wiring and just wanted to confirm that it looks ok.. any recommendations are welcome and any help is greatly appreciated!

**Not shown on the sketch is the 30A in-line circuit breaker to protect the fuse panel. Would this breaker be between the battery and the switch terminal #2, or would it be between the switch output terminal to the fuse box?
 

Attachments

  • A0F8A203-04B9-4C55-AE8C-619DB93A50EB.jpeg
    A0F8A203-04B9-4C55-AE8C-619DB93A50EB.jpeg
    1.7 MB · Views: 16

DennisG01

GreatGrady Captain
Joined
Sep 1, 2013
Messages
7,189
Reaction score
1,341
Points
113
Location
Allentown, PA & Friendship, ME
Model
Offshore
A fuse or breaker's primary purpose is always to protect the wiring. As such, the 30a should be mounted within about a foot or so of the battery switch to protect the wire (10g?) on the way to the dash fuse panel.
 
Last edited:
Joined
Jan 17, 2023
Messages
22
Reaction score
4
Points
3
Age
55
Model
Seafarer
I’ve just wrapped up requiring my 89 Seafarer, and I expect there are a lot of similarities. The breaker can go between the battery switch and fuse panel, but it should be positioned very close to the battery switch. The 4 AWG to fuse panel is overkill (unnecessary $), especially with a 30 amp breaker. Consider 40-amp breaker and 6-AWG from battery switch to panel and back. Invest in a nice terminal crimper for butt ends, ring terminals, and 1/4 inch connectors and buy all these in bulk…you’re going to use a bunch. You may want to invest in a decent lug terminal crimper as well. You are doing the right thing and saving yourself many headaches down the line.
 
  • Like
Reactions: Grey56

MikeyThumbs

Active Member
Joined
Apr 2, 2023
Messages
27
Reaction score
4
Points
3
Age
41
Model
CHOOSE
I’ve just wrapped up requiring my 89 Seafarer, and I expect there are a lot of similarities. The breaker can go between the battery switch and fuse panel, but it should be positioned very close to the battery switch. The 4 AWG to fuse panel is overkill (unnecessary $), especially with a 30 amp breaker. Consider 40-amp breaker and 6-AWG from battery switch to panel and back. Invest in a nice terminal crimper for butt ends, ring terminals, and 1/4 inch connectors and buy all these in bulk…you’re going to use a bunch. You may want to invest in a decent lug terminal crimper as well. You are doing the right thing and saving yourself many headaches down the line

thanks for the reply. I chose 4AWG to feed the fuse panel but now realize I was looking at the 3% voltage drop chart instead of the 10% as recommended for accessories, lighting, etc.. actually looks like I’ll be able to get away with #8 for 40a feeder with a 30a CB (close to the switch as possible).

i purchased a 520 piece crimp/shrink connectors kit and a crimp tool. Also picked up a lug terminal crimper for the battery leads and a bunch of heat shrink, so material-wise I think I’m in good shape.

I received the boat recently and more than anything just want to know what wire does what.. God forbid I had to troubleshoot something on the water at least now what and where everything is.
 

Grey56

Well-Known Member
Joined
Mar 15, 2021
Messages
68
Reaction score
7
Points
8
Age
43
Location
Los Angeles, CA
Model
Sailfish
Have been wrestling with this during the off-season; what a nightmare. If you can get ahold of your original diagram (Grady does a good job of archiving them - and your local dealer may still have an original) they are color-coded - though if it's all corroded it might be a blessing in disguise. At serval points I just wanted to rip everything out & start new.

I ended up calling New Wire Marine for a quote on a new switch panel since the old one simply was outdated & had functions that were no longer in use. Not to mention - those older switches/toggles can't be bought anymore (mine is a '92 Sailfish).

I do keep print-outs of my wiring diagrams though just to be sure. Good luck!
 

MikeyThumbs

Active Member
Joined
Apr 2, 2023
Messages
27
Reaction score
4
Points
3
Age
41
Model
CHOOSE
Have been wrestling with this during the off-season; what a nightmare. If you can get ahold of your original diagram (Grady does a good job of archiving them - and your local dealer may still have an original) they are color-coded - though if it's all corroded it might be a blessing in disguise. At serval points I just wanted to rip everything out & start new.

I ended up calling New Wire Marine for a quote on a new switch panel since the old one simply was outdated & had functions that were no longer in use. Not to mention - those older switches/toggles can't be bought anymore (mine is a '92 Sailfish).

I do keep print-outs of my wiring diagrams though just to be sure. Good luck!
I am very handy, so I decided to get a piece of HDPE and going to trace it up with the old switch console.. then I bought a new fuse panel, switch console, fuel gauge, separate bilge switch/fuse and going to make up a new switch console. I actually found (through the help of GG.com) the original owners manual and the wiring diagram, which helped me a bunch with figuring out what was what once I started peeling back some tape and wire loom. Things were so bad though that I had to go the route of running new and then ripping out the old stuff. Costs more $ but the peace of mind is worth it to me. I’m sure by doing myself I’m saving a pretty penny though because electric isn’t cheap!!
 
  • Like
Reactions: Grey56

Grey56

Well-Known Member
Joined
Mar 15, 2021
Messages
68
Reaction score
7
Points
8
Age
43
Location
Los Angeles, CA
Model
Sailfish
I am very handy, so I decided to get a piece of HDPE and going to trace it up with the old switch console.. then I bought a new fuse panel, switch console, fuel gauge, separate bilge switch/fuse and going to make up a new switch console. I actually found (through the help of GG.com) the original owners manual and the wiring diagram, which helped me a bunch with figuring out what was what once I started peeling back some tape and wire loom. Things were so bad though that I had to go the route of running new and then ripping out the old stuff. Costs more $ but the peace of mind is worth it to me. I’m sure by doing myself I’m saving a pretty penny though because electric isn’t cheap!!
Glad you were able to label/assess the bulk of it - I truly feel your pain; it's been tough. Feel free to post some photos of your hard work!!
 
  • Like
Reactions: MikeyThumbs

Hookup1

GreatGrady Captain
Joined
Oct 16, 2007
Messages
3,035
Reaction score
855
Points
113
Age
70
Location
Cape May, NJ
Model
Islander
I guess at that age rewiring is necessary. It's 15 years older than mine which is 25 years old now. I was fortunate that the previous owners did not hack the wiring or drill holes everywhere. Use quality composers, lots of shrink tubing and good wire.

Sherico is where I buy most of my electrical stuff from. Not sure if they still do this but you could place orders for lengths of wire in different color including stripped for boat rewiring projects. I couldn't find it today so it may have been discontinued but its worth a call if you need it.

 
Last edited:

SkunkBoat

Well-Known Member
Joined
Oct 12, 2017
Messages
4,508
Reaction score
1,614
Points
113
Location
Manasquan Inlet NJ
Website
www.youtube.com
Model
Express 265
Your diagram of the switch is incorrect. There is no "1&2"terminal on a switch. The switch has a #1 Terminal that connects to Batt1, a #2 terminal that connects to Batt2, and a Feed (sometimes labeled COM). The Motor and the House12v go on the Feed(COM) terminal. Put the breaker within a foot of the switch between the FEED terminal and the Fuse panel.
I would use an MRCB style or Bussman 285 type breaker


4 awg is way overkill for a 17ft boat with no winch and no radar...unless you have a 2500watt stereo booster and 17 speakers.:rolleyes:
6 awg is what is used on +25ft boats with multiple pumps and lights and macerator and refrigerator and sonars and MFDs..
You could use 8 awg since your run is shorter....unless...see above....:rolleyes:
Again, it depends on how many things you are going to run at once.


Technically, the green wire from the Fuel fill shoud go directly to a neg battery post, just like the fuel tank. The reasoning is that the black wire from the fuse panel to the battery is carrying all of the current for your fuse panel. There is a tiny voltage drop across that length of wire. The green wires to the neg battery don't (should not)carry any current. For the same reason, you would never use the green wires as the negative return for an accessory.


I'm not sure about your bilge pump wiring. You don't show the switch connections so I can't say its right or wrong.
Why is there no black wire from bilge pump to a neg battery post?

I think 10awg is overkill. 12awg is plenty. You could buy some brown wire to make it color coded for bilge pump.

I am not a fan of the Auto/Off/Man Bilge switch. It is very possible to accidentally turn off your bilge pump.

The other way is to wire the float switch to a battery with an inline fuse.
The + connection can be on a + battery terminal or on #1 or #2 of the Battery switch (since they are already connected to the + of the batteries). As long as the fuse is good, your float switch will power the pump if there is water. Then just use a Manual Bilge switch on your dash.
 
  • Like
Reactions: Hookup1

MikeyThumbs

Active Member
Joined
Apr 2, 2023
Messages
27
Reaction score
4
Points
3
Age
41
Model
CHOOSE
Your diagram of the switch is incorrect. There is no "1&2"terminal on a switch. The switch has a #1 Terminal that connects to Batt1, a #2 terminal that connects to Batt2, and a Feed (sometimes labeled COM). The Motor and the House12v go on the Feed(COM) terminal. Put the breaker within a foot of the switch between the FEED terminal and the Fuse panel.
I would use an MRCB style or Bussman 285 type breaker


4 awg is way overkill for a 17ft boat with no winch and no radar...unless you have a 2500watt stereo booster and 17 speakers.:rolleyes:
6 awg is what is used on +25ft boats with multiple pumps and lights and macerator and refrigerator and sonars and MFDs..
You could use 8 awg since your run is shorter....unless...see above....:rolleyes:
Again, it depends on how many things you are going to run at once.


Technically, the green wire from the Fuel fill shoud go directly to a neg battery post, just like the fuel tank. The reasoning is that the black wire from the fuse panel to the battery is carrying all of the current for your fuse panel. There is a tiny voltage drop across that length of wire. The green wires to the neg battery don't (should not)carry any current. For the same reason, you would never use the green wires as the negative return for an accessory.


I'm not sure about your bilge pump wiring. You don't show the switch connections so I can't say its right or wrong.
Why is there no black wire from bilge pump to a neg battery post?

I think 10awg is overkill. 12awg is plenty. You could buy some brown wire to make it color coded for bilge pump.

I am not a fan of the Auto/Off/Man Bilge switch. It is very possible to accidentally turn off your bilge pump.

The other way is to wire the float switch to a battery with an inline fuse.
The + connection can be on a + battery terminal or on #1 or #2 of the Battery switch (since they are already connected to the + of the batteries). As long as the fuse is good, your float switch will power the pump if there is water. Then just use a Manual Bilge switch on your dash.

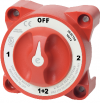
I got a Blue Sea Systems 9001e for the selector switch. It actually is labeled with 1, 2, 1+2 or OFF.. but 1+2 = COM
There will be a 30A Type 285 fuse approx. 6" away from the switch between the switch and fuse panel.

1681820864216.png


You're right about the wiring being overkill. I hadn't realized when I drew this up, I was looking at the wrong wire sizing chart and was using the voltage drop for critical power components. I picked up some #8 and will be using this for the feed to the fuse panel.

For the bilge wiring, I know it isn't very detailed, I was just trying to show the intent of dedicated power/control direct to the battery, but I know how to wire that already and have hooked it up with the fuse/switch panel to confirm..
I'm not a huge fan of the switches either, but this one has an LED indicator so hopefully this will help me avoid accidentally turning it off. The wiring I am using for that will actually be #12 and I didn't get any brown wire so I planned on using black or white but heat shrinking the last few inches of cable to identify easier.

I appreciate the info regarding the ground for the fuel filler.. I will connect this direct to the negative battery terminal rather than the fuse block. Question... does it matter which battery? I'm assuming not.

Thanks again for the info and recommendations!!
 

DennisG01

GreatGrady Captain
Joined
Sep 1, 2013
Messages
7,189
Reaction score
1,341
Points
113
Location
Allentown, PA & Friendship, ME
Model
Offshore
Skunk was referring the BACK of the switch since that's where the electrical connections (posts) are and that is what is relevant in a wiring diagram.

Truthfully, even 8g is overkill for a small boat dash feed. Boats bigger than that use 10g. But of course it won't hurt to use the 8g... and then there's the "see above" that Skunk mentioned :)

I agree with keeping the bilge pump simple. All you need is a simple on/off switch at the dash (which is electrically disabled when the battery switch is OFF) and then the "auto" function of the pump/float comes direct from the battery. I think most bilge pumps actually use 16g wiring? Maybe 14g.

The green grounding wire COULD be connected to a ground bus bar if it's near the battery - that's a totally acceptable way to do it, as well. Personally, I like to keep the connections at a battery to a minimum (when possible). But you may not have that bus bar in a smaller boat so just go right to the battery in that case.
 

SkunkBoat

Well-Known Member
Joined
Oct 12, 2017
Messages
4,508
Reaction score
1,614
Points
113
Location
Manasquan Inlet NJ
Website
www.youtube.com
Model
Express 265
1&2 does not = COM. You are confusing the front labeling for switch position with the terminal post labels on the back.

The switch connects COM (common) to the choices of 1 or 2 or Both(1&2) or OFF. There is no terminal post for "1&2".
As you turn the switch from OFF to 1 it connects COM to 1. Turn to 1&2 it stays connected to 1 and also connects to 2. Turn to 2 and it stops connecting to 1.

COM is the "Load". Your Starter motor and the House 12V. the switch is choosing which battery it connects to.
Because the Motor also charges the battery when running, the switch is also choosing which battery is charging.

Don't use black wire for the + bilge pump wire. Never use black wire for anything but negative connections (aka ground).
 
Last edited:

MikeyThumbs

Active Member
Joined
Apr 2, 2023
Messages
27
Reaction score
4
Points
3
Age
41
Model
CHOOSE
1&2 does not = COM. You are confusing the front labeling for switch position with the terminal post labels on the back.

The switch connects COM (common) to the choices of 1 or 2 or Both(1&2) or OFF. There is no terminal post for "1&2".
As you turn the switch from OFF to 1 it connects COM to 1. Turn to 1&2 it stays connected to 1 and also connects to 2. Turn to 2 and it stops connecting to 1.

COM is the "Load". Your Starter motor and the House 12V. the switch is choosing which battery it connects to.
Because the Motor also charges the battery when running, the switch is also choosing which battery is charging.

Don't use black wire for the + bilge pump wire. Never use black wire for anything but negative connections (aka ground).
Ok thanks. I understood how it worked but wasn’t realizing the layout of the studs on the back didn’t correspond with the switch labels on the front but I got it now..

For the bilge wiring (or any wiring for that matter) black will only be used for negative/ground connections except for the fuel tank and fill which will be green.
 

MikeyThumbs

Active Member
Joined
Apr 2, 2023
Messages
27
Reaction score
4
Points
3
Age
41
Model
CHOOSE
I mocked up the wiring and connected the batteries and switch last night to make sure everything worked, which it did. Today I’m going to pull the wiring under the gunwale and secure everything and begin wiring the accessories.
I already cut a new console panel out of a piece of black starboard and cut in the new switch panel and fuel gauge, hopefully by this weekend she’s all wired up..

Thanks again for the help/advice so far!
 
  • Like
Reactions: SkunkBoat