Strengthening/reinforcing hatches

Neckbone

Member
Joined
Nov 9, 2023
Messages
20
Reaction score
8
Points
3
Age
40
Model
Islander
I tried the search function and have only come up with repairs for chipped hatch lids..

1996 islander. The bilge hatch lid, port side rear hatch lid, and port side livewell lid are all a bit soft. There is no coring on these lids to tear out and repair. Going over ideas on how to reinforce/strengthen the integrity of these areas that see a lot of foot traffic.

Option 1: glass a few strips of wood/coosa on end to the underside of the hatch. Was thinking bonding 2 pieces of 3/4” ply cutting long strips and glassing them on end to the underside.

Option 2: Adding coring to the underside of the hatch lid.

Open to any and all suggestions or advice.

Thank you!
 

DennisG01

GreatGrady Captain
Joined
Sep 1, 2013
Messages
7,190
Reaction score
1,341
Points
113
Location
Allentown, PA & Friendship, ME
Model
Offshore
A piece of 1/2" coring (any material will be fine) will be the easiest. It doesn't even have to go the edge. An inch, even 2" back from the edge/perimeter will be PLENTY. What I mean is that the coring can be 2" smaller (in all directions) than the size of the underside of the hatch.
 

Neckbone

Member
Joined
Nov 9, 2023
Messages
20
Reaction score
8
Points
3
Age
40
Model
Islander
A piece of 1/2" coring (any material will be fine) will be the easiest. It doesn't even have to go the edge. An inch, even 2" back from the edge/perimeter will be PLENTY. What I mean is that the coring can be 2" smaller (in all directions) than the size of the underside of the hatch.
This is what I was hoping to hear. I can pick up a 4x8 sheet of 5/8" marine ply locally.

Doing further research it looks like there is coring in these lids, a thin wood of some sort. Hoping I can simply grind away the gel coat underneath and add the coring to sure it up without needing to grind away the thin layer of coring that is in place.
 

DennisG01

GreatGrady Captain
Joined
Sep 1, 2013
Messages
7,190
Reaction score
1,341
Points
113
Location
Allentown, PA & Friendship, ME
Model
Offshore
Although marine ply is certainly the best choice in terms of wood, you can just get a small sheet (2x4) of regular plywood if that's all you need. Saturate it a few times in epoxy till it no longer soaks in then do the job. That will work out just fine and be less expensive. If it fails a couple decades from now - it's easy enough to re-do. Don't get me wrong - use the marine if you want - it's certainly "better" - but for this job, you "could" keep it cheaper if you wanted to.
 
  • Like
Reactions: Sardinia306Canyon

Neckbone

Member
Joined
Nov 9, 2023
Messages
20
Reaction score
8
Points
3
Age
40
Model
Islander
Although marine ply is certainly the best choice in terms of wood, you can just get a small sheet (2x4) of regular plywood if that's all you need. Saturate it a few times in epoxy till it no longer soaks in then do the job. That will work out just fine and be less expensive. If it fails a couple decades from now - it's easy enough to re-do. Don't get me wrong - use the marine if you want - it's certainly "better" - but for this job, you "could" keep it cheaper if you wanted to.
True, and I assume of the hatch lid has flex, the coring likely is wet. So I'm already cutting a corner just reinforcing it.. lol
 

DennisG01

GreatGrady Captain
Joined
Sep 1, 2013
Messages
7,190
Reaction score
1,341
Points
113
Location
Allentown, PA & Friendship, ME
Model
Offshore
True, and I assume of the hatch lid has flex, the coring likely is wet. So I'm already cutting a corner just reinforcing it.. lol
Yes, if it's flexing more than it should then the top and bottom "skins" have lost adhesion with the core. It's this adhesion that gives a structure like this it's strength - not so much that actual core, itself. Case in point... I rebuilt a large hatch with foamboard insulation from HD and it is solid as a rock.
 
Last edited:
  • Like
Reactions: Neckbone

Jimsalv

Active Member
Joined
Jul 21, 2019
Messages
41
Reaction score
3
Points
8
Age
67
Location
Clinton Ct
Model
Explorer
You can use polyester resin which is much much cheaper and works just as well. Also, if you are doing the job, do a complete job, not partial, you will feel better in the long run. Use a multi-tool to cut the thin coring out. Use Youtube, you will learn quite a bit on proper techniques.
 

seasick

Well-Known Member
Joined
Aug 19, 2008
Messages
9,531
Reaction score
1,420
Points
113
Location
NYC
I am curious. If as you stated, 'there is no coring on these lids', what got soft?
Do you mean that there was coring but it is now gone?
 

mooseandmermaid

New Member
Joined
Oct 6, 2023
Messages
3
Reaction score
1
Points
3
Age
66
Location
Vancouver Island, Canada
Model
Dolphin
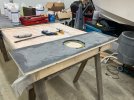
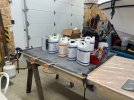
I am in progress of rebuilding my hatch covers. Both covers were very soft, once i removed the inner skin I found all the plywood to be saturated with water and completely delaminated and mostly rotten.
I cleaned up skin and using polyester resin added two layers of 1708 before placing the sheets of 1/2" Coosa Bluewater 26 which I laminated with polyester thickened with silica.
Once this step has cured I'll be adding another layer of 1708 before a final sheet of Coosa that will be topped off with 1708.

small-hatch-repair-with-coosa.jpg
large-hatch-repair-with-coosa.jpg
 

DennisG01

GreatGrady Captain
Joined
Sep 1, 2013
Messages
7,190
Reaction score
1,341
Points
113
Location
Allentown, PA & Friendship, ME
Model
Offshore
Moose, just an FYI... of course you can do this any way you want, but you can save some time and money by keeping things simpler. Meaning, you ABSOLUTELY don't need a second sheet of Coosa - that is WAY overkill. Really, all you would have had to do was lay a light mat on the hatch, then the Coosa, then one layer of 1708. And, you don't have to have the Coosa go all the way to edge - a ouple inches back with a beveled edge would do it. Also, doing it all at the same time is preferred over letting it first harden - a better bond is made this way.

Again, it's not going to be "bad" by any means the way you're doing it - but there's really no benefit. :)

As a side note for others reading this... be darned sure your table is perfectly flat and true - otherwise your hatch will end up twisted.
 

Jimsalv

Active Member
Joined
Jul 21, 2019
Messages
41
Reaction score
3
Points
8
Age
67
Location
Clinton Ct
Model
Explorer
I tried the search function and have only come up with repairs for chipped hatch lids..

1996 islander. The bilge hatch lid, port side rear hatch lid, and port side livewell lid are all a bit soft. There is no coring on these lids to tear out and repair. Going over ideas on how to reinforce/strengthen the integrity of these areas that see a lot of foot traffic.

Option 1: glass a few strips of wood/coosa on end to the underside of the hatch. Was thinking bonding 2 pieces of 3/4” ply cutting long strips and glassing them on end to the underside.

Option 2: Adding coring to the underside of the hatch lid.

Open to any and all suggestions or advice.

Thank you!
Now I am confused, how could they get soft if no coring? Are you positive? Fiberglass does not soften, but coring will.
 

OceanSun

GreatGrady Captain
Joined
Jun 20, 2023
Messages
69
Reaction score
31
Points
18
Age
59
Model
Gulfstream
Now I am confused, how could they get soft if no coring? Are you positive? Fiberglass does not soften, but coring will.
See OP's second post: "Doing further research it looks like there is coring in these lids, a thin wood of some sort. Hoping I can simply grind away the gel coat underneath and add the coring to sure it up without needing to grind away the thin layer of coring that is in place."
 
  • Like
Reactions: Jimsalv

Hookup1

GreatGrady Captain
Joined
Oct 16, 2007
Messages
3,035
Reaction score
855
Points
113
Age
70
Location
Cape May, NJ
Model
Islander
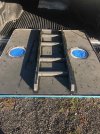
I did the deck hatch on my 1997 268 Islander. Coosa board to the edges. Additional bracing to match otiginal. Epoxy resin. Vacuum bagged. There are a lot of ways and material choices to do this job. Even though the labor is "free" I dread the thought of having to do it over again. Done right...done once. When you consider what the boat is costing you better materials are insignificant.

Dech Hatch Coosa.jpeg 1 Rebuilt hatch.jpeg

The aft hatch on the top of port side is cored. I'll have to check the fish box and baitwell hatches. If they are cored (probably are) there is no quick fix. Cut the perimeter out and lift the fiberglass. If the core is shot it will come up easily. Scrape it all out.
 

Neckbone

Member
Joined
Nov 9, 2023
Messages
20
Reaction score
8
Points
3
Age
40
Model
Islander
Well we had about a solid week of rain and the ugly really showed itself. Several of the hatch lids became saturated and held water and became very soft. Hatches are removed and taking them to a fiberglass guy for a quote. Going to farm this job out as I have deck drain tube and thru hulls to replace. I will have the glass guy take pictures of the process to post here for future reference. Thank you all for the replies.
 

Jimsalv

Active Member
Joined
Jul 21, 2019
Messages
41
Reaction score
3
Points
8
Age
67
Location
Clinton Ct
Model
Explorer
I am in progress of rebuilding my hatch covers. Both covers were very soft, once i removed the inner skin I found all the plywood to be saturated with water and completely delaminated and mostly rotten.
I cleaned up skin and using polyester resin added two layers of 1708 before placing the sheets of 1/2" Coosa Bluewater 26 which I laminated with polyester thickened with silica.
Once this step has cured I'll be adding another layer of 1708 before a final sheet of Coosa that will be topped off with 1708.

View attachment 31926
View attachment 31925
you are so lucky to have your boat inside! How is your gas tank?
 

mooseandmermaid

New Member
Joined
Oct 6, 2023
Messages
3
Reaction score
1
Points
3
Age
66
Location
Vancouver Island, Canada
Model
Dolphin
you are so lucky to have your boat inside! How is your gas tank?
To fit the boat inside my shop, I had to remove everything from the roof. I had less than 1" clearance under the door header. I was prepared to let some air out of the tires if needed.

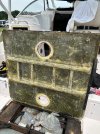
Yeah, I was worried about the tank as it is original. It did have a bit of pitting on the top surface but nothing too deep. I ground out the pitting to see the depth and filled the pits with JB Weld Marine Weld.
I pulled the tank to inspect the underside and I have rot in two of the aft bulkheads as well that I will repair now that I have it out.. Once I got the tank out and cleaned it up I found the area of the tank sender was quite pitted and the sender itself was NFG, did a repair there and I replaced that too. I put a pressure test on (3 PSI) it's been holding steady for almost a week now.
 
  • Like
Reactions: Jimsalv

Jimsalv

Active Member
Joined
Jul 21, 2019
Messages
41
Reaction score
3
Points
8
Age
67
Location
Clinton Ct
Model
Explorer
To fit the boat inside my shop, I had to remove everything from the roof. I had less than 1" clearance under the door header. I was prepared to let some air out of the tires if needed.

Yeah, I was worried about the tank as it is original. It did have a bit of pitting on the top surface but nothing too deep. I ground out the pitting to see the depth and filled the pits with JB Weld Marine Weld.
I pulled the tank to inspect the underside and I have rot in two of the aft bulkheads as well that I will repair now that I have it out.. Once I got the tank out and cleaned it up I found the area of the tank sender was quite pitted and the sender itself was NFG, did a repair there and I replaced that too. I put a pressure test on (3 PSI) it's been holding steady for almost a week now.
Mine is a 92 Explorer, outside under shrink with a door, in Conn. I will be pulling the soft tank hatch soon, and inspect. My heat is a heater buddy with an external tank.
 
  • Like
Reactions: mooseandmermaid

Fishtales

Well-Known Member
Joined
Jan 31, 2005
Messages
8,033
Reaction score
1,286
Points
113
I am in progress of rebuilding my hatch covers. Both covers were very soft, once i removed the inner skin I found all the plywood to be saturated with water and completely delaminated and mostly rotten.
I cleaned up skin and using polyester resin added two layers of 1708 before placing the sheets of 1/2" Coosa Bluewater 26 which I laminated with polyester thickened with silica.
Once this step has cured I'll be adding another layer of 1708 before a final sheet of Coosa that will be topped off with 1708.

View attachment 31926
View attachment 31925
Did the exact same thing. One sheet of coosa is more than sufficient.