Trim tab screw heads gone on 285

Macon waves

Member
Joined
Sep 15, 2019
Messages
11
Reaction score
0
Points
1
Age
67
Model
Freedom 307
The SS screw heads that secure the trim tabs underneath the hull have several missing where the screw head is gone but screws still there. Anyone had experience with the easiest way to remove these and fixing the problem? Thanks
 

DennisG01

GreatGrady Captain
Joined
Sep 1, 2013
Messages
7,186
Reaction score
1,340
Points
113
Location
Allentown, PA & Friendship, ME
Model
Offshore
-- Drill the screw and use a screw extractor
-- Drill over/around the screw with a hole saw that is just barely bigger than the screw, then pop the "plug" out and fill/repair the hole
-- Grind the screw so it's slightly below the surface, repair the surface to be flat, install new screws in a slightly different spot
 

luckydude

GreatGrady Captain
Joined
Jun 5, 2020
Messages
1,288
Reaction score
601
Points
113
Age
62
Location
Santa Cruz Mountains, CA
Website
mcvoy.com
Model
Seafarer
The SS screw heads that secure the trim tabs underneath the hull have several missing where the screw head is gone but screws still there. Anyone had experience with the easiest way to remove these and fixing the problem? Thanks
That can be a bitch. The normal way is you drill a tiny hole in the center of the screw, stick a screw extractor in there (it's reverse threaded) and then use that to spin them out. Sounds easy, isn't.

Having recently gone through upgrading my trim tabs from 12x9 to 18x12, I'd look hard at an upgrade. Grady tends to put tabs on that are too small. If you could upgrade, there is a very high chance the new screw holes won't match up, you can drill them out as best as you can, cover them in 5200 (or epoxy, some people say that is better), mark the new holes, drill them, smear a bunch of 4200 on the hinge and screw that into place.
 

Macon waves

Member
Joined
Sep 15, 2019
Messages
11
Reaction score
0
Points
1
Age
67
Model
Freedom 307
That can be a bitch. The normal way is you drill a tiny hole in the center of the screw, stick a screw extractor in there (it's reverse threaded) and then use that to spin them out. Sounds easy, isn't.

Having recently gone through upgrading my trim tabs from 12x9 to 18x12, I'd look hard at an upgrade. Grady tends to put tabs on that are too small. If you could upgrade, there is a very high chance the new screw holes won't match up, you can drill them out as best as you can, cover them in 5200 (or epoxy, some people say that is better), mark the new holes, drill them, smear a bunch of 4200 on the hinge and screw that into place.
I’m good with the size of tabs but those screws are small so I agree it will be tough to extract them. I didn’t want to relocate screws as the SS mounting plate already has the attachment holes and I’m thinking drilling new won’t look so good..
 

Halfhitch

GreatGrady Captain
Joined
Nov 11, 2017
Messages
1,412
Reaction score
457
Points
83
Location
Venice, Florida
Leave the old
-- Drill the screw and use a screw extractor
-- Drill over/around the screw with a hole saw that is just barely bigger than the screw, then pop the "plug" out and fill/repair the hole
-- Grind the screw so it's slightly below the surface, repair the surface to be flat, install new screws in a slightly different spot
Another option, Leave the old broken screws alone. Remove the trim tab. Drill holes between existing holes in the tab. Reinstall tab with new screws in the old existing holes that are not broken just to hold alignment. Mark the location of the new holes in the tab. Remove the tab. Drill and chamfer for new screws at new locations. Use appropriate sealant (not 5200) and install all new screws in the new holes and the old holes that didn't have a failure. Reconnect cylinder to the tab. Done. If you are careful about keeping the hole spacing equal, the finished product will look professional and robust.
 

DennisG01

GreatGrady Captain
Joined
Sep 1, 2013
Messages
7,186
Reaction score
1,340
Points
113
Location
Allentown, PA & Friendship, ME
Model
Offshore
Leave the old

Another option, Leave the old broken screws alone. Remove the trim tab. Drill holes between existing holes in the tab. Reinstall tab with new screws in the old existing holes that are not broken just to hold alignment. Mark the location of the new holes in the tab. Remove the tab. Drill and chamfer for new screws at new locations. Use appropriate sealant (not 5200) and install all new screws in the new holes and the old holes that didn't have a failure. Reconnect cylinder to the tab. Done. If you are careful about keeping the hole spacing equal, the finished product will look professional and robust.
Yup - that's my option #3... just worded better :)

One change to what you wrote... drill the new holes "now" - no need to remove, drill, then reinstall. Drill the new holes while it's place as it both makes the holes in the plate and marks the transom for a new hole at the same time. Same idea - just a little more efficient.

But... you do want to grind away the old, broken screw a little bit to get better "sealing" so you don't risk water intrusion into the glass and or between the gel/glass and end up with delamination or blisters. Personally, I'd use poly or epoxy resin and a couple small snips of glass. That's going a bit overboard as a good sealant should be fine, too. But sometimes I like cooling off on a hot day out on the boat... ;)
 

Macon waves

Member
Joined
Sep 15, 2019
Messages
11
Reaction score
0
Points
1
Age
67
Model
Freedom 307
Leave the old

Another option, Leave the old broken screws alone. Remove the trim tab. Drill holes between existing holes in the tab. Reinstall tab with new screws in the old existing holes that are not broken just to hold alignment. Mark the location of the new holes in the tab. Remove the tab. Drill and chamfer for new screws at new locations. Use appropriate sealant (not 5200) and install all new screws in the new holes and the old holes that didn't have a failure. Reconnect cylinder to the tab. Done. If you are careful about keeping the hole spacing equal, the finished product will look professional and robust.
That is a good option I just hate having the caulked holes in tabs - too anal. What if I remove tabs, drill around the threads, remove the plug like mentioned, patch, and install new screws? Would that work and what patch would plug the holes and hold up to new screws. And use 5200 when re- attaching.
 

DennisG01

GreatGrady Captain
Joined
Sep 1, 2013
Messages
7,186
Reaction score
1,340
Points
113
Location
Allentown, PA & Friendship, ME
Model
Offshore
Like Half mentioned - don't use 5200 anywhere you are mating the plate to the hull. You're basically super glueing it if you use that stuff. Wrong application for 5200.

You won't be making a "patch" in option #2. You'll be repairing the hole. The screws, most likely, are 1" long and would not penetrate through the transom. Once you get the "plug" out, use a much larger drill bit (or a dremel sanding drum bit) and chamfer this new hole. The purpose here is to give more surface area for the epoxy (poly is fine, if you prefer) and glass to bond. Pre-cut a couple small pieces of glass for this chamfered area. Once piece will be the size of the chamfered area and then a couple more pieces are cut to successively smaller sizes to build up the area flat. For the hole, pre-wet it (a couple times over the course of about 15 minutes so the resin soaks into the core) with a pipe cleaner. Also pre-wet some scraps of glass to be pushed into the hole, as well. The trick is to avoid air pockets in the hole - which you can do by using a syringe and filling from the backside of the hole. Have a good piece of tape ready to go and cover the hole to keep the resin from leaking out. Let that gel up and then you can remove the tape and finish with the pre-cut pieces of glass. Once it's cured, lightly sand the area so it's flush with the surrounding area. When you're done, this will actually be an improvement over the original way that GW installed it.

That's "ideal" (in my book). But... you could also pre-wet the hole and then fill with thickened resin - that will be quite good, as well. But you still want to use a syringe to avoid air pockets.

Those are just two thoughts off the top of my head - other ways can work, as well.

Pre-wetting is important to get a good bond inside the hole.

Caulked holes are not a problem functionally... just aesthetically. Unless of course your boat is bottom painted then you won't see it, anyways.
 
  • Like
Reactions: A&J Outdoors

seasick

Well-Known Member
Joined
Aug 19, 2008
Messages
9,529
Reaction score
1,420
Points
113
Location
NYC
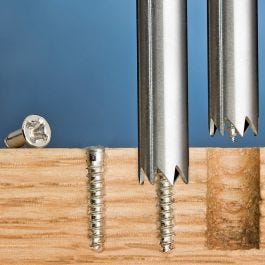
I would drill around the old screws with a hollow 'coring' bit. You can make one with a piece of metal tubing and filing some sharp points or teeth into the edge. I would also try drilling just enough around the screw to allow a pliers or vice grips to grab the screw shaft and twist out. If you can't you just have to 'core' deeper.Fill the holes with resin and a filler like cabosil or just fill with Marinetex. The color mismatch won't be visible under the tab bracket. Of course pre drill the hardened resin before driving the screws and also squeeze some sealant into the holes and on the screws themselves. For small screws like this case, 4200 is fine

An option for the coring bit could be something like this
 

Macon waves

Member
Joined
Sep 15, 2019
Messages
11
Reaction score
0
Points
1
Age
67
Model
Freedom 307
Looks like the easiest route. Thanks and I like the bit.
 

Macon waves

Member
Joined
Sep 15, 2019
Messages
11
Reaction score
0
Points
1
Age
67
Model
Freedom 307
Looks like the easiest route. Thanks and I like the bit.
 

seasick

Well-Known Member
Joined
Aug 19, 2008
Messages
9,529
Reaction score
1,420
Points
113
Location
NYC
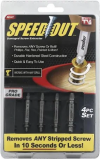
The extractor shown is meant for a stripped head, but still a head.
The type of bit I referenced is meant for a screw with no head, just the shaft
 

luckydude

GreatGrady Captain
Joined
Jun 5, 2020
Messages
1,288
Reaction score
601
Points
113
Age
62
Location
Santa Cruz Mountains, CA
Website
mcvoy.com
Model
Seafarer
Gotcha thanks .
For screws of your size, a screw extractor is just the path to heartache. There isn't really enough metal there to get a hole centered and even if you did, the tiny screw extractors don't have the strength to pull out your screws, the extractor will just break (ask me how I know - former Porsche owner. Sigh.)

Personally, I like Dennis' idea of grinding down the screws so you can put some sort of glue cap on them. Lots of people like epoxy, I filled my old holes with 5200, let it dry, then did the new holes and lots of 4200 to make a seal.

Just leaving the screws as they are is likely to leak.
 

seasick

Well-Known Member
Joined
Aug 19, 2008
Messages
9,529
Reaction score
1,420
Points
113
Location
NYC
They may rust and leaving them will require new tab holes or relocation of the tab. Just remove the screws.