Trolling motor orientation - Fisherman 216

AUMike99

Member
Joined
Jul 11, 2023
Messages
19
Reaction score
1
Points
3
Age
47
Model
Fisherman 216
I am installing a Garmin 75" trolling motor on my Fisherman 216. I would sure appreciate any opinions about the mock-up I did below that shows how the orientation places the shaft over the anchor locker. This is my planned installation unless I learn of a better way to tackle it. I have brainstormed and researched different ways to install but the limited bow space makes it a challenge. I am installing using the Garmin Quick Mount so that I can easily remove the trolling motor for storage when it isn't going to be used. Access to the anchor is possibly but would require a partial deployment of the motor (enough so that the shaft is out of the way of the locker door). I reason that this is not a big deal because on days that I am using the trolling motor, I really won't be using the anchor.

Note:
- The shaft actually extends all the way to the first cup holder so the scale on my mock-up is a bit off.
- I am using a 1/2" 6061 aluminum metal plate to extend the mounting bracket over the bow in such a way that the shaft of the motor clears the rub rail.

Thanks in advance for any advice!

Trolling motor.jpg
 
Joined
Mar 28, 2024
Messages
10
Reaction score
3
Points
3
Model
Fisherman 180
I think tht looks pretty good. Allows you to keep your nav lights and agree that blocking the anchor locker is not such a big deal. That the motor is offset slightly hasn't mattered in the boats I have trolling motors on. Don't know if that motor needs a stabilizer on the shaft but looks like you could attack to the rail if needed.
 
  • Like
Reactions: AUMike99

AUMike99

Member
Joined
Jul 11, 2023
Messages
19
Reaction score
1
Points
3
Age
47
Model
Fisherman 216
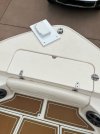
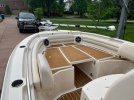
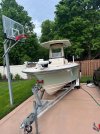
I'm very happy with the way the installation came together. The motor stays out of the way of any passengers riding on the front of the boat. It also does not hang over the boat at all on the starboard side. Including pics for anyone that may find them helpful.
 

Attachments

  • image0.jpeg
    image0.jpeg
    443.9 KB · Views: 24
  • image1.jpeg
    image1.jpeg
    955.2 KB · Views: 26
  • image2.jpeg
    image2.jpeg
    839 KB · Views: 24
  • image3.jpeg
    image3.jpeg
    499.9 KB · Views: 24

gw216

New Member
Joined
Sep 15, 2024
Messages
4
Reaction score
0
Points
1
Location
Long Beach, CA
Model
Fisherman 216
Hello, the boat and trolling motor install look great. I recently placed an order for a 216, and expect the boat to be delivered in a few more weeks. I want to install a trolling motor, as well. The local shop is recommending the 90" Kraken. Would you mind sharing with me how the 72" model has performed? Have you used your trolling motor offshore? If so, does it come out of the water in 2-4 ft swells? Any insight you can provide would be greatly appreciated. Thanks
 

AUMike99

Member
Joined
Jul 11, 2023
Messages
19
Reaction score
1
Points
3
Age
47
Model
Fisherman 216
Hello, the boat and trolling motor install look great. I recently placed an order for a 216, and expect the boat to be delivered in a few more weeks. I want to install a trolling motor, as well. The local shop is recommending the 90" Kraken. Would you mind sharing with me how the 72" model has performed? Have you used your trolling motor offshore? If so, does it come out of the water in 2-4 ft swells? Any insight you can provide would be greatly appreciated. Thanks
Thanks for your note gw216. The Garmin Kraken is actually 75", not 72". It works great. I fished in some fairly choppy water and never actually lowered the motor all the way. If the water was so choppy that the prop came out of the water, I wouldn't want to be out there fishing. In my opinion, that extra 18" on the bow of the boat would be too much.
 
  • Like
Reactions: gw216

gw216

New Member
Joined
Sep 15, 2024
Messages
4
Reaction score
0
Points
1
Location
Long Beach, CA
Model
Fisherman 216
Thanks for your note gw216. The Garmin Kraken is actually 75", not 72". It works great. I fished in some fairly choppy water and never actually lowered the motor all the way. If the water was so choppy that the prop came out of the water, I wouldn't want to be out there fishing. In my opinion, that extra 18" on the bow of the boat would be too much.
Thank you for sharing that info. There isn't a lot of information available with trolling motor installs in the 216. What did you have to do to bolt down the mounting plate? What batteries did you go with? Are they in the console?
 

AUMike99

Member
Joined
Jul 11, 2023
Messages
19
Reaction score
1
Points
3
Age
47
Model
Fisherman 216
Thank you for sharing that info. There isn't a lot of information available with trolling motor installs in the 216. What did you have to do to bolt down the mounting plate? What batteries did you go with? Are they in the console?
I got the Miller Tech Boost package which includes an onboard charger that I installed: https://millertechenergy.com/product/the-boost-package/
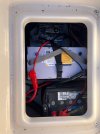
Very happy with the battery choice so far. I fretted about the amp hours but ultimately very happy with what I chose. It it more than sufficient for what I need. After a full day of fishing, the battery was still over 80% is what I recall. I mounted the battery next to one of the existing batteries and I'm including a pic. I didn't want to take space in the console. This required me to run battery cables the length of the boat but to me it was worth it. Here are the wires I bought: https://www.amazon.com/dp/B0CTH8ZF5C/ref=pe_386300_440135490_TE_simp_item_image
I used the existing rigging tubes to run the cables from the battery to the console but then I had to run it free (no tubing) to the bow from the console. I am including the rigging tube diagram that Grady sent me. You'll need fish tape and string.

Look at the first pic that I shared on 5/2/24 for the mounting bracket. I bought a piece of 6061 aluminum for the Garmin mounting bracket to mount to: https://www.amazon.com/dp/B0B4D8CDP7/ref=pe_386300_440135490_TE_simp_item_image
You need the mounting bracket to extend the reach of the motor further than the Garmin bracket alone will allow (in order to clear the gunwale). I was concerned about the stress of the motor weight on the fiberglass so I bought a second piece of aluminum that wasn't as thick (maybe from the hardware store) to support the weight from the underside. Given the thickness of two pieces of aluminum plus the fiberglass, you will need to source some longer SS bolts than what comes with the motor. I bought the hardware from McMaster Carr because I couldn't find what I needed locally. The front two bolts in the Garmin bracket in my installation did not penetrate the boat. But you will see that I have four bolts that do support the motor through the boat.

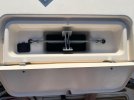
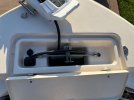
I mounted the receptacle inside the anchor locker... out of sight and out of mind. See pic.

If you have add'l questions, do not hesitate to ask. I couldn't find any examples so I had wing it on this project and I'm happy with the outcome.
 

Attachments

  • 216 rigging tubes.pdf
    85.3 KB · Views: 6
  • 3.jpg
    3.jpg
    279.7 KB · Views: 13
  • 1.jpg
    1.jpg
    272 KB · Views: 13
  • 2.jpg
    2.jpg
    339.9 KB · Views: 13

gw216

New Member
Joined
Sep 15, 2024
Messages
4
Reaction score
0
Points
1
Location
Long Beach, CA
Model
Fisherman 216
I got the Miller Tech Boost package which includes an onboard charger that I installed: https://millertechenergy.com/product/the-boost-package/
Very happy with the battery choice so far. I fretted about the amp hours but ultimately very happy with what I chose. It it more than sufficient for what I need. After a full day of fishing, the battery was still over 80% is what I recall. I mounted the battery next to one of the existing batteries and I'm including a pic. I didn't want to take space in the console. This required me to run battery cables the length of the boat but to me it was worth it. Here are the wires I bought: https://www.amazon.com/dp/B0CTH8ZF5C/ref=pe_386300_440135490_TE_simp_item_image
I used the existing rigging tubes to run the cables from the battery to the console but then I had to run it free (no tubing) to the bow from the console. I am including the rigging tube diagram that Grady sent me. You'll need fish tape and string.

Look at the first pic that I shared on 5/2/24 for the mounting bracket. I bought a piece of 6061 aluminum for the Garmin mounting bracket to mount to: https://www.amazon.com/dp/B0B4D8CDP7/ref=pe_386300_440135490_TE_simp_item_image
You need the mounting bracket to extend the reach of the motor further than the Garmin bracket alone will allow (in order to clear the gunwale). I was concerned about the stress of the motor weight on the fiberglass so I bought a second piece of aluminum that wasn't as thick (maybe from the hardware store) to support the weight from the underside. Given the thickness of two pieces of aluminum plus the fiberglass, you will need to source some longer SS bolts than what comes with the motor. I bought the hardware from McMaster Carr because I couldn't find what I needed locally. The front two bolts in the Garmin bracket in my installation did not penetrate the boat. But you will see that I have four bolts that do support the motor through the boat.

I mounted the receptacle inside the anchor locker... out of sight and out of mind. See pic.

If you have add'l questions, do not hesitate to ask. I couldn't find any examples so I had wing it on this project and I'm happy with the outcome.
That looks clean! I like how you hid the receptacle. I should have the boat in a few weeks. Once I get it and can see what I am working with, I will most likely have more questions. Thank you, I appreciate your insight and help.
 

AUMike99

Member
Joined
Jul 11, 2023
Messages
19
Reaction score
1
Points
3
Age
47
Model
Fisherman 216
That looks clean! I like how you hid the receptacle. I should have the boat in a few weeks. Once I get it and can see what I am working with, I will most likely have more questions. Thank you, I appreciate your insight and help.
Sounds great... just let me know!
 

Jimsalv

Active Member
Joined
Jul 21, 2019
Messages
41
Reaction score
3
Points
8
Age
67
Location
Clinton Ct
Model
Explorer
I got the Miller Tech Boost package which includes an onboard charger that I installed: https://millertechenergy.com/product/the-boost-package/
Very happy with the battery choice so far. I fretted about the amp hours but ultimately very happy with what I chose. It it more than sufficient for what I need. After a full day of fishing, the battery was still over 80% is what I recall. I mounted the battery next to one of the existing batteries and I'm including a pic. I didn't want to take space in the console. This required me to run battery cables the length of the boat but to me it was worth it. Here are the wires I bought: https://www.amazon.com/dp/B0CTH8ZF5C/ref=pe_386300_440135490_TE_simp_item_image
I used the existing rigging tubes to run the cables from the battery to the console but then I had to run it free (no tubing) to the bow from the console. I am including the rigging tube diagram that Grady sent me. You'll need fish tape and string.

Look at the first pic that I shared on 5/2/24 for the mounting bracket. I bought a piece of 6061 aluminum for the Garmin mounting bracket to mount to: https://www.amazon.com/dp/B0B4D8CDP7/ref=pe_386300_440135490_TE_simp_item_image
You need the mounting bracket to extend the reach of the motor further than the Garmin bracket alone will allow (in order to clear the gunwale). I was concerned about the stress of the motor weight on the fiberglass so I bought a second piece of aluminum that wasn't as thick (maybe from the hardware store) to support the weight from the underside. Given the thickness of two pieces of aluminum plus the fiberglass, you will need to source some longer SS bolts than what comes with the motor. I bought the hardware from McMaster Carr because I couldn't find what I needed locally. The front two bolts in the Garmin bracket in my installation did not penetrate the boat. But you will see that I have four bolts that do support the motor through the boat.

I mounted the receptacle inside the anchor locker... out of sight and out of mind. See pic.

If you have add'l questions, do not hesitate to ask. I couldn't find any examples so I had wing it on this project and I'm happy with the outcome
what did you do with the anchor chocks?