UPDATE Advice dealing with Moisture at the Trim Tabs

A&J Outdoors

Well-Known Member
Joined
Jul 14, 2022
Messages
193
Reaction score
36
Points
28
Age
60
Location
San Antonio, TX./Au Gres MI.
Website
www.outdoorslivecrew.com
Model
Sailfish
Ok, I am looking for input; one of the things the surveyor found on our 03 282 was moisture at the mounting points of the trim tabs. He used a moisture meter and mallet to check the hull. Besides the meter and mallet he pointed out the rust running from the mounting screws. He indicated that it would be something we would need to address down the road.

His suggestion to address it was to remove the trim tabs, over drill the mounting holes, cover in plastic and use a vacuum to help pull out moisture. Then refill the holes with epoxy and fiberglass, re-drill, and remount.

What do you all think?
 
  • Like
Reactions: PointedRose

DennisG01

GreatGrady Captain
Joined
Sep 1, 2013
Messages
7,246
Reaction score
1,359
Points
113
Location
Allentown, PA & Friendship, ME
Model
Offshore
Rust staining doesn't necessarily mean there has been water intrusion into the transom core. It could be from crevice corrosion (google it). If the boat was recently in the water, a moisture meter isn't always very accurate.

However, there "could" be a problem, as well. The only way to know for sure is to take them off and check it out. Do that first, then we'll deal with solutions, if needed.
 

A&J Outdoors

Well-Known Member
Joined
Jul 14, 2022
Messages
193
Reaction score
36
Points
28
Age
60
Location
San Antonio, TX./Au Gres MI.
Website
www.outdoorslivecrew.com
Model
Sailfish
Rust staining doesn't necessarily mean there has been water intrusion into the transom core. It could be from crevice corrosion (google it). If the boat was recently in the water, a moisture meter isn't always very accurate.

However, there "could" be a problem, as well. The only way to know for sure is to take them off and check it out. Do that first, then we'll deal with solutions, if needed.
Good call. It's on the list of to does. :)
 

seasick

Well-Known Member
Joined
Aug 19, 2008
Messages
9,585
Reaction score
1,447
Points
113
Location
NYC
I don't understand whay the surveyor didn't test to determine the scope of the moisture. If it was a large area, the coring is wet but if it was limited to small area around the mounting screws, it was probably not a big issue.
If you have a wet transom, you can suck with a vacuum forever and still have moisture.

I would remove one of the tabs and see if water seeps out and how much. That may not be practical so if you don't own the boat ask if you can remove one screw. If that is OK, Insert a small drill bit into the hole and see how far is goes and give it a slight clockwise twist. While twisting, slowly pull the bit out and see if there is wet mush on the bit. Some wet core is not a big deal.
Have some sealant on hand when you put the screw back as a curtesy to the seller

What was the result of the hammer tapping?
If you are not sure what the surveyor said or didn't say, ask him to explain his findings again.
 

A&J Outdoors

Well-Known Member
Joined
Jul 14, 2022
Messages
193
Reaction score
36
Points
28
Age
60
Location
San Antonio, TX./Au Gres MI.
Website
www.outdoorslivecrew.com
Model
Sailfish
The survey was back in August, we've owned the boat since Sept. He explained it pretty much as I did in the original post. The transom is not the issue, it is at the mounting points of the trim tab. The drill bit is a good idea, I'll give it a try when I pull the mounting screws, thank you.
 

A&J Outdoors

Well-Known Member
Joined
Jul 14, 2022
Messages
193
Reaction score
36
Points
28
Age
60
Location
San Antonio, TX./Au Gres MI.
Website
www.outdoorslivecrew.com
Model
Sailfish
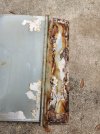
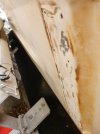
I finally got to this issue. Pulled the port side trim tab and using the q-tip and paper towel I was able to determine there is moisture in most the the mounting screw holes. Now what?
As a reminder the surveyor suggesting pulling the trim tabs, drill the mounting holes bigger, and putting plastic over it with the shop vac sucking out some of the moisture. Then filling the holes with fiberglass/epoxy and re-drilling them. His concern was that the trim tabs could rip out while underway.
So do you guys have any suggestions? I've worked with epoxy, but never fiberglass.trimtab2.jpgtrimtab1.jpg
 
Last edited:

DennisG01

GreatGrady Captain
Joined
Sep 1, 2013
Messages
7,246
Reaction score
1,359
Points
113
Location
Allentown, PA & Friendship, ME
Model
Offshore
Fiberglass is the reinforcing "additive" to epoxy. It's like aggregate and re-bar for cement.

The question is... and you often don't know this till you get in there (so there's no way for us to advise)... how wet are things and how far does the wetness extend.

Personally... I would drill a few of the holes about twice as large and examine the shavings. Then make a decision from there. Don't drill all the way through the inner fiberglass. The goal is track down where the bad stuff stops and where it's just slightly wet to where you can just dry it out. It might be that you remove a section of the exterior glass (skin it), remove/replace the core, then glass the skinned piece back on.

The final part of this would be to drill an oversize hole, chamfer the outer perimeter, fill with glass/epoxy, then redrill your pilot hole and put your screws into this epoxy "plug". IF it would ever leak again, the core is now completely separated from the leak.

If the shavings turn out to be just moist - but "solid" - you may only need to oversize each hole and fill with epoxy. But when you do this, you want to allow some time for unthickened epoxy to soak into the core before coming back and filling with some glass scraps and epoxy. The trick is eliminating air bubbles in the hole - using a syringe to fill from the back side will help.

Remember... don't drill through the inner transom glass? Now you know why.

But you also need to contain the epoxy in the hole so it doesn't just leak out. Ideally, you would tip the boat vertically on it's nose :) Short of that feat, I've used non-hardening rope caulk to make a "dam". Then grind/sand down the excess epoxy flat.
 
  • Like
Reactions: A&J Outdoors

Saltyone

Well-Known Member
Joined
Jul 13, 2018
Messages
292
Reaction score
85
Points
28
Location
St Helens, OR
Model
Express 265
Sorry if sounds dumb, but isn't the bottom of the hulls on these solid fiberglass?
 

DennisG01

GreatGrady Captain
Joined
Sep 1, 2013
Messages
7,246
Reaction score
1,359
Points
113
Location
Allentown, PA & Friendship, ME
Model
Offshore
Sorry if sounds dumb, but isn't the bottom of the hulls on these solid fiberglass?
Wait... John... is this trim tab mounted on the bottom of the hull? If so... ugh. Based on what's been written I've been under the impression that the tab is mounted in the more normal location of being screwed into the transom. If it's on the bottom - this entire converstation has been all for not. In that case... let it dry out for a day or two for good measure, then seal 'er up and go boating. Use a good sealant like LifeCaulk (or others). But do not use 3M5200.
 

A&J Outdoors

Well-Known Member
Joined
Jul 14, 2022
Messages
193
Reaction score
36
Points
28
Age
60
Location
San Antonio, TX./Au Gres MI.
Website
www.outdoorslivecrew.com
Model
Sailfish
Wait... John... is this trim tab mounted on the bottom of the hull? If so... ugh. Based on what's been written I've been under the impression that the tab is mounted in the more normal location of being screwed into the transom. If it's on the bottom - this entire converstation has been all for not. In that case... let it dry out for a day or two for good measure, then seal 'er up and go boating. Use a good sealant like LifeCaulk (or others). But do not use 3M5200.
Yes it is the ones mounted to the bottom of the hull. I just took the starboard side off and water actually dripped out. So, I don't have to drill out and re-glass? That would be awesome news!
 

DennisG01

GreatGrady Captain
Joined
Sep 1, 2013
Messages
7,246
Reaction score
1,359
Points
113
Location
Allentown, PA & Friendship, ME
Model
Offshore
Yes it is the ones mounted to the bottom of the hull. I just took the starboard side off and water actually dripped out. So, I don't have to drill out and re-glass? That would be awesome news!
Nope. If the holes appear a little wallowed out (screw not fitting tight), you can slightly drill out the hole to expose fresh glass and then squish a little thickened epoxy in there and then re-drill - but that's the extent of it.

Water dripped out... how much? A drop or two? Dripped out from behind the plate or from the screw holes?
 

A&J Outdoors

Well-Known Member
Joined
Jul 14, 2022
Messages
193
Reaction score
36
Points
28
Age
60
Location
San Antonio, TX./Au Gres MI.
Website
www.outdoorslivecrew.com
Model
Sailfish
Nope. If the holes appear a little wallowed out (screw not fitting tight), you can slightly drill out the hole to expose fresh glass and then squish a little thickened epoxy in there and then re-drill - but that's the extent of it.

Water dripped out... how much? A drop or two? Dripped out from behind the plate or from the screw holes?
So I loosened the 2 lower screws and water streamed down the bunk to the ground. Made a wet mark about the size of a quarter. Not sure if it actually came out of the holes, or was between the plate and hull.
 

seasick

Well-Known Member
Joined
Aug 19, 2008
Messages
9,585
Reaction score
1,447
Points
113
Location
NYC
As long as the holes didn't weep water after the tab plate was removed, you should be OK. You may want to apply something like butyl tape to the mounting plate as well as some sealant to the screw holes to prevent the accululation of water between the plate and hull.
As long as the screws cab be tightened well ( but not overtightened) without them spinning, I don't see a need to fill the screw holes with epoxy or the like.
 
  • Like
Reactions: A&J Outdoors

DennisG01

GreatGrady Captain
Joined
Sep 1, 2013
Messages
7,246
Reaction score
1,359
Points
113
Location
Allentown, PA & Friendship, ME
Model
Offshore
So I loosened the 2 lower screws and water streamed down the bunk to the ground. Made a wet mark about the size of a quarter. Not sure if it actually came out of the holes, or was between the plate and hull.
Most likely it was just trapped between the plate and the hull. Probe the holes - as long as they don't penetrate into the interior of the boat and everything "feels" solid by probing, I wouldn't worry about. Just give it a day or two to dry out for good measure.
 
  • Like
Reactions: A&J Outdoors

seasick

Well-Known Member
Joined
Aug 19, 2008
Messages
9,585
Reaction score
1,447
Points
113
Location
NYC
A lot of folks don't paint the tabs. Many also install sacrificial anodes (zincs) to reduce electrolysis.
Here is a link to some helpful info
 

SkunkBoat

Well-Known Member
Joined
Oct 12, 2017
Messages
4,543
Reaction score
1,623
Points
113
Location
Manasquan Inlet NJ
Website
www.youtube.com
Model
Express 265
HEHEHE...I would probably get some 5200 into the existing holes and on the screws and screw it in. Between the screws and the 5200 it aint ever coming off.
Thats what 5200 is for...ADHESIVE on shit that ain't supposed to come off.
 
  • Like
Reactions: A&J Outdoors