Where's the Wood in 94 Spirit Transom

ThruTraffic

Active Member
Joined
Jul 16, 2024
Messages
25
Reaction score
1
Points
3
Age
72
Location
North Carolina
Model
Spirit
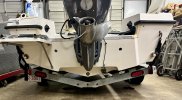
Where is the wood in the transom of a 1994 Spirit 175?

I'm thinking of tackling a transom repair and would like to do a pour. If the wood extends from gunnel to gunnel then a pour may not be an option. I'd have to remove the entire rear end of the boat to replace the wood if pour isn't an option.

Has anyone out there opened up the transom area on a Spirit of this era? If you have or have specific knowledge of this boat's transom I'd love to hear from your experience.

A detailed description or draw a line on my photo would be great!

TIA
 

Attachments

  • IMG_1436.jpeg
    IMG_1436.jpeg
    1.9 MB · Views: 12

Hookup1

GreatGrady Captain
Joined
Oct 16, 2007
Messages
2,960
Reaction score
818
Points
113
Age
70
Location
Cape May, NJ
Model
Islander
Get inside there with a camera. Should only go to outboard stringers. That transom doesn’t look that bad (yet!). It’s the transom to stringer bond you really have to address. That gives the transom support to keep it from tearing out under power. Difficult to address without opening it up.
 

ThruTraffic

Active Member
Joined
Jul 16, 2024
Messages
25
Reaction score
1
Points
3
Age
72
Location
North Carolina
Model
Spirit
Wood isn't visible inside or out. Would have to lift the engine to remove the aluminum cap to actually see wood.

No flex pushing the motor up and down. No voids exposed by hammer test.

I don't know for certain its bad but given it's age and reports on those era boats having problems I figured I'd start investigating how to do it if it happens.

Thanks for the suggestion.
 

DennisG01

GreatGrady Captain
Joined
Sep 1, 2013
Messages
7,056
Reaction score
1,296
Points
113
Location
Allentown, PA & Friendship, ME
Model
Offshore
No, of course you're not going to actually "see" the wood. What Hookup is talking about is that you should (with many boats, anyways) be able to see where the wood stops by looking at the inside transom wall. You'll see a change in the glass layup.

A few simple 1/8" exploratory holes on the inside transom wall is another easy way to figure this out.

But, if all is good right now - just keep it that way and this is all a moot point... which would be the best scenario.
 

ThruTraffic

Active Member
Joined
Jul 16, 2024
Messages
25
Reaction score
1
Points
3
Age
72
Location
North Carolina
Model
Spirit
Cool. Thanks! I'll get back in there and look with a new perspective. I didn't think about shapes as a delineator.
 

DennisG01

GreatGrady Captain
Joined
Sep 1, 2013
Messages
7,056
Reaction score
1,296
Points
113
Location
Allentown, PA & Friendship, ME
Model
Offshore
Sure!

If, however, you are looking for some projects to do... and assuming the wood is good... some preventative maintenance would be to reseal any of the penetrations into the transom such as the transducer, cable ties, etc, etc. Take a real good look at the brass motor well drain tubes, too. TH Marine makes nice plastic drain tubes - no special tools needed to install! I'd also seriously consider removing the bang cap and resealing underneath it. Inspect it - a faux pas by Grady was using that aluminum bang cap with SS screws. Galvanic corrosion sets in and eats away at the screw holes which then lets water in and the transom seal underneath wasn't always the best. Replacing with a vinyl bang cap (available through any GW dealer) is the solution. This does require lifting the engine off - but you don't need to disconnect anything - just a few inches of lift. If you have a sturdy tree limb that would work - or put a hook in your ceiling.
 

ThruTraffic

Active Member
Joined
Jul 16, 2024
Messages
25
Reaction score
1
Points
3
Age
72
Location
North Carolina
Model
Spirit
Luckily I have a steel building with a 20 foot ceiling. I've hung a two ton chain hoist from a beam and unloaded a 2300 lb power hammer before so I think that 115 won't be a problem. Visuals always beat speculation.