268 Islander Fuel Tank Replacement

Hookup1

GreatGrady Captain
Joined
Oct 16, 2007
Messages
3,039
Reaction score
858
Points
113
Age
70
Location
Cape May, NJ
Model
Islander
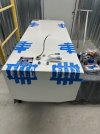
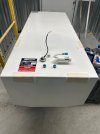
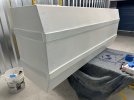
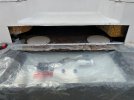
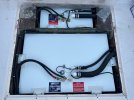
Fuel tank was ready yesterday. Picked up today. SP Sheet Metal in Clermont, NJ turned it around in less than two weeks! Had all the nitrile strips, fittings, hoses, sealant, etc. 134 gallon original GW tank size. About $10 a gallon plus $150 to paint.

Lots to do to prep bulkhead repair, step repair, tank prep, finish bilge cleanup. Going with single tank but installing everything to allow a smaller aux tank. Bulkhead repair will be 1" thicker than original so replacement aux tank will be a little smaller (70 gallon vs 72). I don't need the fuel capacity and may never install aux tank. But it would be an easy install - all hose installed - drop tank and hookup.
 
Last edited:

Hookup1

GreatGrady Captain
Joined
Oct 16, 2007
Messages
3,039
Reaction score
858
Points
113
Age
70
Location
Cape May, NJ
Model
Islander
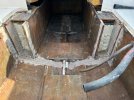
Finally got back to cleaning up the bulkhead. Complete bulkhead removed out to stringers. Sanded out the old glass tabs and ready to build a new bulkhead. 3/4" Coosa board.

27 Bulkhead 2.jpeg
Some water collected on top of the foam on both sides. Not sure where it came from. Had nowhere to go. I'm going to install drains.
 
Last edited:
  • Like
Reactions: Chutch

Hookup1

GreatGrady Captain
Joined
Oct 16, 2007
Messages
3,039
Reaction score
858
Points
113
Age
70
Location
Cape May, NJ
Model
Islander
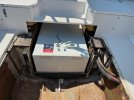
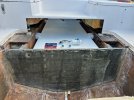
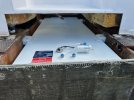
Turned the corner on the project. Got bulkhead cut. Assembling new fuel tank. Attached all the nitrile insulators with 3M 4000.

28 Tank 2.jpeg 28 Tank 3.jpeg 28 Tank.jpeg
 
Last edited:
  • Like
Reactions: wahoo33417

seasick

Well-Known Member
Joined
Aug 19, 2008
Messages
9,560
Reaction score
1,432
Points
113
Location
NYC
The tank looks nice.What was it painted with and was it primed before painting?
 

Hookup1

GreatGrady Captain
Joined
Oct 16, 2007
Messages
3,039
Reaction score
858
Points
113
Age
70
Location
Cape May, NJ
Model
Islander
The tank looks nice.What was it painted with and was it primed before painting?
Not a very good paint job. Not primed and 2-part epoxy paint. SP Sheetmetal built the tank and painted it. Few scratches already. Just a little more protection. Patriot wasn't a fan of painting. It will be fine though. Twent-five years from now the tank won't be my problem!

SEASICK sent me an article earlier in this stream that discusses the proper way to protect and install a tank. SP recommended the same.

The tank killer is water trapped against the tank. The 1/4" nitrile is glued to the tank with no voids. Even the HDPE blocks that hold the tank down are insulated. The tank does not rest against anything except the glued nitrile insulators.
 
Last edited:
  • Like
Reactions: Stephnic

efx

Well-Known Member
Joined
Jun 19, 2018
Messages
268
Reaction score
87
Points
28
Location
Los Angeles
Model
Islander
Nice job. I also have an Islander. I decided I only needed one tank with a repower of more efficient engines. It looks like you will be set for a long time. Thanks for posting all this.
 

Hookup1

GreatGrady Captain
Joined
Oct 16, 2007
Messages
3,039
Reaction score
858
Points
113
Age
70
Location
Cape May, NJ
Model
Islander
Nice job. I also have an Islander. I decided I only needed one tank with a repower of more efficient engines. It looks like you will be set for a long time. Thanks for posting all this.
I'm redoing everything for 2 tanks but only installing the forward tank (the hard one). If I decide I want the aux tank hoses, etc are there.
 

family affair

Well-Known Member
Joined
Jul 31, 2010
Messages
1,458
Reaction score
346
Points
83
Location
Ohio
Model
Islander
I've been scratching my head with what to do with ours. The set up with the new engines is so efficient, I could get by with the auxiliary tank only at 50 gallons. It alone would give me 110+ miles of range. However the main 150 tank full really stabilizes the boat. If I top it off in the fall, it takes me most of the following season to burn it off. So all season, I'm burning old gas. I treat it, but I know the octane has dropped off. I had some pinging under hard acceleration with the Zukes a couple weeks ago. I added some 93 octane and the engines haven't pinged since. What to do?
 

Hookup1

GreatGrady Captain
Joined
Oct 16, 2007
Messages
3,039
Reaction score
858
Points
113
Age
70
Location
Cape May, NJ
Model
Islander
I've been scratching my head with what to do with ours. The set up with the new engines is so efficient, I could get by with the auxiliary tank only at 50 gallons. It alone would give me 110+ miles of range. However the main 150 tank full really stabilizes the boat. If I top it off in the fall, it takes me most of the following season to burn it off. So all season, I'm burning old gas. I treat it, but I know the octane has dropped off. I had some pinging under hard acceleration with the Zukes a couple weeks ago. I added some 93 octane and the engines haven't pinged since. What to do?
If i had your use case I would and knowing what I know now I would first - not fill the tanks in the fall. Install a set of Sierra clear bowl fuel filters. Make sure you replace fuel fill o-rings. Run the boat with forward tank only. I do this all the time with my NJ/FL seasons.

Fuel leak will drain to aft bilge. You could plug the fuel compartment drain (the larger one). Monitor for any evidence of a leak. You should not get fuel in aft or forward bilges with compartment closed off. Only problem with this is when you do get a leak you will have to deal with it then.
 
Last edited:

Hookup1

GreatGrady Captain
Joined
Oct 16, 2007
Messages
3,039
Reaction score
858
Points
113
Age
70
Location
Cape May, NJ
Model
Islander
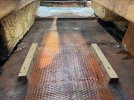
Placed new tank, completed the new bulkhead installation, installed tank spacers, cleaned up and placed floor over fuel tank.

30 Tank 1.jpeg 30 Tank 2.jpeg 30 Tank 3.jpeg 30 Tank 4.jpeg 30 Tank 5.jpeg

Some fiberglass work and cleanup next.
 
Last edited:
  • Like
Reactions: family affair

Hookup1

GreatGrady Captain
Joined
Oct 16, 2007
Messages
3,039
Reaction score
858
Points
113
Age
70
Location
Cape May, NJ
Model
Islander
If your tanks are in good shape with no holes, clean them well and encapsulate the entire tank in one layer of fiberglass and West System epoxy. An experienced boat builder gave me that advice. He said they will last forever with that protection.
I have a real problem with this kind of advice.
 

DogBone

GreatGrady Captain
Joined
May 23, 2013
Messages
58
Reaction score
15
Points
8
Location
Tampa Bay
Model
Gulfstream
I'll give you the logic behind my advice. These aluminum fuel tanks most likely failure mode appears to be corrosion caused by moisture on the top surface or moisture trapped in the contact points. If you have a tank with no holes and only minor pitting that still has it's sealing integrity, you can clean it and prevent future corrosion by encasing the tank in a layer of fiberglass with a two part epoxy. The fiberglass cloth gives the epoxy resin a matrix to bind to and helps resist cracking of the coating or abrasion at the contact points.

If your tank already has holes or deep corrosion pitting, then a new tank is probably the best way to go. However, I would still apply the fiberglass/epoxy layer to a new tank to prevent future corrosion and abrasion problems like happens with only a two part epoxy paint (scratches expose the bare aluminum).

Now I must go do prep for this hurricane. Good luck to anyone else in its path.
 

Hookup1

GreatGrady Captain
Joined
Oct 16, 2007
Messages
3,039
Reaction score
858
Points
113
Age
70
Location
Cape May, NJ
Model
Islander
I'll give you the logic behind my advice. These aluminum fuel tanks most likely failure mode appears to be corrosion caused by moisture on the top surface or moisture trapped in the contact points. If you have a tank with no holes and only minor pitting that still has it's sealing integrity, you can clean it and prevent future corrosion by encasing the tank in a layer of fiberglass with a two part epoxy. The fiberglass cloth gives the epoxy resin a matrix to bind to and helps resist cracking of the coating or abrasion at the contact points.

If your tank already has holes or deep corrosion pitting, then a new tank is probably the best way to go. However, I would still apply the fiberglass/epoxy layer to a new tank to prevent future corrosion and abrasion problems like happens with only a two part epoxy paint (scratches expose the bare aluminum).

Now I must go do prep for this hurricane. Good luck to anyone else in its path.
Start with the "experienced boat builder gave me that advice". This a typical internet example of someone making an anonymous statement with no credentials or experience to back it up. It may work and it may not. Doubtful it has been time tested. When buying new tanks for my boat I talked to two experienced tank builders that build to USCG specifications (SP Sheet Metal and Patriot Marine). Neither one mentioned or offered a fiberglass option. Epoxy paint or coal tar were the only options. Aluminum tanks can get wet even without being painted. One told me don't bother to paint the tank - just insulate it properly with glued on nitrile strips. Do a search online and try to find a credible person who recommends fiberglass/epoxy over aluminum tank.

For my forward tank I think it's a mistake to put the old tank back. In the replacement process on my boat there is significant fiberglass work get the tank out and to restore it. If I were to have someone do it (instead of DIY) this is easily $5,000 of labor. If I were to take tank out and repair it (choose your method) it takes labor and materials to repair. A new tank was $1,600.

In the case of the aft tank This is an easy in/out. No fiberglass repair needed. So I could see someone repairing the aft tank. They still have the labor of cleaning the tank up, pressure testing it and then painting or fiberglassing it. A new tank would be $1,300.

Last part is your logic. Aluminum is self protecting (oxidizing) and difficult to bond to. If it's not really clean and painted or powder coated it will oxidize and push the finish away from the surface. I could see it delaminating the fiberglass and trapping water between the fiberglass and the tank. Trapped water against an aluminum tank is a tank killer.

I repaired my aluminum tower on my boat last year. It was sandblasted and primed immediately with AwlGrip Wash Primer. It was then painted with AwlGrip primer and AwlGrip topcoat. It looks fantastic and has held up well so far but it's labor intensive and expensive. If you were to do this on a fuel tank you would have to be sure the tank is really clean and prime it with an aluminum primer.
 
Last edited:

DogBone

GreatGrady Captain
Joined
May 23, 2013
Messages
58
Reaction score
15
Points
8
Location
Tampa Bay
Model
Gulfstream
Start with the "experienced boat builder gave me that advice". This a typical internet example of someone making an anonymous statement with no credentials or experience to back it up. It may work and it may not. Doubtful it has been time tested. When buying new tanks for my boat I talked to two experienced tank builders that build to USCG specifications (SP Sheet Metal and Patriot Marine). Neither one mentioned or offered a fiberglass option. Epoxy paint or coal tar were the only options. Aluminum tanks can get wet even without being painted. One told me don't bother to paint the tank - just insulate it properly with glued on nitrile strips. Do a search online and try to find a credible person who recommends fiberglass/epoxy over aluminum tank.

For my forward tank I think it's a mistake to put the old tank back. In the replacement process on my boat there is significant fiberglass work get the tank out and to restore it. If I were to have someone do it (instead of DIY) this is easily $5,000 of labor. If I were to take tank out and repair it (choose your method) it takes labor and materials to repair. A new tank was $1,600.

In the case of the aft tank This is an easy in/out. No fiberglass repair needed. So I could see someone repairing the aft tank. They still have the labor of cleaning the tank up, pressure testing it and then painting or fiberglassing it. A new tank would be $1,300.

Last part is your logic. Aluminum is self protecting (oxidizing) and difficult to bond to. If it's not really clean and painted or powder coated it will oxidize and push the finish away from the surface. I could see it delaminating the fiberglass and trapping water between the fiberglass and the tank. Trapped water against an aluminum tank is a tank killer.

I repaired my aluminum tower on my boat last year. It was sandblasted and primed immediately with AwlGrip Wash Primer. It was then painted with AwlGrip primer and AwlGrip topcoat. It looks fantastic and has held up well so far but it's labor intensive and expensive. If you were to do this on a fuel tank you would have to be sure the tank is really clean and prime it with an aluminum primer.
Your points about labor to remove the tank compared to the expense of a new tank are well advised. De-lamination from improper prep of the aluminum is a valid concern also. In doing further research I see some people advise against even paint due to potential blistering (I believe the Grady tanks were all painted grey). I understand the self protecting nature of aluminum when it is free to oxidize, look at an aluminum trailer and how it survives. The crevice corrosion seems to be the major problem with the fuel tanks. With that said, I can still see how a properly glassed in tank could avoid crevice corrosion. Thanks for your detailed reply.
 
  • Like
Reactions: Hookup1

Hookup1

GreatGrady Captain
Joined
Oct 16, 2007
Messages
3,039
Reaction score
858
Points
113
Age
70
Location
Cape May, NJ
Model
Islander
Your points about labor to remove the tank compared to the expense of a new tank are well advised. De-lamination from improper prep of the aluminum is a valid concern also. In doing further research I see some people advise against even paint due to potential blistering (I believe the Grady tanks were all painted grey). I understand the self protecting nature of aluminum when it is free to oxidize, look at an aluminum trailer and how it survives. The crevice corrosion seems to be the major problem with the fuel tanks. With that said, I can still see how a properly glassed in tank could avoid crevice corrosion. Thanks for your detailed reply.

For me it's going to be a new 134 gallon forward tank and preparing to a new 72 gallon aft tank that I may or may not install (I don't need the capacity).

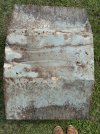
Take a close look at the old aft tank. Tank was not leaking. Along the bottom were two self adhesive neoprene strips that came loose over the 25 years of service. Tank was painted at factory but not sure with what. You can see the corrosion along their path. There are 4 areas on the bottom that are serious. But look at the angled bottom. There are hundreds of little white spots. They are little corrosion spots that popped the paint. You can feel the corrosion coming thru.

15 Old Tank.jpeg


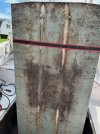
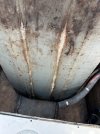
Now take a look at forward tank. Less pock mark corrosion but more corrosion along the neoprene strips that also fell off. Both tanks are 1/8" aluminum. You can feel the erosion of the aluminum and they haven't been cleaned up yet.

20 Tank Out 1.jpeg

21 Tank Out 2.jpeg
 
Last edited:

DogBone

GreatGrady Captain
Joined
May 23, 2013
Messages
58
Reaction score
15
Points
8
Location
Tampa Bay
Model
Gulfstream
I'm guessing all of the spot corrosion is from paint blisters that trapped moisture and caused crevice corrosion due to lack of oxygen. I guess the perfect solution would be naked aluminum with good air flow and no contact points, but that is not feasible since the thin walled tanks need some support on the bottom (5200 for the strips seems like a good attempt at supports that don't trap moisture). I also would have some concern for the top of the tank if left uncoated, holding moisture and debris trapping it. How were the tops of your tanks? The other perfect solution would be a coating that is never compromised preventing moisture to be trapped, not sure if that is possible either. There are never perfect solutions, but what is best, that is always the engineering question. Thanks for the photos.
 

Hookup1

GreatGrady Captain
Joined
Oct 16, 2007
Messages
3,039
Reaction score
858
Points
113
Age
70
Location
Cape May, NJ
Model
Islander
I'm guessing all of the spot corrosion is from paint blisters that trapped moisture and caused crevice corrosion due to lack of oxygen. I guess the perfect solution would be naked aluminum with good air flow and no contact points, but that is not feasible since the thin walled tanks need some support on the bottom (5200 for the strips seems like a good attempt at supports that don't trap moisture). I also would have some concern for the top of the tank if left uncoated, holding moisture and debris trapping it. How were the tops of your tanks? The other perfect solution would be a coating that is never compromised preventing moisture to be trapped, not sure if that is possible either. There are never perfect solutions, but what is best, that is always the engineering question. Thanks for the photos.
Even the paint finish started to fail over time. You can see where the neoprene strip were that also failed to adhere and compromised the paint and tank. Interesting that the tank did not corrode where there was no support underneath it (1/4 the way down).

Not sure there is a cost effective way to encapsulate an aluminum tank that will last 25 years. Several GG members have said tanks "age" and are replacement items.
 

Hookup1

GreatGrady Captain
Joined
Oct 16, 2007
Messages
3,039
Reaction score
858
Points
113
Age
70
Location
Cape May, NJ
Model
Islander
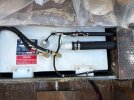
Forward tank back in. Some cleanup work.

32 New tank.jpeg

Alway some drama. Dropped three screws trying to get hose clamps installed. Got camera on them and vacuumed them out.

Screws in bilge.JPG

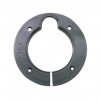
Replaced fuel fills. New Perko vented fuel fills ship with an optional 3/8" shim. Directs water away from vented fill (which can leak even with good o-ring).
Spacer.jpeg
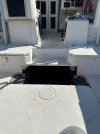
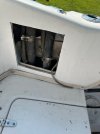
Next step to repair fiberglass step and gunnel by fuel fills.

19-1 Cut Step.jpeg 29 Fuel 1.jpeg

Decided to install the aft tank after all. $1,400. All the hoses were replaced anyway. This will go in last.
 
Last edited: