restoration pics.

hooked on Grady

Well-Known Member
Joined
Nov 18, 2019
Messages
190
Reaction score
142
Points
43
Location
northern New Jersey
Model
Offshore
ok built a couple of spray booths, things are getting serious now. If I only knew what I was doing. Got the boat all covered in plastic and drop clothes as well as the tents. I got to two 10 x 20 shelters and made a 30 footer out of them. Crash course on spraying, learning not to thin the paint too much and how to properly set the gun up. I think I can !
 

hooked on Grady

Well-Known Member
Joined
Nov 18, 2019
Messages
190
Reaction score
142
Points
43
Location
northern New Jersey
Model
Offshore
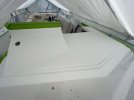
so I got some paint down. Very tuff to spray in confined spaces. Started the non skid surfaces and will tape off and finish cabin surfaces this week.
Got the new battery trays built for the forward storage spaces(thanks for the idea someone) and am now looking forward to putting stuff back together
IMG_0507.jpegIMG_0506.jpegIMG_0503.jpegIMG_0505.jpegIMG_0480.jpegIMG_0508.jpeg
 

hooked on Grady

Well-Known Member
Joined
Nov 18, 2019
Messages
190
Reaction score
142
Points
43
Location
northern New Jersey
Model
Offshore
so the non skid/anti glare went down well. Looks like I could have gotten my tape line a bit better i a place or two but overall - Moving on!
Will mount the relocated battery shelves next to be done in the cabin for a bit then try to get some paint on the topside to get the bow pulpit on and out of the way as it has taken over the weights bench
IMG_0551.jpegIMG_0549.jpeg
 

Redoagain

New Member
Joined
Jun 3, 2023
Messages
2
Reaction score
0
Points
1
Age
67
Model
Overnighter
Great job thus far. Will follow your transom project closely!
 

hooked on Grady

Well-Known Member
Joined
Nov 18, 2019
Messages
190
Reaction score
142
Points
43
Location
northern New Jersey
Model
Offshore
IMG_0554.jpegIMG_0555.jpeg70794804938__60F17EE9-6499-4099-95AC-5E640439F377.jpegIMG_0558.jpeg
so thanks again to the person who posted about using the storages for battery relocation. Finally put something back on the boat, a milestone of sorts.
 

hooked on Grady

Well-Known Member
Joined
Nov 18, 2019
Messages
190
Reaction score
142
Points
43
Location
northern New Jersey
Model
Offshore
IMG_0565.jpeg
really having a hard time not liking the cork. I think I am going to have to put in on. perhaps at the helm at first to see how it stands up. but just like my rods, a fine sanding after cleaning the handles look new, well see. It's nice to look at that bracket as its been buried since I picked upIMG_0540.jpegIMG_0567.jpegIMG_0568.jpeg
 
  • Like
Reactions: trapper

hooked on Grady

Well-Known Member
Joined
Nov 18, 2019
Messages
190
Reaction score
142
Points
43
Location
northern New Jersey
Model
Offshore
Question, from the transom picture above would everyone agree on my cut lines(based on the glass thickness Have allowed 3" of taper for reinstallation of glass) or should they be out further past lifting bolts and scuppers. I guess I should be cutting those out as well but only concerned about what is prescribed as the taper ratio to lay up the new glass later. Obviously there would be less then that left and I have seen other rebuilds that appear to have left less as well. Any help is greatly appreciated
 

hooked on Grady

Well-Known Member
Joined
Nov 18, 2019
Messages
190
Reaction score
142
Points
43
Location
northern New Jersey
Model
Offshore
70819980802__A9CEDF96-6073-454F-9A9D-A94763215A64.jpeg
I ran out of room to store all the wood pcs as they were finished so I didn't make the pcs for starboard side. really wish I would have now. moving on
 

SkunkBoat

Well-Known Member
Joined
Oct 12, 2017
Messages
4,507
Reaction score
1,614
Points
113
Location
Manasquan Inlet NJ
Website
www.youtube.com
Model
Express 265
looking good.

The 3" cut is what I used when I did a transom on my V20. I had to do from inside because the V20 had multiple angles in the transom, not flat like Grady.
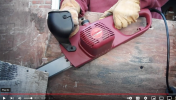
After trying many different tools, the clear winner for digging out the remaining wood from the 3" was a small electric chain saw.

I went back and looked at video. It was 4".

Screen Shot 2023-06-12 at 9.43.46 AM.png
 
Last edited:

JJF

Well-Known Member
Joined
Feb 14, 2021
Messages
442
Reaction score
133
Points
43
Location
Gloucester, MA
Model
Canyon 306
I have zero experience replacing a transom, so my opinion isn't worth much at all, but three inches doesn't seem like much space to work with...
 

hooked on Grady

Well-Known Member
Joined
Nov 18, 2019
Messages
190
Reaction score
142
Points
43
Location
northern New Jersey
Model
Offshore
Thank you Skunk, I was hoping to hear from you as you are truly a wealth of info..My peers called me the walking encyclopedia of construction back in the day, I would say you are that for this site!!
As for JJF's post, I based this number based on repair manuals that give you the ratio of thickness of glass to the amount of angled exposure each side of joint to lay up new glass. Not sure if I stated that correctly but anyway it's not a random number is the point.
Because I don't know what I am doing I actually researched a few things instead of winging as usual. you know with life on the line I figured perhaps I should :)
 

JJF

Well-Known Member
Joined
Feb 14, 2021
Messages
442
Reaction score
133
Points
43
Location
Gloucester, MA
Model
Canyon 306
"As for JJF's post, I based this number based on repair manuals that give you the ratio of thickness of glass to the amount of angled exposure each side of joint to lay up new glass."

This makes total sense.
 

hooked on Grady

Well-Known Member
Joined
Nov 18, 2019
Messages
190
Reaction score
142
Points
43
Location
northern New Jersey
Model
Offshore
I was not able to load some pics but the windshield as well as the hard top have been remounted. Port and aft spreader lights added to the top.
Moved/replaced bow nav lights to make way for pulpit.
wired up the search lights, nav lights and spreader lights. Got my tunes rocking the whole neighborhood:). I am very close to cutting the transom out. I can almost see the light at the end of the tunnel